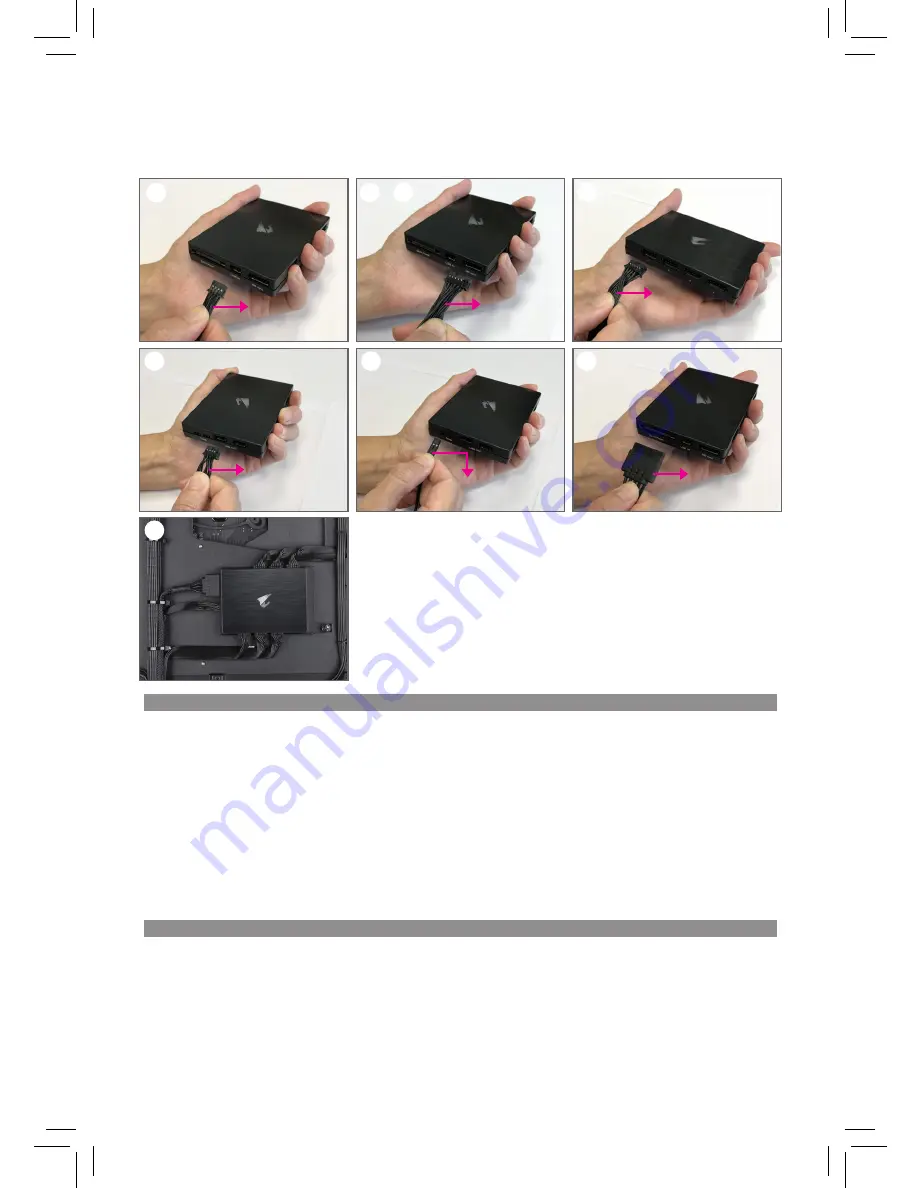
Turn your system off for the installation of your AORUS RGB FAN COMMANDER.
安裝
AORUS RGB FAN COMMANDER
前請先關掉系統電源。
安装
AORUS RGB FAN COMMANDER
前请先关掉系统电源。
AORUS RGB FAN COMMANDER
설치를
위해
시스템을
종료하십시오
.
Apague el sistema para instalar su AORUS RGB FAN COMMANDER.
Steps:
1. Connect USB Input cable to USB IN port, and the other end connect to Motherboard's F_USB1 header. (For Gigabyte motherboard pls use
USB Input cable)
1-1 If you use non-Gigabyte motherboard, pls connect MB sync cable to MB sync port, and connect the other end of corresponding
header on the motherboard according to your needs.
(Note 1)
2. Connect RGB Fan cable by sequentially 1~8 port, each RGB Fan cable can support PWM/DC fan, 4-pin RGB LED and 3-pin Addressable LED.
(Note 2)
3. Connect USB extention cable to USB OUT port, the other end support USB 3.1 Gen 1 header. (This step is installed according to your
needs.)
4. Connect Temp sensor cable to Temp port, put temp sensor in any place of chassis can monitor the temperature. (This step is installed
according to your needs.)
5. Connect SATA power cable to SATA Power port, the other end connect to power supply.
6. Final step install AORUS RGB FAN COMMANDER anywhere in the chassis with enough space. Magnetic back side allows for easy
installation on magnetic surfaces.
7. After installation is complete, please reboot and download the GIGABYTE Smart Fan and RGB Fusion utilities to set up the fan and RGB
lighting device.
English
步驟:
1.
將
USB
輸入線連接至
USB IN
插座,另一端連接至主機板上的
F_USB1
插座。
(
技嘉主機板必須搭配此
USB
輸入線使用
)
1-1
如果您不是使用技嘉主機板,請將主機板同步線連接至
MB sync
插座,另一端再依您的需求連接至主機板對應插座。
(
註一
)
2.
將
RGB
風扇線依序連接至編號
1~8
的插座,每一條
RGB
風扇線另一端可支援
PWM/DC
風扇、
4-pin RGB LED
和
3-pin
可編程
LED
。
(
註二
)
3.
將
USB
延長線連接至
USB OUT
插座,另一端經由排線即可支援
USB 3.1 Gen 1
連接埠。
(
此步驟請依個人需求安裝
)
4.
將溫度感應線連接至
Temp
插座,再把感應點放在機殼內任何區域才可以發揮監控溫度功能。
(
此步驟請依個人需求安裝
)
5.
將
SATA
電源線連接至
SATA Power
插座,另一端與電源供應器連接。
6.
最後將
AORUS RGB Fan Commander
安裝於機殼內空間足夠的位置,背面的磁吸設計可以輕易吸附在具磁性的表面上。
7.
安裝完成後請重新開機並且下載技嘉
Smart Fan
和
RGB Fusion
工具程式,即可透過工具程式設定風扇和
RGB
燈光裝置。
繁體中文
z
D
w
A
u
B
-
u u
C
v
E
x
F
y


