AOpen i865PEa-7ILFR Скачать руководство пользователя страница 3

This socket supports FC-LGA4 CPU, which is the latest CPU package developed by 
Intel. Other forms of CPU package are impossible to be fitted in. 

1.


Pull CPU socket lever and plate up. 

2.


Remove plastic cap from CPU 
socket plate. 

3.


Locate Pin 1 in the socket and look 

for a golden arrow on the CPU 
upper interface. Match Pin 1 and 

golden arrow. Then insert the CPU 

into the socket. 

4.


Press down CPU socket plate and 

lever to finish CPU installation. 

Primary 

Master (1st) 

Primary 

Slave (2nd) 

Secondary 

Slave (4th) 

Secondary 

Master (3rd) 

Pin 1 


Socket Pin 1 

Warning: If you do not match the CPU 

socket Pin 1 and CPU golden arrow well, you 
may damage the CPU. And please don’t 
touch CPU socket pins when installing CPU. 

CPU socket plate 

Plastic cap 

Golden arrow 

CPU socket lever 

Note:  It’s strongly recommended by 

Intel to use thermal paste properly to avoid 
over-heat generated From Prescott CPU.   

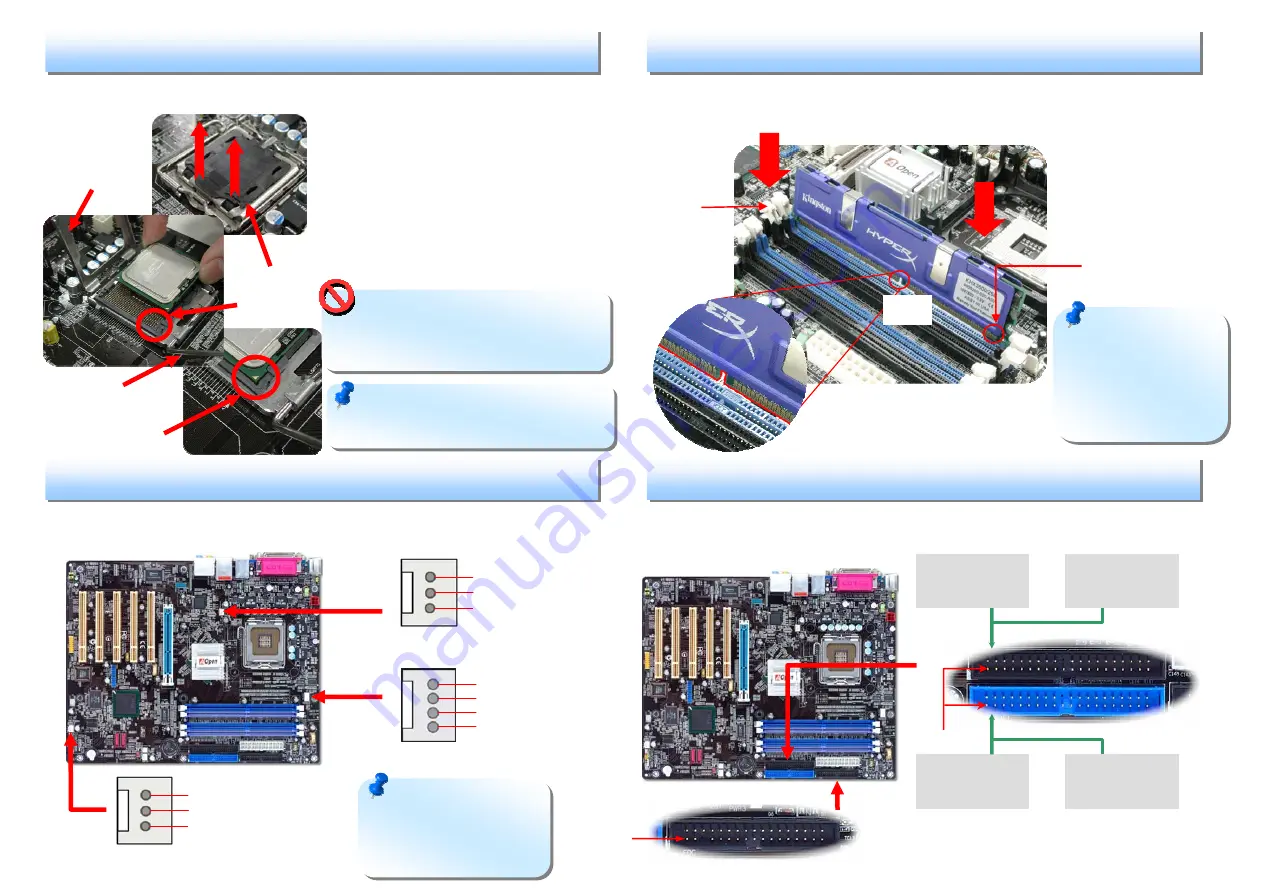
3. Installing Memory Modules   

2. Installing CPU & System Fans 

  1. Installing CPU 

Plug in the CPU fan cable to the 4-pin CPUFAN connector. If you have chassis fan, 
you can also plug it in SYSFAN1 or SYSFAN2 connector. 

CPUFAN Connector 

SYSFAN2 Connector 

DIMM slots are designed in Electronic Blue and Navy Blue which are very easy to 
recognize. Insert the module straight down to the DIMM slot with both hands and 
press down firmly until the DIMM module is securely in place. 

4. Connecting IDE and Floppy Cables 

Connect 34-pin floppy cable and 40-pin, 80-wire IDE cable to floppy connector FDD 
and IDE connector. Be careful of the pin1 orientation. Wrong orientation may cause 
system damage. 

Pin 1 

ATA 66/100 IDE 

Connector 

IDE 1 (Primary) 

IDE 2 (Secondary)   

FDD Connector 

Note:


The tabs of 

the DIMM slot will clip 
to hold the DIMM in 
place when the DIMM 
touches the slot’s 
bottom. 

Note:  Some CPU fans 

do not have sensor pin so 
they cannot support fan 
monitoring. 

Tab


Pin 1 

Key 

GND 
+12V 

SENSOR 

SYSFAN1 Connector 

GND 
+12V 

SENSOR 

GND 
+12V 
SENSOR 
PWM 

Содержание i865PEa-7ILFR

Страница 1: ...PDIF Connector Front Audio Connector USB 2 0 Connectors x 2 Front Panel Connector Serial ATA Ports x2 Supports 100 MB s Transfer Rate FDD Connector CPUFAN Connector 4 pin 12V ATX Power Connector Inte...

Страница 2: ...his motherboard is included in this Easy Installation Guide For more information a complete Online User s Manual can be found in the Bonus Pack CD Thanks for the help of saving our earth 1 Installing...

Страница 3: ...nerated From Prescott CPU 3 Installing Memory Modules 2 Installing CPU System Fans 1 Installing CPU Plug in the CPU fan cable to the 4 pin CPUFAN connector If you have chassis fan you can also plug it...

Страница 4: ...enable Suspend Mode item in BIOS Setup the ACPI Power LED will keep flashing while the system is in suspend mode Locate the power switch cable from your ATX housing It is 2 pin female connector from t...

Страница 5: ...aster CPU on the market by the time you received this installation guide This table is kindly for your references only JP14 Clear CMOS JP28 Keyboard Mouse Wakeup Jumper This motherboard provides keybo...

Страница 6: ...nge Gigabit mode Linking Right Yellow Front Audio Connectors If the housing has been designed with an audio port on the front panel you ll be able to connect onboard audio to front panel through this...

Страница 7: ...corner of first boot screen POST screen For example i865PEa 7ILFR is model name of motherboard R1 02 is BIOS version Register Your Motherboard Thanks for choosing AOpen product please register this mo...

Страница 8: ...Thanks very much for your understanding Europe Email Support AOpen NL Pacific Rim http www aopen com tw tech default htm China http www aopen com cn tech default htm Germany http www aopencom de tech...

Отзывы: