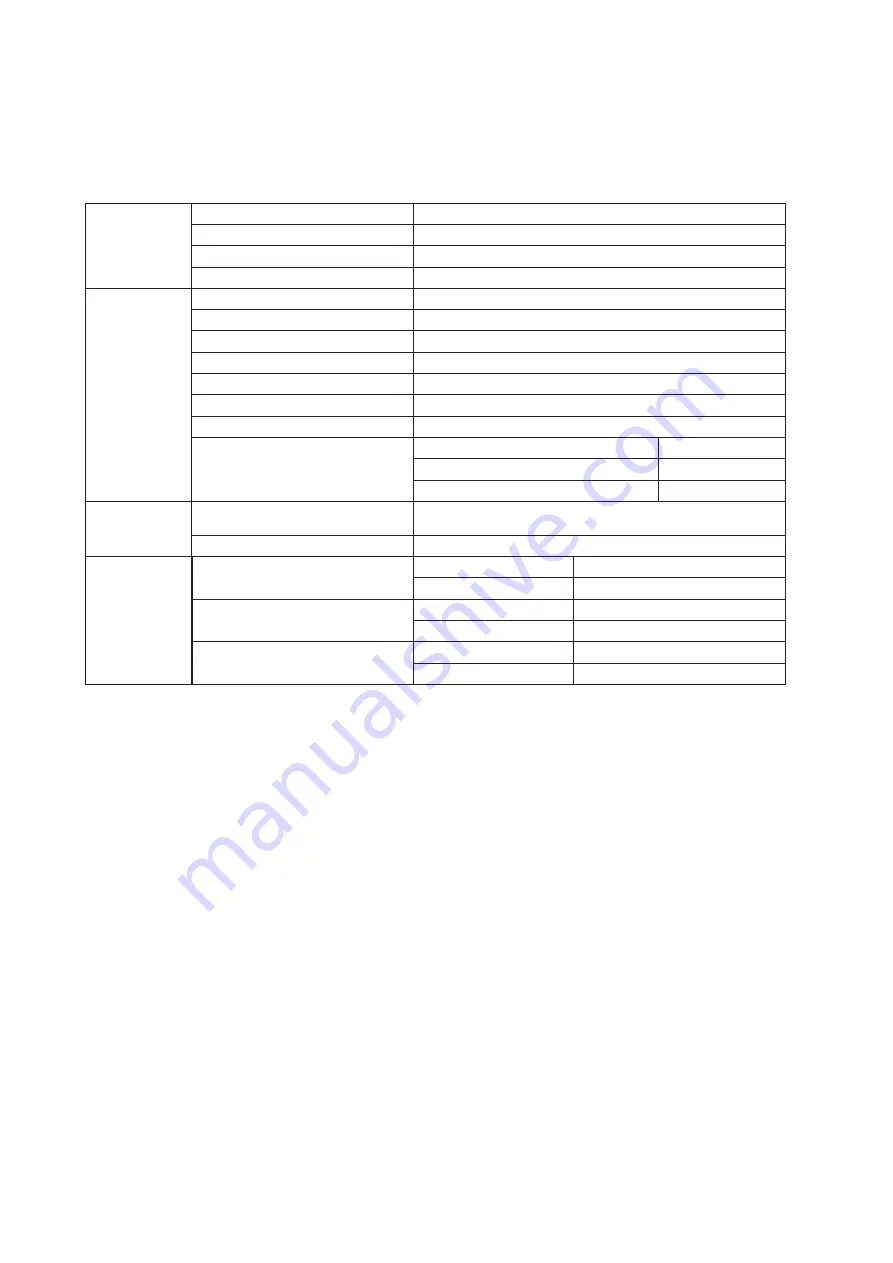
AOC U4309V Скачать руководство пользователя страница 28

26

Specification

General Specification

Panel 

Model name

U4309V

Driving system 

TFT Color LCD 

Viewable Image Size

108cm diagonal

Pixel pitch 

0.2451mm(H) x 0.2451mm(V)

Others

Horizontal scan range 

30k-140kHz

Horizontal scan Size(Maximum)

941.184mm

Vertical scan range 

23-75Hz

Vertical Scan Size(Maximum)

529.416mm

Max resolution

3840x2160@60Hz 

Plug & Play 

VESA DDC2B/CI

Power Source 

100-240V~, 50/60Hz, 

2.5

A

Power Consumption

Typical(default brightness and contrast) 94W
Max. (brightness = 100, contrast =100)

170W

Standby mode

0.5W

Physical 

Characteristics

Connector Type

HDMI×2

DP

USB×4

USB-PC(USB upstream)


Earphone

Signal Cable Type 

Detachable

Environmental

Temperature

Operating 

0°~ 40° 

Non-Operating 

-25°~ 55°

Humidity

Operating 

10% ~ 85% (non-condensing) 

Non-Operating 

5% ~ 93% (non-condensing) 

Altitude

Operating 

0~ 5000 m (0~ 16404ft ) 

Non-Operating 

0~ 12192m (0~ 40000ft ) 

Содержание U4309V

Страница 1: ...1 www aoc com 2021 AOC All Rights Reserved TM LCD Monitor User Manual U4309V...

Страница 2: ...nitor 9 AMD FreeSync function 10 HDR 11 Adjusting 12 Hotkeys 12 Description of the remote control buttons 14 OSD Setting 15 Luminance 16 Color Setup 17 Picture Boost 18 OSD Setup 19 PIP Setting 20 Gam...

Страница 3: ...used as follows NOTE A NOTE indicates important information that helps you make better use of your computer system CAUTION A CAUTION indicates either potential damage to hardware or loss of data and...

Страница 4: ...ctrician install the correct outlet or use an adapter to ground the appliance safely Do not defeat the safety purpose of the grounded plug Unplug the unit during a lightning storm or when it will not...

Страница 5: ...ce the front of the product on the floor If you mount the monitor on a wall or shelf use a mounting kit approved by the manufacturer and follow the kit instructions Leave some space around the monitor...

Страница 6: ...t the stain instead of strong detergent which will cauterize the product cabinet When cleaning make sure no detergent is leaked into the product The cleaning cloth should not be too rough as it will s...

Страница 7: ...act conditions during operation Do not knock or drop the monitor during operation or transportation IThe power cords shall be safety approved For Germany it shall be H03VV F 3G 0 75 mm2 or better For...

Страница 8: ...Manual Warranty Card Base Remote control Batteries Power Cable HDMI Cable USB Cable DP Cable Not all signal cables will be provided for all countries and regions Please check with the local dealer or...

Страница 9: ...7 Setup Stand Base Please setup or remove the base following the steps as below Setup Remove...

Страница 10: ...hen you change the monitor s angle You are able to adjust the monitor as below 5 10 NOTE Do not touch the LCD screen when you change the angle It may cause damage or break the LCD screen WARNING 1 To...

Страница 11: ...display firmly 2 Turn off your computer and unplug its power cable 3 Connect the display signal cable to the video connector on the back of your computer 4 Plug the power cord of your computer and yo...

Страница 12: ...mend list is as the below also could be checked by visiting www AMD com Radeon RX Vega series Radeon RX 500 series Radeon RX 400 series Radeon R9 R7 300 series R9 370 X R7 370 X R7 265 except Radeon P...

Страница 13: ...ion on the compatibility of your device and content Please select OFF for the HDR function when you have no need for automatical activation function Note 1 Only the HDMI interface is available and the...

Страница 14: ...to turn off the monitor Source Exit Up When the OSD is closed press Source Exit button will be Source hot key function When the OSD is adjusted press Source Exit button will be Source hot key functio...

Страница 15: ...and a message of Clear Vision Demo on will be display on the screen for a duration of 5 seconds Press Menu or Exit button the message will disappear Press and hold Left button for 5 seconds again Cle...

Страница 16: ...cess the OSD menu 4 Adjust the OSD options upwards 5 Return to previous OSD level 6 Confirm the OSD adjustment Access the OSD menu 7 Access the OSD menu Confirm the OSD adjustment 8 Adjust the OSD opt...

Страница 17: ...t or Right to navigate through the sub menu functions Once the desired function is highlighted press MENU button to activate it 3 Press Left or Right to change the settings of the selected function Pr...

Страница 18: ...Sports Sports Mode Reading Reading Mode Uniformity Uniformity Mode Gamma Gamma1 Adjust to Gamma 1 Gamma2 Adjust to Gamma 2 Gamma3 Adjust to Gamma 3 DCR Off Disable dynamic contrast ratio On Enable dy...

Страница 19: ...Enhance Disable or Enable Full Enhance Mode Nature Skin Disable or Enable Nature Skin Mode Green Field Disable or Enable Green Field Mode Sky blue Disable or Enable Sky blue Mode Auto Detect Disable o...

Страница 20: ...rame Frame Size 14 100 Adjust Frame Size Brightness 0 100 Adjust Frame Brightness Contrast 0 100 Adjust Frame Contrast H position 0 100 Adjust Frame horizontal Position V position 0 100 Adjust Frame v...

Страница 21: ...language Timeout 5 120 Adjust the OSD Timeout DP Capability 1 1 1 2 1 4 If the DP video content supports DP1 2 1 4 please select DP1 2 104 for DP Capability otherwise please select DP1 1 H Position 0...

Страница 22: ...ng PIP PIP Setting O PIP PBP Disable or Enable PIP or PBP Main Source HDMI1 HDMI2 DP Select main screen source Sub Source HDMI1 HDMI2 DP Select sub screen source Size Small Middle Large Select screen...

Страница 23: ...contrast for clear picture 1 If picture is too dark to be saw the detail clearly adjusting from 50 to100 for clear picture 2 If picture is too white to be saw the detail clearly adjusting from 50 to0...

Страница 24: ...esolution 3840 H X2160 V H Frequency 135KHz V Frequency 60Hz Extra Game Setting PIP Setting PIP Input Select Select Input Signal Source Off timer 0 24hrs Select DC off time Image Ratio Wide Select ima...

Страница 25: ...23 Exit Picture Boost OSD Setup Luminance Color Setup Exit Extra Game Setting PIP Setting PIP Exit Exit the main OSD...

Страница 26: ...24 LED Indicator Status LED Color Full Power Mode White Active off Mode Orange...

Страница 27: ...you are not using an extension cable or switch box We recommend plugging the monitor directly to the video card output connector on the back Picture Bounces Flickers Or Wave Pattern Appears In The Pic...

Страница 28: ...ution 3840x2160 60Hz Plug Play VESA DDC2B CI Power Source 100 240V 50 60Hz 2 5A Power Consumption Typical default brightness and contrast 94W Max brightness 100 contrast 100 170W Standby mode 0 5W Phy...

Страница 29: ...6 70 069 1024x768 75Hz 60 023 75 029 SXGA 1280x1024 60Hz 63 981 60 02 1280x1024 75Hz 79 976 75 025 WXGA 1440x900 60Hz 55 935 59 887 1440x900 60Hz 55 469 59 901 WSXGA 1680x1050 60Hz 65 29 59 954 1680x1...

Страница 30: ...t 4 TMDS Data 1 12 TMDS Clock 5 TMDS Data 1Shield 13 CEC 6 TMDS Data 1 14 Reserved N C on device 7 TMDS Data 0 15 SCL 8 TMDS Data 0 Shield 16 SDA 20 Pin Color Display Signal Cable Pin No Signal Name P...

Страница 31: ...SA DDC STANDARD It allows the monitor to inform the host system of its identity and depending on the level of DDC used communicate additional information about its display capabilities The DDC2B is a...

Отзывы: