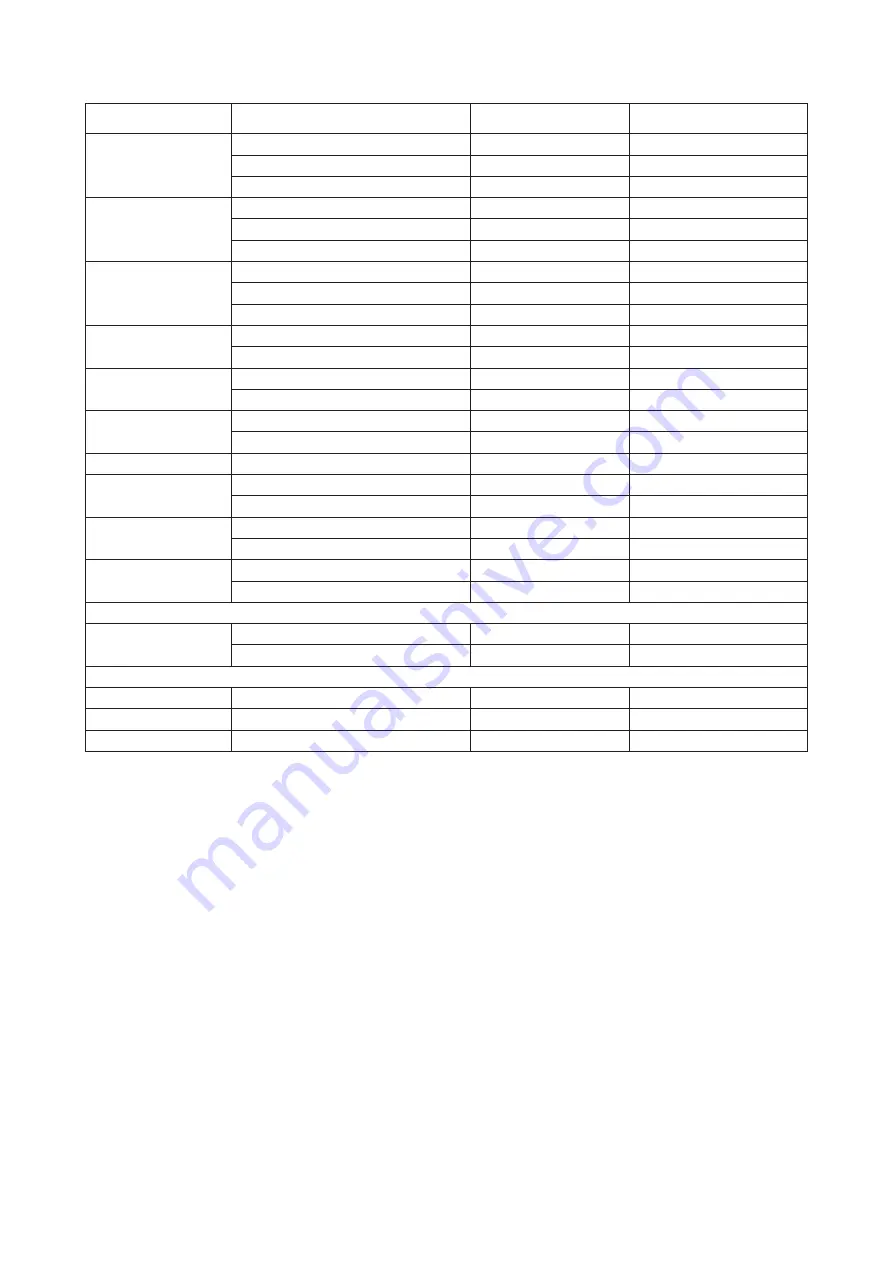
AOC U32P2C Скачать руководство пользователя страница 30

28

U34P2C

STANDARD

RESOLUTION

HORIZONTAL 

FREQUENCY(kHz)

VERTICAL 

FREQUENCY(Hz)

VGA

640x480@60Hz

31.469

59.94

640x480@72Hz

37.861

72.809

640x480@75Hz

37.5

75

SVGA

800x600@60Hz

37.879

60.317

800x600@72Hz

48.077

72.188

800x600@75Hz

46.875

75

XGA

1024x768@60Hz

48.363

60.004

1024x768@70Hz

56.476

70.069

1024x768@75Hz

60.023

75.029

SXGA

1280x1024@60Hz

63.981

60.020

1280x1024@75Hz

79.976

75.025

WXGA+

1440x900@60Hz

55.935

59.887

1440x900@60Hz

55.469

59.901

WSXGA

1680x1050@60Hz

65.290

59.954

1680x1050@60Hz

64.674

59.883

FHD

1920x1080@60Hz

67.5

60

***

1152x864@75Hz

67.5

75

1280x960@60Hz

60

60

WFHD

2560x1080@60Hz

66

60

2560x1080@50Hz

56.25

50

WQHD

3440x1440@60Hz

89.819

59.973

3440x1440@75Hz

111.788

74.925

IBM MODES

DOS

640x350@70Hz

31.469

70.087

720x400@70Hz

31.469

70.087

MAC MODES

VGA

640x480@67Hz

35.000

66.667

SVGA

832x624@75Hz

49.725

74.551

XGA

1024x768@75Hz

60.241

74.927

Содержание U32P2C

Страница 1: ...1 www aoc com 2020 AOC All Rights Reserved TM LCD Monitor User Manual U32P2C U34P2C...

Страница 2: ...ing Angle 9 Connecting the Monitor 10 Wall Mounting 11 Adjusting 12 Hotkeys 12 OSD Setting 14 Luminance 15 Color Setup 16 Picture Boost 17 OSD Setup 18 PIP Setting 19 Game Setting 20 Extra 21 Exit 22...

Страница 3: ...used as follows NOTE A NOTE indicates important information that helps you make better use of your computer system CAUTION A CAUTION indicates either potential damage to hardware or loss of data and...

Страница 4: ...ctrician install the correct outlet or use an adapter to ground the appliance safely Do not defeat the safety purpose of the grounded plug Unplug the unit during a lightning storm or when it will not...

Страница 5: ...ce the front of the product on the floor If you mount the monitor on a wall or shelf use a mounting kit approved by the manufacturer and follow the kit instructions Leave some space around the monitor...

Страница 6: ...t the stain instead of strong detergent which will cauterize the product cabinet When cleaning make sure no detergent is leaked into the product The cleaning cloth should not be too rough as it will s...

Страница 7: ...act conditions during operation Do not knock or drop the monitor during operation or transportation IThe power cords shall be safety approved For Germany it shall be H03VV F 3G 0 75 mm2 or better For...

Страница 8: ...onitor CD Manual Warranty Card Stand Base Power Cable HDMI Cable USB Cable DP Cable USB C C Cable Not all signal cables will be provided for all countries and regions Please check with the local deale...

Страница 9: ...7 Setup Stand Base Please setup or remove the base following the steps as below U32P2C Setup 1 2 3 4 Remove 1 2 3 4...

Страница 10: ...8 U34P2C Setup 4 Remove...

Страница 11: ...hen you change the monitor s angle You are able to adjust the monitor as below 5 22 NOTE Do not touch the LCD screen when you change the angle It may cause damage or break the LCD screen WARNING 1 To...

Страница 12: ...the back of the display firmly 2 Turn off your computer and unplug its power cable 3 Connect the display signal cable to the video connector on the back of your computer 4 Plug the power cord of your...

Страница 13: ...in the back of the monitor 4 Insert the 4 screws into the holes and tighten 5 Reconnect the cables Refer to the user s manual that came with the optional wall mounting arm for instructions on attachi...

Страница 14: ...ed press the key to open the volume adjustment bar and press the or key to adjust the headphone output volume Source switching exit When the OSD menu is off press this key to activate the signal sourc...

Страница 15: ...essage of Clear Vision Demo on will be display on the screen for a duration of 5 seconds Press Menu or Exit button the message will disappear Press and hold button for 5 seconds again Clear Vision Dem...

Страница 16: ...ge the settings of the selected function Press AUTO button to exit If you want to adjust any other function repeat steps 2 3 4 OSD Lock Function To lock the OSD press and hold the MENU button while th...

Страница 17: ...rd Standard Mode Text Text Mode Internet Internet Mode Game Game Mode Movie Movie Mode Sports Sports Mode Reading Reading Mode Uniformity Uniformity Mode Gamma Gamma1 Adjust to Gamma 1 Gamma2 Adjust t...

Страница 18: ...l Enhance on or off Disable or Enable Full Enhance Mode Nature Skin on or off Disable or Enable Nature Skin Mode Green Field on or off Disable or Enable Green Field Mode Sky blue on or off Disable or...

Страница 19: ...rame Frame Size 14 100 Adjust Frame Size Brightness 0 100 Adjust Frame Brightness Contrast 0 100 Adjust Frame Contrast H position 0 100 Adjust Frame horizontal Position V position 0 100 Adjust Frame v...

Страница 20: ...DP Capability otherwise please select DP1 1 H Position 0 100 Adjust the horizontal position of OSD V Position 0 100 Adjust the vertical position of OSD USB on or off For model need to turn on off USB...

Страница 21: ...PIP Setting OFF PIP PBP Disable or Enable PIP or PBP Main Source HDMI1 HDMI2 DP USB C Select main screen source Sub Source HDMI1 HDMI2 DP USB C Select sub screen source Size Small Middle Large Select...

Страница 22: ...m 50 to 100 or 0 to increase contrast for clear picture 1 If picture is too dark to be saw the detail clearly adjusting from 50 to100 for clear picture 2 If picture is too white to be saw the detail c...

Страница 23: ...Frequency 89 KHz V Frequency 60 Hz Extra PIP Setting PIP Game Setting Input Select Select Input Signal Source Off timer 0 24hrs Select DC off time Image Ratio Wide Select image ratio for display 4 3...

Страница 24: ...22 Exit Picture Boost OSD Setup Luminance Color Setup Exit Extra Game Setting PIP Setting PIP Exit Exit the main OSD...

Страница 25: ...23 LED Indicator Status LED Color Full Power Mode White Active off Mode Orange...

Страница 26: ...you are not using an extension cable or switch box We recommend plugging the monitor directly to the video card output connector on the back Picture Bounces Flickers Or Wave Pattern Appears In The Pic...

Страница 27: ...ness 90 Contrast 50 46W Max brightness 100 contrast 100 160W Standby mode 0 5W Physical Characteristics Input Connector HDMI DP USB USB C USB Upstream USB Bx1 USB Cx1 Downstream USB3 2x4 Gen1 with 1 f...

Страница 28: ...46W Max brightness 100 contrast 100 200W Standby mode 0 5W Physical Characteristics Input Connector HDMI DP USB USB C USB Upstream USB Bx1 USB Cx1 Downstream USB3 2x4 Gen1 with 1 fast charge BC1 2 USB...

Страница 29: ...6 476 70 069 1024x768 75Hz 60 023 75 029 SXGA 1280x1024 60Hz 63 981 60 02 1280x1024 75Hz 79 976 75 025 WXGA 1440x900 60Hz 55 935 59 887 1440x900 60Hz 55 469 59 901 WSXGA 1680x1050 60Hz 65 29 59 954 16...

Страница 30: ...x1024 60Hz 63 981 60 020 1280x1024 75Hz 79 976 75 025 WXGA 1440x900 60Hz 55 935 59 887 1440x900 60Hz 55 469 59 901 WSXGA 1680x1050 60Hz 65 290 59 954 1680x1050 60Hz 64 674 59 883 FHD 1920x1080 60Hz 67...

Страница 31: ...t 4 TMDS Data 1 12 TMDS Clock 5 TMDS Data 1Shield 13 CEC 6 TMDS Data 1 14 Reserved N C on device 7 TMDS Data 0 15 SCL 8 TMDS Data 0 Shield 16 SDA 20 Pin Color Display Signal Cable Pin No Signal Name P...

Страница 32: ...SA DDC STANDARD It allows the monitor to inform the host system of its identity and depending on the level of DDC used communicate additional information about its display capabilities The DDC2B is a...

Отзывы: