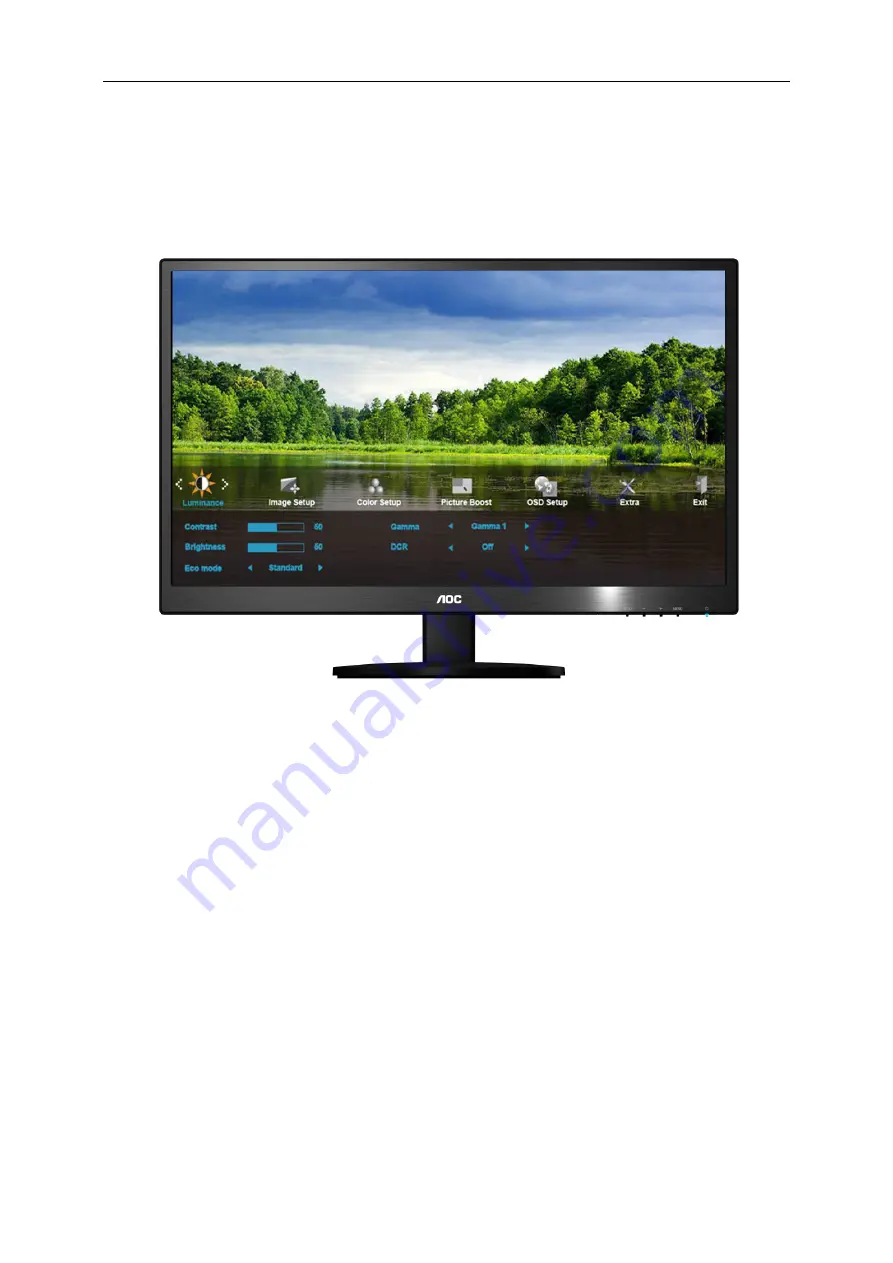
AOC M2470SWD Скачать руководство пользователя страница 22


OSD Setting 


Basic and simple instruction on the control keys. 


1)  Press the 

MENU-button

 to activate the OSD window.   

2)  Press

 - or + 

to navigate through the functions. Once the desired function is highlighted, press the 

MENU-button 

to activate it . press 

- or + 

to navigate through the sub-menu functions. Once the desired 

function is highlighted, press 

MENU-button

 to activate it.   

3)  Press 

- or + 

to change the settings of the selected function. Press 

AUTO

 to exit.    If you want to adjust any 

other function, repeat steps 2-3.   

4)  OSD Lock Function: To lock the OSD, press and hold the 

MENU button

 while the monitor is off and then press 

power button

 to turn the monitor on. To un-lock the OSD - press and hold the 

MENU button

 while the monitor 

is off and then press

 power button

 to turn the monitor on. 


Notes: 

1)  If the product has only one signal input, the item of "Input Select" is disable to adjust. 

2)  If the product screen size is 4:3 or input signal resolution is wide format, the item of "Image Ratio" is disable to 

adjust.    

3)  One of Clear vision, DCR, Color Boost, and Picture Boost functions is activated; the other three functions are 

turned off accordingly. 


22 

Содержание M2470SWD

Страница 1: ...2 0 1 4A O C A l l R i g h t s R e s e r v e d w w w a o c c o m L C DMo n i t o r U s e r Ma n u a l L E DB a c k l i g h t M2 4 7 0 S WD M2 4 7 0 S WD A...

Страница 2: ...ows XP 16 Windows ME 2000 17 Windows 8 18 Hotkeys 20 OSD Setting 22 Luminance 23 Image Setup 24 Color Setup 25 Picture Boost 26 OSD Setup 27 Extra 28 Exit 29 LED Indicator 29 Driver 30 Monitor Driver...

Страница 3: ...ergy Star 54 EPEAT Declaration 55 TCO DOCUMENT 56 Service 57 Warranty Statement for Europe 57 Warranty Statement for Middle East and Africa MEA 59 AOC Pixel Policy ISO 9241 307 Class 1 61 Warranty Sta...

Страница 4: ...sed as follows NOTE A NOTE indicates important information that helps you make better use of your computer system CAUTION A CAUTION indicates either potential damage to hardware or loss of data and te...

Страница 5: ...trician install the correct outlet or use an adapter to ground the appliance safely Do not defeat the safety purpose of the grounded plug Unplug the unit during a lightning storm or when it will not b...

Страница 6: ...should be moved with care Never push any object into the slot on the monitor cabinet It could damage circuit parts causing a fire or electric shock Never spill liquids on the monitor Do not place the...

Страница 7: ...the stain instead of strong detergent which will cauterize the product cabinet When cleaning make sure no detergent is leaked into the product The cleaning cloth should not be too rough as it will scr...

Страница 8: ...lug IMMEDIATELY and contact a Service Center Make sure that the ventilating openings are not blocked by a table or curtain Do not engage the LCD monitor in severe vibration or high impact conditions d...

Страница 9: ...Manual Monitor Base Stand Power Cable DVI Cable Analog Cable Audio Cable Not all signal cables Audio Analog DVI will be provided for all countries and regions Please check with the local dealer or AOC...

Страница 10: ...Setup Stand Base Please setup or remove the base following the steps as below Setup Remove 10...

Страница 11: ...then adjust the monitor s angle to your own preference Hold the stand so you will not topple the monitor when you change the monitor s angle You are able to adjust the monitor s angle from 5 to 25 NOT...

Страница 12: ...end of the 15 pin D Sub cable to the back of the monitor and connect the other end to the computer s D Sub port 3 Connect one end of the DVI cable to the back of the monitor and connect the other end...

Страница 13: ...the wall mounting arm 3 Place the wall mounting arm onto the back of the monitor Line up the holes of the arm with the holes in the back of the monitor 4 Insert the 4 screws into the holes and tighte...

Страница 14: ...Adjusting Setting Optimal Resolution Windows Vista For Windows Vista 1 Click START 2 Click CONTROL PANEL 3 Click Appearance and Personalization 4 Click Personalization 14...

Страница 15: ...5 Click Display Settings 6 Set the resolution SLIDE BAR to 1920 by 1080 15...

Страница 16: ...Windows XP For Windows XP 1 Click START 2 Click SETTINGS 3 Click CONTROL PANEL 4 Click Appearance and Themes 5 Double click DISPLAY 16...

Страница 17: ...t the resolution SLIDE BAR to 1920 by 1080 Windows ME 2000 For Windows ME 2000 1 Click START 2 Click SETTINGS 3 Click CONTROL PANEL 4 Double click DISPLAY 5 Click SETTINGS 6 Set the resolution SLIDE B...

Страница 18: ...Windows 8 For Windows 8 1 Right click and click All apps at the bottom right of the screen 2 Set the View by to Category 3 Click Appearance and Personalization 18...

Страница 19: ...4 Click DISPLAY 5 Set the resolution SLIDE BAR to 1920x1080 19...

Страница 20: ...ly for the models with Audio 4 3 or wide image ratio M2470SWD When there is no OSD press hotkey continuously to change 4 3 or wide image ratio If the product screen size is 4 3 or input signal resolut...

Страница 21: ...5 seconds to activate the Clear Vision Demo and a message of Clear Vision Demo on will be display on the screen for a duration of 5 seconds Press Menu or Exit button the message will disappear Press...

Страница 22: ...t any other function repeat steps 2 3 4 OSD Lock Function To lock the OSD press and hold the MENU button while the monitor is off and then press power button to turn the monitor on To un lock the OSD...

Страница 23: ...ess AUTO to exit Brightness 0 100 Backlight Adjustment Contrast 0 100 Contrast from Digital register Eco mode Standard Standard Mode Text Text Mode Internet Internet Mode Game Game Mode Movie Movie Mo...

Страница 24: ...to enter 4 Press or to adjust 5 Press AUTO to exit Clock 0 100 Adjust picture Clock to reduce Vertical Line noise Phase 0 100 Adjust Picture Phase to reduce Horizontal Line noise Sharpness 0 100 Adjus...

Страница 25: ...l Color Temperature from EEPROM sRGB Recall SRGB Color Temperature from EEPROM User Red Red Gain from Digital register Green Green Gain Digital register Blue Blue Gain from Digital register DCB Mode F...

Страница 26: ...and press MENU to enter 4 Press or to adjust 5 Press AUTO to exit Frame Size 14 100 Adjust Frame Size Brightness 0 100 Adjust Frame Brightness Contrast 0 100 Adjust Frame Contrast H position 0 100 Ad...

Страница 27: ...ss or to adjust 5 Press AUTO to exit H Position 0 100 Adjust the horizontal position of OSD V Position 0 100 Adjust the vertical position of OSD Timeout 5 120 Adjust the OSD Timeout Transparence 0 100...

Страница 28: ...o exit Input Select Auto D SUB DVI Select Input Signal Source Auto Config yes or no Auto adjust the picture to default Off timer 0 24hrs Select DC off time Image Ratio wide or 4 3 Select wide or 4 3 f...

Страница 29: ...Press MENU Menu to display menu 2 Press or to select Exit and press MENU to enter 3 Press AUTO to exit Exit Exit the main OSD LED Indicator Status LED Color Full Power Mode Green Active off Mode Oran...

Страница 30: ...river Monitor Driver Windows 8 1 Start Windows 8 2 Right click and click All apps at the bottom right of the screen 3 Click on the Control panel icon 4 Set the View by to Large icons or Small icons 30...

Страница 31: ...5 Click on the Display icon 6 Click on the Change display settings button 7 Click the Advanced Settings button 31...

Страница 32: ...ab and then click the Properties button 9 Click the Driver tab 10 Open the Update Driver Software Generic PnP Monitor window by clicking on Update Driver and then click the Browse my computer for driv...

Страница 33: ...ve letter designator for the CD ROM drive 13 Select the xxx inf file and click the Open button Click the OK button 14 Select your monitor model and click the Next button The files will be copied from...

Страница 34: ...Windows 7 1 Start Windows 7 2 Click on the Start button and then click on Control Panel 3 Click on the Display icon 34...

Страница 35: ...4 Ckick on the Change display settings button 5 Click the Advanced Settings button 6 Click the Monitor tab and then click the Properties button 35...

Страница 36: ...8 Open the Update Driver Software Generic PnP Monitor window by clicking on Update Driver and then click the Browse my computer for driver software button 9 Select Let me pick from a list of device dr...

Страница 37: ...M drive 11 Select the xxx inf file and click the Open button Click the OK button 12 Select your monitor model and click the Next button The files will be copied from the CD to your hard disk drive 13...

Страница 38: ...Windows Vista 1 Click Start and Control Panel Then double click on Appearance and Personalization 2 Click Personalization and then Display Settings 3 Click Advanced Settings 38...

Страница 39: ...lick Continue 5 Click Update Driver in the Driver tab 6 Check the Browse my computer for driver software checkbox and click Let me pick from a list of device drivers on my computer 7 Click on the Have...

Страница 40: ...Windows XP 1 Start Windows XP 2 Click on the Start button and then click on Control Panel 3 Select and click on the category Appearance and Themes 4 Click on the Display Item 40...

Страница 41: ...or tab If the Properties button is inactive it means your monitor is properly configured Please stop installation If the Properties button is active click on Properties button Please follow the steps...

Страница 42: ...button and then select the appropriate drive F CD ROM Drive 11 Click on the Open button then click the OK button 12 Select your monitor model and click on the Next button If you can see the has not pa...

Страница 43: ...pen button then click on the OK button 10 Select your monitor model and click on the Next button 11 Click on the Finish button then the Close button If you can see the Digital Signature Not Found wind...

Страница 44: ...o i Menu software by AOC i Menu makes it easy to adjust your monitor display setting by using on screen menus instead of the OSD button on the monitor To complete installation please follow the instal...

Страница 45: ...wizard to complete software installation Under each of the four PC status you may choose from the pull down menu the desired time in minutes for your monitor to automatically shutdown The example abov...

Страница 46: ...ool it splits the desktop into different panes each pane displays a different window You only need to drag the window to a corresponding pane when you want to access it It supports multiple monitor di...

Страница 47: ...the Contrast and Brightness Controls Press to auto adjust Make sure you are not using an extension cable or switch box We recommend plugging the monitor directly to the video card output connector on...

Страница 48: ...1080 60 Hz Plug Play VESA DDC2B CI Input Connector D Sub 15pin DVI 24pin Input Video Signal Analog 0 7Vp p standard 75 OHM TMDS Power Source 100 240V 50 60Hz Power Consumption Active 26 W typical M247...

Страница 49: ...SVGA 800 600 56Hz 35 156 56 25 800 600 60Hz 37 879 60 317 800 600 72Hz 48 077 72 188 800 600 75Hz 46 875 75 MAC MODE SVGA 832 624 75Hz 49 725 74 5 XGA 1024 768 60Hz 48 363 60 004 1024 768 70Hz 56 476...

Страница 50: ...me Pin No Signal Name Pin No Signal Name 1 TMDS Data 2 9 TMDS Data 1 17 TMDS Data 0 2 TMDS Data 2 10 TMDS Data 1 18 TMDS Data 0 3 TMDS Data 2 4 Shield 11 TMDS Data 1 3 Shield 19 TMDS Data 0 5 Shield 4...

Страница 51: ...DDC STANDARD It allows the monitor to inform the host system of its identity and depending on the level of DDC used communicate additional information about its display capabilities The DDC2B is a bi...

Страница 52: ...etermined by turning the equipment off and on the user is encouraged to try to correct the interference by one or more of the following measures Reorient or relocate the receiving antenna Increase the...

Страница 53: ...lity to dispose of your waste equipment by handing it over to a designated collection point for the recycling of waste electrical and electronic equipment The separate collection and recycling of your...

Страница 54: ...r ENERGY STAR is a U S registered mark As an ENERGY STAR Partner AOC International Europe BV and Envision Peripherals Inc have determined that this product meets the ENERGY STAR guidelines for energy...

Страница 55: ...n for the conservation of natural resources as well as land ll protection AOC announces the launch of AOC monitor s packaging recycling program This program is designed to help you discard of your mon...

Страница 56: ...TCO DOCUMENT 56...

Страница 57: ...on the address label Put the RMA number on the shipping carton AOC International Europe B V will pay the return shipping charges within one of the countries specified within this warranty statement AO...

Страница 58: ...EUROPE B V OBLIGATIONS AND YOUR REMEDIES HEREUNDER ARE SOLELY AND EXCULSIVELY AS STATED HERE AOC INTERNATIONAL EUROPE B V LIABILITY WHETHER BASED ON CONTRACT TORT WARRANTY STRICT LIABILITY OR OTHER TH...

Страница 59: ...considered for exceptional cases that are out of warranty as per the product ID serial number and for such exceptional cases Original Invoice Proof Of Purchase Receipt is mandatory If the product appe...

Страница 60: ...LL EXPRESS AND IMPLIED WARRANTIES FOR THIS PRODUCT INCLUDING THE WARRANTIES OF MERCHANTABILITY AND FITNESS FOR A PARTICULAR PURPOSE ARE LIMITED IN DURATION TO A PERIOD OF ONE 1 to THREE 3 YEARS FOR PA...

Страница 61: ...AOC Pixel Policy ISO 9241 307 Class 1 61...

Страница 62: ...e during shipment Pay all shipping charges EPI is not responsible for damage to inbound product that was not properly packaged EPI will pay the return shipment charges within one of the countries spec...

Страница 63: ...AGES SO THE ABOVE LIMITATION MAY NOT APPLY TO YOU ALTHOUGH THIS LIMITED WARRANTY GIVES YOU SPECIFIC LEGAL RIGHTS YOU MAY HAVE OTHER RIGHTS WHICH MAY VARY FROM STATE TO STATE In the United States of Am...

Страница 64: ...UPS Call Tag to pick up the defective unit Step 6 Please review the following chart to see your EASE program qualifications WARRANTY PERIOD COVERAGE AT NO CHARGE CUSTOMER CHARGES Within the first thre...

Отзывы: