background image

10

Introduction

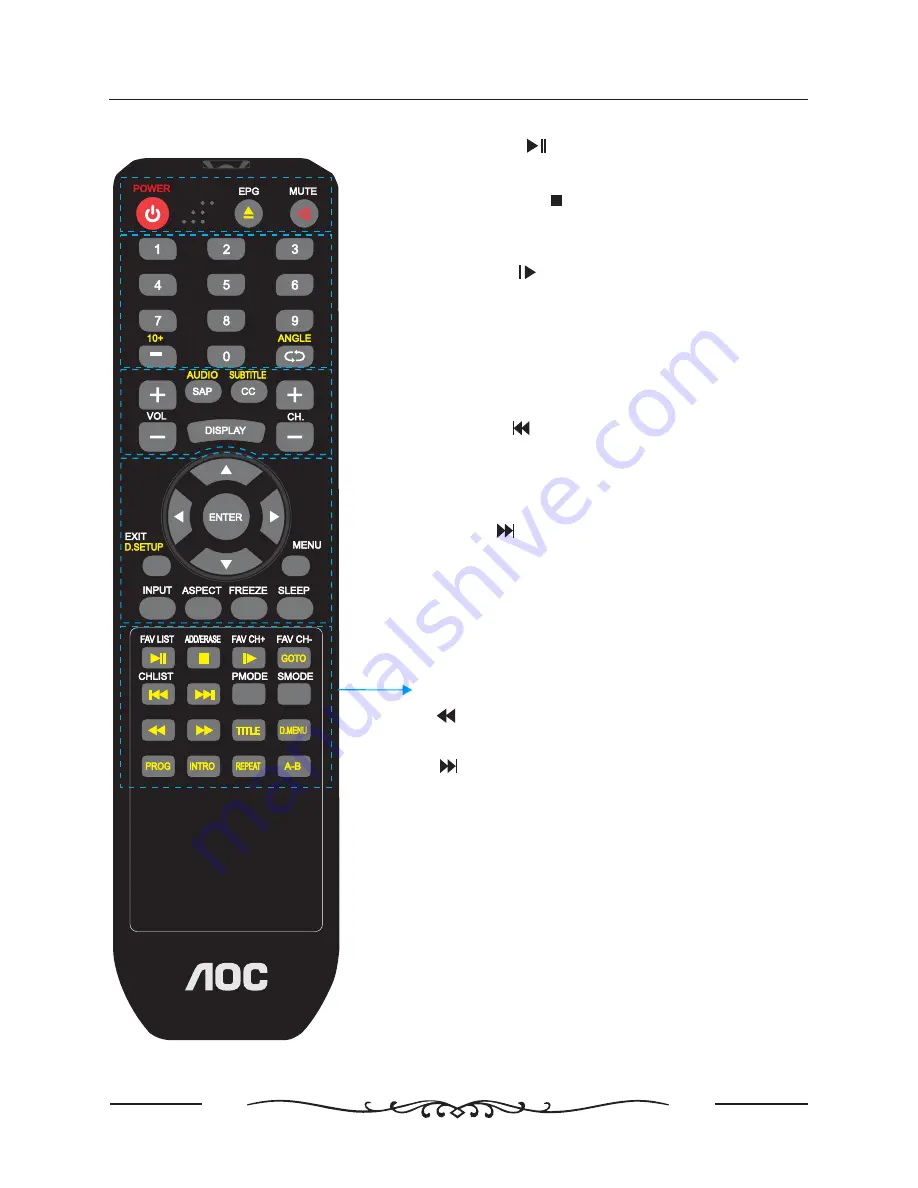
FAV LIST/

ADD/ERASE/

FAV CH+/

FAV CH-/GOTO

CHLIST/

AUTO/

PMODE

SMODE

from the previous

chapter/track.

Press repeatedly to cycle through the available
video picture modes.

Press to cycle through the different sound
settings.

Press FAV LIST to display a FAV menu in TV mode”

Press ADD ERASE to add or delete Favorite
channel

Press to stop playing

to slow/step the speed of DVD playing

DVD mode: Press to Go To a specific chapter
on a DVD.

Press CH LIST to display channel list

Press once to jump to the

beginning of current playing track and twice to
the previous track.

DVD/mode: Press to advance forward to the
next chapter/track

multimedia format

DVD mode: Press to advance forward to the
next chapter/track .

Press to display DVD title

/

TITLE

D.MENU

DVD mode: Press to play or pause the DVD.

DVD mode:

Digital mode: Press to increase favourite
channel.
DVD mode:

Digital mode: Press to decrease favourite
channel.

DVD/mode:

Press to automatically set up the screen in PC
mode

DVD mode: Press to play a
program track in fast rewind mode

DVD mode: Press to display the disc menu (if
available on DVD disc)

Press to play a short introduction to each
chapter when available on disc

DVD Mode: Press to set repeat

DVD Mode: Press to A-B playback

.

PROG

INTRO

REPEAT

A-B

To select the DVD program playback

.

AUTO

Содержание LC19W060C

Страница 1: ......

Страница 2: ...ANGUAGE SETUP 35 AUDIO SETUP 36 36 Trouble Shooting 38 4 6 7 8 Remote control 9 Power Cord Connection 11 AV INPUT Connection 12 PC Connection 13 14 15 15 16 SOUND MENU 19 21 28 31 Headphone Connection Dimensions Specifications 37 SELECT INPUT SOURCE CHANNEL MENU PARENTAL CONTROL SETUP MENU OTHERS MENU Using built in DVD Player Playback of media files in disc SYSTEM SETUP 33 DIGITAL SETUP ...

Страница 3: ...ATION This equipment generates uses and can radiate radio frequency energy and if not installed and used in accordance with the instructions may cause harmful interference to radio communication However there is no guarantee that interference will not occur in a particular installation If this equipment does cause harmful interference to radio or television reception which can be determined by tur...

Страница 4: ...cause harmful interference to radio or television reception which can be determined by turning the equipment off and on the user is encouraged to try to correct the interference by one or more of the following measures Reorient or relocate the receiving antenna Increase the separation between the equipment and receiver Connect the equipment into an outlet on a circuit different from that to which ...

Страница 5: ...structions WARNING O w ner sManual 8 Do not install near any heat source such as radiators heat registers stoves or other Apparatus including amplifiers that produce heat 9 Do not defeat the safety purpose of the polarized or grounding type plug A polarized plug has two blades with one wider than other A grounding type plug has two blades and a third grounding prong The wide blade or the third pro...

Страница 6: ...or holding your finger s against it CAUTION connecting the Power Cord Do not overload wall outlets Overloaded wall outlets could damage the TV and could result to electric shock or fire Periodically examine the cord of your appliance if its appearance indicates damage or deterioration unplug it Stop using it until you have it replaced with a cord authorized by your dealer Protect the power cord fr...

Страница 7: ...ke Point the remote towards the remote control sensor of the wireless TV and use it within 7 meters Put the used batteries into the recycling bin since it can negatively affect the environment Ensure that the following accessories are included with your TV If any accessory is missing please contact the dealer from where you purchased the product ACCESSORIES 1 2 Introduction Power Cable x 1 Remote ...

Страница 8: ...is just a kind of colour in the TV series 1 2 3 4 5 6 7 8 9 Select the input source Displays Menu OSD Volume down and menu down Volume up and menu up Program Channel down and menu down Program Channel up and menu up Standby ON OFF 1 2 3 4 5 6 7 8 9 Eject Play Pause 11 Infrared sensor for the remote control Switch ON the LCD TV when at standby mode or vice versa 10 10 11 ...

Страница 9: ...EO VIDEO INPUT Connect the Video output jack of DVD or VCR S VIDEO INPUT Connect the S VIDEO output jack of DVD or VCR YPbPr INPUT Connect YPbPr output jack of DVD or VCR PC RGB INPUT Connect the PC RGB output jack of PC HDMI INPUT Connect the HDMI output jack of DVD USB SLOT Can be used for software updating HEADPHONE Connect the headphone POWER The Power on off AC IN Connect the Power supply cab...

Страница 10: ...s SAP to show the list of audio languages available for current in TV mode Press to display the source or DVD program information DVD mode Press to switch between the different subtitle languages TV mode Press to display close caption cc function needs support of the broadcast system Press to select the next previous channel the AUTO EXIT D SETUP INPUT ASPECT FREEZE SLEEP Press to exit the menu on...

Страница 11: ...twice to the previous track DVD mode Press to advance forward to the next chapter track multimedia format DVD mode Press to advance forward to the next chapter track Press to display DVD title TITLE D MENU DVD mode Press to play or pause the DVD DVD mode Digital mode Press to increase favourite channel DVD mode Digital mode Press to decrease favourite channel DVD mode Press to automatically set up...

Страница 12: ...e front panel lights up in green STANDBY Antenna Connection Antenna or Cable Service without a Cable Box Connections For optimum picture quality adjust antenna direction if needed VHF Antenna UHF Antenna Wall Antenna Socket RF Coaxial Wire 75ohm NOTE Before connecting any external equipment turn OFF all main power for safety NOTE AC INPUT CONNECTIONS ...

Страница 13: ...udio right red Select the AV S VIDEO input source with INPUT button 1 Connect the YPbPr connector on the external video device to the scart connector on the LCD TV using a scart cable YPbPr connector supports YPbPr functions CVBS RGB input output TV out 2 Press INPUT button on the remote control to select YPbPr which corresponds with your connection YPbPr INPUT Connection YPbPr INPUT Connection S ...

Страница 14: ...C to the VGA IN jack on the set Connect the PC AUDIO output of the PC to the PC AUDIO IN jack on the set Turn on the PC and set Select the VGA input source with INPUT button 1 ConnecttheHDMIconnectorontheexternalvideodevicetothescartconnector ontheLCDTVusingascartcable HDMI connectorsupports HDMI functions CVBS RGBinput output TVout 2 PressINPUTbuttonontheremotecontroltoselect HDMI whichcorrespond...

Страница 15: ...TV program without disturbing people around you Insert a headphone into the 3 5mm mini jack on the set NOTE 1 Prolonged used of headphones at a high volume may damage your hearing 2 You will not receive the sound from speaker when you connect headphones to the system Headphone Connection ...

Страница 16: ...splay the Source Select list Pess button to select the input source you want to watch Press ENTER or button to enter the input source Source Select TV AV S Video HDMI YPbPr PC DVD BASIC OPERATION Press button to display the Press button to select the MENU you want Press ENTER button to enter the sub menu You can press button to go back to the upper menu or button to close the OSD O PICTURE SOUND C...

Страница 17: ...ss button to select Picture Mode then press button to adjust Available picture mode Movie User Dynamic Standard PICTURE Picture Settings Screen Settings PC Settings Color Temperature Normal PICTURE Picture Settings Screen Settings Color Temperature Normal Advanced Picture Settings PC Settings Select Menu Go to Next Menu Select Menu Go to Next Menu MENU Return ENTER O PICTURE SETTINGS Picture Mode ...

Страница 18: ...tton to select then press button to adjust Sharpness Tint 25 Sharpness 27 Screen Settings 1 Press ENTER when the Screen Settings item is highlighted Then you will go the sub menu as following 2 Press to select the desired menu item Press ENTER to proceed if necessary 3 Press to adjust the item to the desired level 4 When you have changed the settings you can exit from the menu by pressing MENU O S...

Страница 19: ...Press ENTER when the Color Temperature item is highlighted Then press button to adjust Available color temperature Cool Normal Warm Advanced Picture Settings Dynamic Contrast Press button to select the item Dynamic Contrast then press button to adjust it can adjust the contrast corresponding to the input signal in order to improve the picture quality displayed Available Mode Off Low Medium High Dy...

Страница 20: ...u item Press ENTER to proceed if necessary 3 Press to adjust the item to the desired level 4 When you have changed the settings you can exit from the menu by pressing M ENU O SOUND SETTING Sound Mode User Bass Treble Balance Select Menu Change Setting Select Menu MENU Return 19 TV Operation MPEG Noise Reduction Press button to select the item MPEG Noise Reduction then press button to adjust It can...

Страница 21: ...ress button to select the item Balance then press button to adjust Bass 7 Treble 7 Balance 7 Surround Mode Surround Mode Press button to select the item Surround Mode then press ENTER button to select Surround Mode Analog Sound Analog Sound Press button to select the item Analog Sound then press button to select Available Analog Sound SAP Stereo Mono Digital Sound Digital Sound Press button to sel...

Страница 22: ... OTHER SETTINGS AVL Off Speaker On Select Menu Select Menu MENU Return Enable Disable O EQUALIZER SETTINGS Mode POP 2 1 2 3 1 0 1 100 250 500 1k 2k 4k 10k Select Menu Select Menu MENU Return Change Setting Equalizer Mode Press button to select the item Equalizer Mode then press button to select the desired mode Available Equalizer Mode POP USER OFF ROCK JAZZ CHANNEL MENU Note This menu is only sho...

Страница 23: ...cute CHANNEL Select Menu Go to Next Menu Select Menu Go to Next Menu MENU Return ENTER 2 3 6 7 9 Page 1 1 Channel List Select Menu Select Menu MENU Return FUNNY Page Select Channel ENTER Favorite List Press button to select Favorite List then press ENTER button to scan the Favorite Channel List 2 3 6 8 12 Page 1 1 FAVORITE LIST Select Menu Select Menu MENU Return FUNNY Page Select Channel ENTER ...

Страница 24: ...he Channel Number or press the number buttons to select the channel you want to set 23 TV Operation In Channel List Press button to select In Channel List then press ENTER button to Add or Delete the current channel in the channel list CHANNEL SETTING Channel Number In Channel List Channel Label _ _ _ _ _ _ _ Favorite Channel 2 Select Menu Select Menu MENU Return Add Delete ENTER Channel Label Pre...

Страница 25: ...o select Favorite Channel then press ENTER button to Add or Delete the current channel in Favorite Channel list E Channel Number In Channel List Channel Label _ _ _ _ _ _ _ Favorite Channel 2 Select Menu Select Menu MENU Return Add Delete ENTER Signal Type Press button to select Signal Type then press button to select the type you want to set There are two selections Air and Cable AUTO CHANNEL SEA...

Страница 26: ...ck Parental Control MENU Return Enter password DIGITAL O V CHIP US V Chip Canada V Chip Block UnRated Show Downloadable Rating Clear Downloadable Data Select Menu Go to Next Menu Select Menu Go to Next Menu MENU Return ENTER US V CHIP Press button to select US V CHIP then press ENTER button to adjust A Sub Menu Will appear as below USA Movie Rating TV Rating Go to Next Menu Select Menu Select Menu...

Страница 27: ...utton to select Rating then press button to lock ENTER TV Rating Press button to select TV Rating then press ENTER button to adjust A Sub Menu Will appear as below Select TV Rating TV Y TV Y7 TV G TV PG TV 14 TV MA D L S V FV Lock Unlock ENTER Press button to select Rating then press OK button to lock CANADA V CHIP Press button to select US V CHIP then press ENTER button to adjust A Sub Menu Will ...

Страница 28: ... to select Downloadable Rating then press ENTER button to set the rating If the DTV program doesn t have this rating information this option will be in gray Press button to select Clear Downloadable Data then press ENTER button to set the rating Note The above two operation only valid when playing the downloadable data stream The operations are the same as US V CHIP Change Password Old Pin New Pin...

Страница 29: ...On Off ENTER Page 1 1 Source Lock Press button to select Source Lock then press Enter button to enter the sub menu Press button to select Source then press Enter button to set the Source Lock You enter the locked source if you set the Source lock can t SETUP MENU Closed Caption SETUP Closed Caption Menu Language Clock Select Menu Go to Next Menu Select Menu Go to Next Menu MENU Return ENTER Englis...

Страница 30: ... Caption Type Service1 Digital CC Preset Default Digital CC Style On Off Select Menu MENU Return Digital Caption Type Digital CC Preset Digital CC Style Press button to select Digital Caption Type then press button to select the type Available type Service1 6 Press button to select Digital CC Preset then press button to select Default or Custom This menu is only shown when the Digital CC Preset is...

Страница 31: ...een Magenta Cyan Default Press button to select CC Background Opacity then press button to select the Opacity TEXT Color TEXT color TV Operation Available Opacity Flashing Default Solid Translucent Transparent Press button to select CC Background Color then press button to select the Color Available Color Blue Yellow Red Black White Green Magenta Cyan Default CC Background Color Menu Language Pres...

Страница 32: ...e setup time OTHERS Blue Back No Signal Power Off No Operation Power Off All Reset Audio Only Select Menu On Off MENU Return ENTER Execute Blue Back No Operation Power Off All Reset Audio Only Press button to select Blue Back then press ENTER button to select Press button to select No Operation Power Off then press button to select Press button to select All Reset then press ENTER button to execut...

Страница 33: ...VCD disc 12cm CD HDCD disc 12 cm DVD RW CD R RW discs that contain MP3 This TV incorporates DVD Supported DVD disc are shown as below and JPEG files Warning Do not insert any 8 cm disc to the DVD driver or it may get stuck MP3 JPEG JPG JPEG BMP GIF Mp3 WMA MPG DAT VOB MP4 AVI AVI JPEG BMP GIF Mp3 WMA MPEG1 MPEG2 MPEG4I AIVX3 11 DIVX5 0 DIVX5 11 VIDEO MUSIC PHOTO DVD Operation Playback of media fil...

Страница 34: ...t seup SYSTEM SETUP SYSTEM SETUP TV SYSTEM TV TYPE PASSWORD RATING DEFAULT EXIT SETUP Press DVD SETUP button to activate the DVD player OSD menu Press button to move and highlight between different sub menu Press ENTER button to enter the highlighted sub menu Press DVD SETUP button to exit the OSD menu or move the highlight to EXIT SETUP then press ENTER button to exit or move the highlight to EXI...

Страница 35: ...ting please enter default password 0000 by number buttons then press ENTER button to confirm To change password input any 4 digit number when the lock is unlocked Once the 4 digit number is entered that will be your new password For discs that are rated by MPAA this function can restrict the playback of the disc according to MPAA rating If ADULT is selected there will be no limit of all discs play...

Страница 36: ...he default subtitle language while playing back the DVD disc The default audio language is English The default subtitle language is English OSD LANGUAGE OSD LANGUAGE AUDIO LANG AUDIO LANG SUBTITLE LANG SUBTITLE LANG MENU LANG MENU LANG EXIT SETUP EXIT SETUP LANGUAGE SETUP LANGUAGE SETUP ENGLISH GERMAN SPANISH FRENCH PORTUGUESE ITALIAN ENGLISH GERMAN SPANISH FRENCH PORTUGUESE ITALIAN POWER MUTE DIS...

Страница 37: ...sound Select OFF to disable the control of dynamic range and FULL to get the lowest dynamic range least difference between the softess and loudest sound EXIT SETUP Exit DVD OSD menu TONE EXIT SETUP AUDIO SETUP MODE LEFT SPEAKER RIGHT SPEAKER STEREO STEREO L STEREO R MONO L MONO R Left channel audio Right channel audio Left channel audio Right channel audio MIX MONO L MONO R MONO L MONO R MONO DUAL...

Страница 38: ...iant VGA Terminals VGA INPUT Rear VGA D SUB 15 Pin Input x1 E EDID compliant Audio Input Mini jack for stereo 3 5Ø Headphone Audio Output Mini jack for stereo 3 5Ø Size W x h x d with base and stand mm 474 x 389 x 170 Weight 4 95Kg with stand Wall mount size 100 x100mm Wall mount kit is not included Wall mount accessory Optional accessory and not included in standard package Equipment Operation Te...

Страница 39: ...ject between the product and remote control Causing obstruction Are batteries installed with correct polarity to to Correct remote operating mode set TV VCR etc Install new batteries Is the sleep timer set Check the power control settings Power interrupted No broadcast on station tuned with auto activated This is normal the image is muted during the product startup process Please contact your serv...

Страница 40: ...Cleaning the cabinet Extended Absence 1 Here s a great way to keep the dust off your screen for a while Wet a soft cloth in a mixture of lukewarm water and a little fabric softener or dish washing detergent Wring the cloth until it s almost dry and then used it to wipe the screen 2 Make sure the excess water is off the screen and then let it air dry before you turn on your TV To remove dirt or dus...

Страница 41: ......

Отзывы: