background image


20 


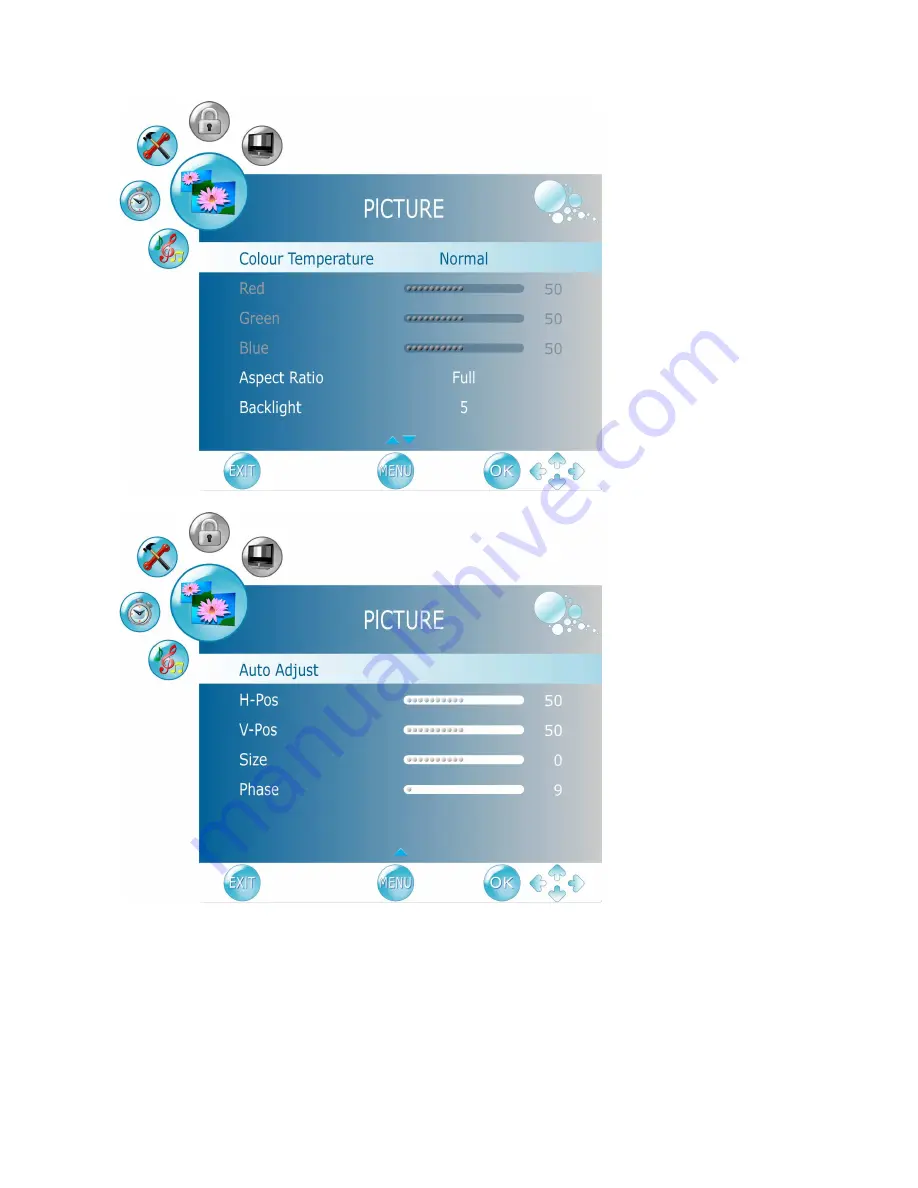
  Picture Mode: To select picture mode between Standard, Mild, User, and Dynamic. When user is 

selected, you can adjust the level of Contrast, Brightness, Colour, Tint, and Sharpness 
separately. 

  Contrast: To adjust contrast of video. 

  Brightness: To adjust luminance of video. 

  Colour: To adjust colour.   

  Tint: To adjust tint level. 

  Sharpness: To adjust picture sharpness. 

  Colour Temperature: To select Colour Temperature from Normal, Cool, User, and Warm with 

Содержание JC240AJ61ED

Страница 1: ...defeat the safety purpose of the polarized or grounding type plug A polarized plug has two blades with one wider than the other A grounding type plug has two blades and a third grounding prong The third prong is provided for your safety If the provided plug does not fit into your outlet consult an electrician for replacement of the obsolete outlet 11 Protect the power cord from being walked on or ...

Страница 2: ...n a wall or ceiling be sure to install the product according to the method recommended by the manufacturer Use only their indicated mounting hardware for safety According to WEEE regulation this monitor can t be handled as normal trash in Europe when it is out of usage Please refer to the recycle information from our website to handle it WARNING To reduce the risk of fire or electric shock do not ...

Страница 3: ...PERATION 12 Power On Off 12 Selecting input source 12 DTV Channel Installation 12 Volume Adjust 13 Channel Select 13 Sleep Time Setting 13 Sound Mode Select 13 Picture Mode Select 13 Aspect Ratio 13 TV AUDIO 13 Subtitle Select 14 DTV RADIO 14 TV DTV 15 INFO 15 Channel List 15 Favorite List 16 Electronic Program Guide EPG 16 Using the OSD Menu 17 ADVANCED OPERATION OSD MENU 18 Picture Menu 18 SOUND...

Страница 4: ......

Страница 5: ...1 ACCESSORIES Thank you for purchasing this LCD TV of high performance This LCD TV package comes with LCD TV User s Manual Remote Control Battery AAA x 2 Power Cord VGA Cable RCA A V Cable ...

Страница 6: ... Adjust Decreasing Volume Up Adjust Increasing On Screen Display Menu Key Back to Previous Menu Power On Off Switch Scroll Down Channel Down Scroll Up Channel Up Input Source Selection Enter Power LED Indicator Remote Control Receiver ...

Страница 7: ...Input D VGA 15 pin Signal Input from Computer E Audio Input for VGA or DVI F YPbPr HD Component Video Input G Audio Input for AV S Video or YPbPr components left right H S Video Input I SCART Signal Input J Composite Video Input K RF Antenna Cable TV Input L CAM Card Slot A B C D E F G H I J K L ...

Страница 8: ...4 REMOTE CONTROL ...

Страница 9: ...ric program guide 15 GREEN Function key for teletext program edit or electric program guide 16 YELLOW Function key for teletext program edit or electric program guide 17 BLUE Function key for teletext program edit or electric program guide 18 MUTE Volume mute ON OFF 19 TV AUDIO Select sound modulation in ATV Select audio language in DTV 20 ATV DTV Swap between ATV DTV Swap to the last TV source wh...

Страница 10: ...e number and then press this button The teletext page will be closed and will show the update symbol on the top left corner When the update symbol changes to the page number it means the page is complete downloaded Press this button again to open the teletext page HOLD button Press this button to remove the information from the display and stop the automatic page change which will occur if a telet...

Страница 11: ...nformation only the pages that you have previously stored in the memory Press LIST button again to exit from LIST Mode to Teletext INDEX button Press the Index button to return back to index page When you press this button in Teletext mode a CURSOR appears This cursor rectangular box contains a page number and you can select the desired page simply by using the four colours RED button Move cursor ...

Страница 12: ...enna or cable TV system without a cable connecter box 2 DTV Connect the LCD TV to an antenna for Digital TV To receive DTV programs perform Auto Tuning function see page 27 for the first time To watch subscription channels insert the CAM card into the CAM card slot Connecting to DVD Set Top Box Connect Video Audio cables from compatible devices into the back panel of LCD TV 1 With RCA A V cable RF...

Страница 13: ...3 With YPbPr cable 4 With SCART cable VCD or DVD Player YPbPr Cable not supplied Audio in Cable not supplied VCD or DVD Player S Video Cable not supplied Audio in Cable not supplied VCD or DVD Player SCART Cable not supplied ...

Страница 14: ...cting to the Headphone Connect the headphone to the headphone output terminal of the LCD TV Headphone sold separately VCD or DVD Player HDMI Cable not supplied VCD or DVD Player HDMI DVI Cable not supplied Audio Cable not supplied Headphone not supplied ...

Страница 15: ...ut of the computer to the HDMI terminal input of the LCD TV Also connect the green end of the Audio In cable from the audio output of your computer to the audio input terminal green of the LCD TV Connecting with the Power Cord Connect the power cord to the power cord connector on the back of your LCD TV and plug the other end of the power cord into a correctly grounded electrical outlet Power cabl...

Страница 16: ...or is per brand designed for ON Selecting input source Press the INPUT button on the remote control and use to select the required input source between DTV ATV SCART YPbPr VGA HDMI AV or S Video and then press OK to confirm DTV Channel Installation When you set up for DTV channels for the first time an Installation Guide screen will appear Follow the following steps to complete the installation pr...

Страница 17: ...min 60min 90min 120min 180min and 240min To cancel Sleep Time function choose Off Sound Mode Select Repeatedly press SOUND key to select the sound mode between Standard Music Movie Sports and User Picture Mode Select Repeatedly press PICTURE key to select picture mode between Standard Mild User and Dynamic Aspect Ratio Repeatedly press WIDE key to select the aspect ratio of screen You can select b...

Страница 18: ...elect subtitle language By selecting through the Subtitle key the setting can only last until the TV is switch off and will not be saved To save the subtitle setting select from the Subtitle Language in OPTION menu DTV RADIO Press the DTV RADIO key to switch between DTV and RADIO programs ...

Страница 19: ...TV Press INFO and the banner displays the program No current time program name teletext info etc When in ATV mode the displayed items may be different Note The favorite channel icon will not be displayed in the channel banner Channel List Press the LIST button and the Channel List will be displayed Press OK key on the channel you wish to watch and you can be directed to that channel immediately ...

Страница 20: ...e channels or to change time period To change date press the Yellow key first and then select date with or You can also pause at a channel and press the INFO key to view the detailed program information or press OK to switch to that program directly You can also add a reminder on a program by pressing the Blue button When the reminder event is about to start a window will appear to remind you for ...

Страница 21: ...following Press MENU to display OSD menu Use to select OSD menu page Press to enter the OSD menu page Use to select the optional item you want to adjust Press to adjust levels or select the items If the item is marked with press to display the sub menu or enable the function Press MENU again to exit current OSD page Use RED GREEN YELLOW BLUE button to perform special functions ...

Страница 22: ... settings for your LCD TV Press the MENU button to display the OSD Menu and use to select the desired OSD menu Picture Menu To adjust the picture quality In ATV DTV AV S Video SCART YPbPr HDMI source Note The LOCK and CHANNEL menu icons are only enabled in ATV and DTV source ...

Страница 23: ...19 Note The LOCK and CHANNEL menu icons are only enabled in ATV and DTV source In VGA source ...

Страница 24: ...he level of Contrast Brightness Colour Tint and Sharpness separately Contrast To adjust contrast of video Brightness To adjust luminance of video Colour To adjust colour Tint To adjust tint level Sharpness To adjust picture sharpness Colour Temperature To select Colour Temperature from Normal Cool User and Warm with ...

Страница 25: ...ntal position vertical position fine tune and H Size H Pos To adjust the horizontal position of the picture V Pos To adjust the vertical position of the picture Size To adjust the size of the picture Phase To adjust delay time of phase in order to reduce the noise of picture SOUND Menu To set the audio quality and status Note The LOCK and CHANNEL menu icons are only enabled in ATV and DTV source S...

Страница 26: ...s to enter sub menu Press to select Repeat Hour Minute and press to set the time you want the unit to be turned off On Time To set a regular turn on time Press to enter sub menu Press to select Activate Hour Minute Volume Mode and press to set the time you want the unit to be turned on Sleep Timer Off 10min 20min 30min 60min 90min 120min 180min 240min Auto Sleep If enabled the TV will automaticall...

Страница 27: ...23 OPTION Menu To adjust OSD setting Note When in AV S Video SCART YPbPr VGA HDMI source some of the optional items will be disabled Also the LOCK and CHANNEL menu icons will be disabled ...

Страница 28: ... source OSD Time Out To automatically shut off the OSD after a preset period of time passed Use to preset the time from 10 to 60 seconds To keep the OSD on select OFF Canal To enable SCART connector to support Canal Set Top Box available in French For normal SCART function please select OFF Note The Canal function is available only when the input source is SCART HDMI Audio To select Auto PC In HDM...

Страница 29: ...e 4 digit number password The factory default password is 0000 Lock System If enabled a password is required for access to the Auto Tuning DTV Manual Tuning ATV Manual Tuning and Program Edit in Channel menu Set Password To change the password press Enter the new password and confirm by entering it again ...

Страница 30: ...you want to block and press Green key on it To watch the blocked program the password is required Parental Guidance To set the rating level of the programs If the rating of the displayed program is higher than the rating set in the Parental Guidance the program will be locked ...

Страница 31: ...ource Select Selects the Auto Tuning range Auto Tuning To automatically preset the channels into TV s memory Select the country of your area with select Start and then press OK to perform Auto Tuning Kindly suggest you auto scan all the channels before watching your TV for the first time ...

Страница 32: ...me DTV Manual Tuning Press to select the channel then press OK to start scan ATV Manual Tuning Press the to select the items and press the button to adjust See details in the following sub options Storage to Press to select the channel number you want to save to System Press to select the TV sound system ...

Страница 33: ... The channel you deleted will not be shown when browsing through the channels with PROG keys To reappear them use the Auto Tuning function Rename Press to select a channel and then press the Green key Use to edit the name When completed press Green key again This function is only enabled for ATV Move Press to select a channel and then press the Yellow key Select the other channel you want to excha...

Страница 34: ...ll vary according to the services provider The most common seen CI Cards that have been tested so far include VIACCESS PCMCIA Magic Module Digital Conax Irdeto Access ZetaCAM Irdeto smit VIACCESS LG FT3 3 Boxer VIACCESS NoVEL TONGFANG TopUp TV CANAL CANALSAT Irdeto Access EpsilonCard all of which can be used in this TV Consultations Press OK to check subscription and card information ...

Страница 35: ...ult 4 digit pincode then press OK Pincode will vary according to services provider Maturity rating Enter the maturity rating you want then press OK Bolts Select Maturity rating or Consultations then press OK to switch between Free and Locked ...

Страница 36: ...32 Changing PIN code To change the pincode for entering Authorization menu Enter your new pincode and press OK then repeat again to confirm Module information Press OK to display module information ...

Страница 37: ...0 5 H x 11 5 V Operating conditions Temperature 32 F to 104 F 0 C to 40 C Humidity 20 to 65 no condensation Altitude To 7 000 feet 2 000m Storage condition Temperature 4 F to 140 F 15 C to 60 C Humidity 20 to 90 no condensation Altitude To 40 000 feet 12 000m Dimensions Physical 566 7mm W x 442 7mm H x 216 0mm D 22 3 W x 17 4 H x 8 5 D Weight Net 6 9 kg 15 2 Ib Regulations CE CB Power saving modes...

Страница 38: ...d be repaired by a qualified technician only Do not remove the LCD TV cabinet There is high voltage parts inside that may cause electric shock to human bodies even when the power cord is disconnected Stop using the LCD TV if the cabinet is damaged Have it checked by a service technician Put your LCD TV only in a clean dry environment Unplug the LCD TV immediately if it gets wet and consult your se...

Страница 39: ...may cause electric shock to human bodies Never try to repair your LCD TV yourself Always call your authorized service center or a qualified technician to fix it TROUBLESHOOTING No Power Make sure A C power cord is securely connected to the power supply is firmly connected to the TV Plug another electrical device into the power outlet to verify the outlet is working Power on but no screen image Mak...

Отзывы: