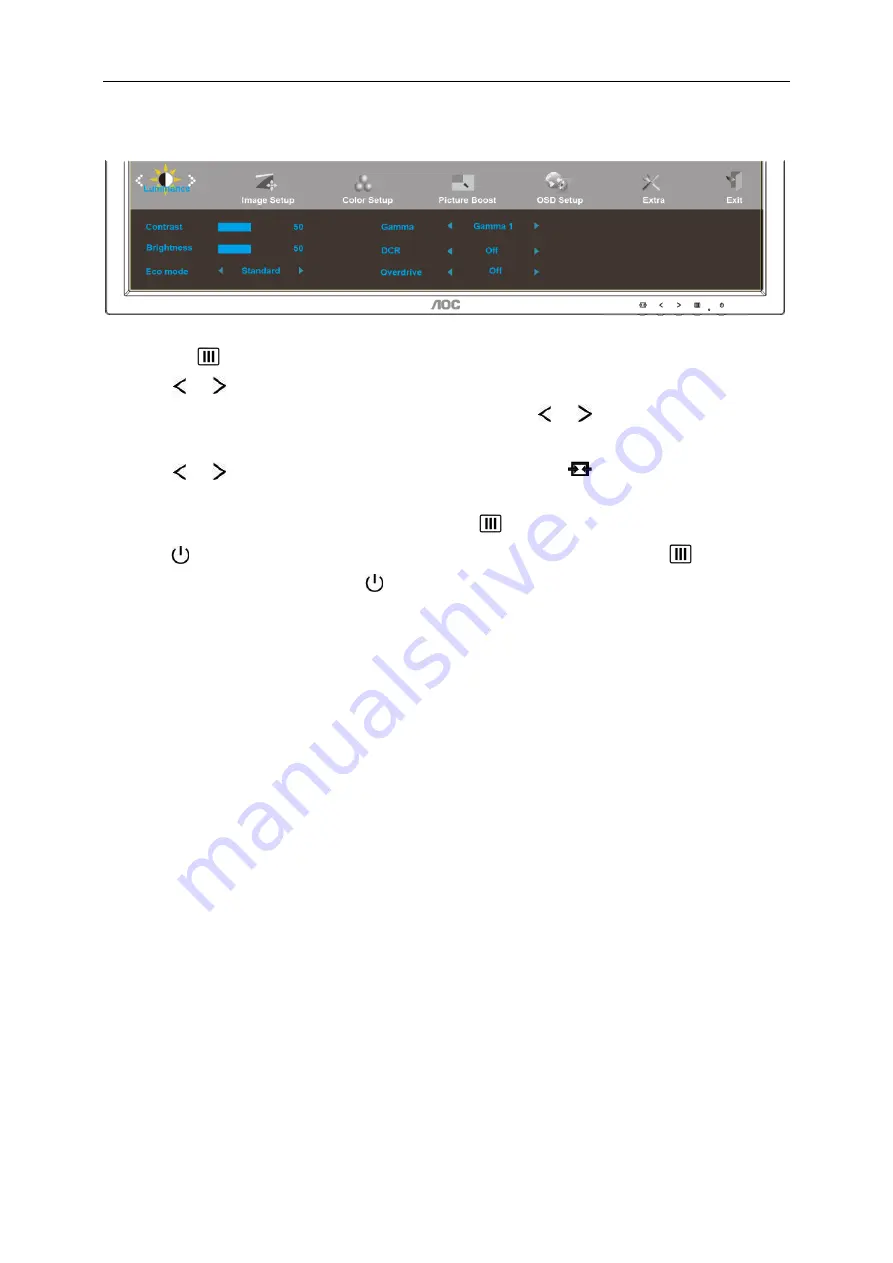
AOC I2475PRQU Скачать руководство пользователя страница 21


21 

OSD Setting 

Basic and simple instruction on the control keys. 


1.  Press the


MENU-button

 to activate the OSD window.   

2.  Press


or 


to navigate through the functions. Once the desired function is highlighted,   

press the 

MENU-button 

to activate it. If there is a sub-menu, press


or 


to navigate through the 

sub-menu functions. 

3.  Press


or 


to change the settings of the selected function. Press 


AUTO

 to exit. If you want to 

adjust any other function, repeat steps 2-3.   

4.  OSD Lock Function: To lock the OSD, press and hold the


MENU-button

 while the monitor is off and then 

press 


power button

 to turn the monitor on. To un-lock the OSD - press and hold the


MENU-button


while the monitor is off and then press 


power button

 to turn the monitor on. 


Notes:


1.  If the product has only one signal input, the item of "Input Select" is disabled. 

2.  If the product screen size is 4:3 or input signal resolution is native resolution, the item of "Image Ratio" is 

disabled. 

3.  One of Clear vision, DCR, Color Boost, and Picture Boost functions is activated; the other three functions are 

turned off accordingly. 

Содержание I2475PRQU

Страница 1: ...1 LCD Monitor User Manual I2475PRQU LED backlight www aoc com 2015 AOC All Rights Reserved...

Страница 2: ...SD Setting 21 Luminance 22 Image Setup 23 Color Setup 24 Picture Boost 25 OSD Setup 26 Extra 27 Exit 28 LED Indicator 29 Driver 30 Monitor Driver 30 Windows 10 30 Windows 8 34 Windows 7 38 i Menu 42 e...

Страница 3: ...ervice 55 Warranty Statement for Europe 55 Warranty Statement for Middle East and Africa MEA 57 AOC International Europe B V 59 Warranty Statement for North South America excluding Brazil 60 EASE PROG...

Страница 4: ...used as follows NOTE A NOTE indicates important information that helps you make better use of your computer system CAUTION A CAUTION indicates either potential damage to hardware or loss of data and...

Страница 5: ...ety feature If your outlet does not accommodate the three wire plug have an electrician install the correct outlet or use an adapter to ground the appliance safely Do not defeat the safety purpose of...

Страница 6: ...n should be moved with care Never push any object into the slot on the monitor cabinet It could damage circuit parts causing a fire or electric shock Never spill liquids on the monitor Do not place th...

Страница 7: ...t the stain instead of strong detergent which will cauterize the product cabinet When cleaning make sure no detergent is leaked into the product The cleaning cloth should not be too rough as it will s...

Страница 8: ...are not blocked by a table or curtain Do not engage the LCD monitor in severe vibration or high impact conditions during operation Do not knock or drop the monitor during operation or transportation...

Страница 9: ...ables Audio DVI D Analog DP HDMI and USB cables will be provided for all countries and regions Please check with the local dealer or AOC branch office for confirmation Audio DVI D Analog Cable DP HDMI...

Страница 10: ...10 Setup Base Please setup or remove the base following the steps as below Please place the monitor on a soft and flat surface to prevent the scratch Setup Remove...

Страница 11: ...he monitor and then adjust the monitor s angle to your own preference Hold the stand so you will not topple the monitor when you change the monitor s angle 1 You are able to adjust the monitor s angle...

Страница 12: ...er end to the computer s D Sub port 3 Optional Requires a video card with DVI port Connect one end of the DVI cable to the back of the monitor and connect the other end to the computer s DVI port 4 Op...

Страница 13: ...13 Adjusting Setting Optimal Resolution Windows 10 For Windows 10 Right click START Click CONTROL PANEL Click DISPLAY...

Страница 14: ...14 Click on the Change display settings button Set the resolution SLIDE BAR to Optimal preset resolution...

Страница 15: ...15 Windows 8 For Windows 8 Right click and click All apps at the bottom right of the screen Set the View by to Category Click Appearance and Personalization...

Страница 16: ...16 Click DISPLAY Set the resolution SLIDE BAR to Optimal preset resolution...

Страница 17: ...17 Windows 7 For Windows 7 Click START Click CONTROL PANEL Click Appearance Click DISPLAY...

Страница 18: ...18 Click on the Change display settings button Set the resolution SLIDE BAR to Optimal preset resolution...

Страница 19: ...otkey continuously to change 4 3 or wide image ratio If the product screen size is 4 3 or input signal resolution is wide format the hot key is disable to adjust Auto Exit Source hot key When there is...

Страница 20: ...for 5 seconds to activate the Clear Vision Demo and a message of Clear Vision Demo on will be display on the screen for a duration of 5 seconds Press Menu or Exit button the message will disappear Pre...

Страница 21: ...ion repeat steps 2 3 4 OSD Lock Function To lock the OSD press and hold the MENU button while the monitor is off and then press power button to turn the monitor on To un lock the OSD press and hold th...

Страница 22: ...ast from Digital register Brightness 0 100 Backlight Adjustment Eco mode Standard Standard Mode Text Text Mode Internet Internet Mode Game Game Mode Movie Movie Mode Sports Sports Mode Gamma Gamma1 Ad...

Страница 23: ...4 Press or to adjust 5 Press AUTO to exit Clock 0 100 Adjust picture Clock to reduce Vertical Line noise Phase 0 100 Adjust Picture Phase to reduce Horizontal Line noise Sharpness 0 100 Adjust picture...

Страница 24: ...olor Temperature from EEPROM sRGB Recall SRGB Color Temperature from EEPROM User Red Red gain from Digital register Green Green gain from Digital register Blue Blue gain from Digital register DCB Mode...

Страница 25: ...Enable Disable Bright Frame Frame Size 14 100 Adjust the Size of the Frame Brightness 0 100 Brightness Adjustment for Enhance Area Contrast 0 100 Contrast Adjustment for Enhance Area H position 0 100...

Страница 26: ...s or to adjust 5 Press AUTO to exit Language Select the OSD language Timeout 5 120 Adjust the OSD timeout H Position 0 100 Adjust the horizontal position of OSD V Position 0 100 Adjust the vertical po...

Страница 27: ...ct input signal D SUB Select D SUB signal source as input DVI Select DVI signal source as input HDMI Select HDMI signal Source as input DP Select DP signal Source as input Auto Config Yes No Auto adju...

Страница 28: ...28 Exit 1 Press MENU Menu to display menu 2 Press or to select Exit and press MENU to enter 3 Press AUTO to exit...

Страница 29: ...29 LED Indicator Status LED Color Full Power Mode Green Power Saving Orange...

Страница 30: ...30 Driver Monitor Driver Windows 10 Start Windows 10 Right click START Click Control Panel Click on the Display icon...

Страница 31: ...31 Click on the Change display settings button Click the Advanced Settings button...

Страница 32: ...or tab and then click the Properties button Click the Driver tab Open the Update Driver Software Generic PnP Monitor window by clicking on Update Driver and then click the Browse my computer for drive...

Страница 33: ...he drive letter designator for the CD ROM drive Select the xxx inf file and click the Open button Click the OK button Select your monitor model and click the Next button The files will be copied from...

Страница 34: ...34 Windows 8 Start Windows 8 Right click and click All apps at the bottom right of the screen Click on the Control Panel icon Set the View by to Large icons or Small icons Click on the Display icon...

Страница 35: ...35 Click on the Change display settings button Click the Advanced Settings button...

Страница 36: ...or tab and then click the Properties button Click the Driver tab Open the Update Driver Software Generic PnP Monitor window by clicking on Update Driver and then click the Browse my computer for drive...

Страница 37: ...he drive letter designator for the CD ROM drive Select the xxx inf file and click the Open button Click the OK button Select your monitor model and click the Next button The files will be copied from...

Страница 38: ...38 Windows 7 Start Windows 7 Click on the Start button and then click on Control Panel Click on the Display icon Click on the Change display settings button...

Страница 39: ...39 Click the Advanced Settings button Click the Monitor tab and then click the Properties button Click the Driver tab...

Страница 40: ...en click the Browse my computer for driver software button Select Let me pick from a list of device drivers on my computer Click the Have Disk button Click on the Browse button and navigate to the fol...

Страница 41: ...lect your monitor model and click the Next button The files will be copied from the CD to your hard disk drive Close all open windows and remove the CD Restart the system The system will automatically...

Страница 42: ...e to i Menu software by AOC i Menu makes it easy to adjust your monitor display setting by using on screen menus instead of the OSD button on the monitor To complete installation please follow the ins...

Страница 43: ...l wizard to complete software installation Under each of the four PC statuses you may choose the desired time in minutes from the pull down menu for your monitor to automatically shutdown The example...

Страница 44: ...ool it splits the desktop into different panels and each panel displays a different window You only need to drag the window to a corresponding panel when you want to access it It supports multiple mon...

Страница 45: ...er to the Setting the Optimal Resolution If the initial screen the login screen does not appear contact the Service Center or your dealer Can you see Input Not Supported on the screen You can see this...

Страница 46: ...he LED should either turn ON or OFF after hitting the CAPS LOCK key Missing one of the primary colors RED GREEN or BLUE Inspect the monitor s video cable and make sure that no pin is damaged Make sure...

Страница 47: ...C2B CI Input Connector VGA DVI D HDMI DP USB2 0 USB3 0 Input Video Signal Analog 0 7Vp p standard 75 OHM Positive TMDS Speaker 2 W x 2 Power Source 100 240V 50 60Hz Power Consumption Typical Brightnes...

Страница 48: ...0Hz 48 363 60 004 XGA 1024x768 70Hz 56 476 70 069 XGA 1024x768 75Hz 60 023 75 029 SXGA 1280x1024 60Hz 63 981 60 02 SXGA 1280x1024 75Hz 79 976 75 025 WXGA 1440x900 60Hz 55 935 59 887 WSXGA 1680x1050 60...

Страница 49: ...N C 4 N C 12 DDC Serial data 5 Detect Cable 13 H sync 6 GND R 14 V sync 7 GND G 15 DDC Serial clock 8 GND B 24 Pin Color Display Signal Cable Pin No Signal Name Pin No Signal Name 1 RX2 13 N C 2 RX2 1...

Страница 50: ...S Data 1 16 SDA 7 TMDS Data 0 17 DDC CEC Ground 8 TMDS Data 0 Shield 18 5V Power 9 TMDS Data 0 19 Hot Plug Detect 10 TMDS Clock 20 Pin Color Display Signal Cable Pin No Signal Name Pin No Signal Name...

Страница 51: ...SA DDC STANDARD It allows the monitor to inform the host system of its identity and depending on the level of DDC used communicate additional information about its display capabilities The DDC2B is a...

Страница 52: ...e determined by turning the equipment off and on the user is encouraged to try to correct the interference by one or more of the following measures Reorient or relocate the receiving antenna Increase...

Страница 53: ...pose of your waste equipment by handing it over to a designated collection point for the recycling of waste electrical and electronic equipment The separate collection and recycling of your waste equi...

Страница 54: ...efforts to reduce the environmental impact of its products AOC believes in protecting the environment With a key concern for the conservation of natural resources as well as land ll protection AOC an...

Страница 55: ...ber on the address label Put the RMA number on the shipping carton AOC International Europe B V will pay the return shipping charges within one of the countries specified within this warranty statemen...

Страница 56: ...AL EUROPE B V OBLIGATIONS AND YOUR REMEDIES HEREUNDER ARE SOLELY AND EXCULSIVELY AS STATED HERE AOC INTERNATIONAL EUROPE B V LIABILITY WHETHER BASED ON CONTRACT TORT WARRANTY STRICT LIABILITY OR OTHER...

Страница 57: ...anty as per the product ID serial number and for such exceptional cases Original Invoice Proof Of Purchase Receipt is mandatory If the product appears to be defective please contact your AOC authorize...

Страница 58: ...CT INCLUDING THE WARRANTIES OF MERCHANTABILITY AND FITNESS FOR A PARTICULAR PURPOSE ARE LIMITED IN DURATION TO A PERIOD OF ONE 1 to THREE 3 YEARS FOR PARTS AND LABOR FROM THE ORIGINAL DATE OF CONSUMER...

Страница 59: ...acceptable defect levels for each type In order to qualify for repair or replacement under warranty the number of pixel defects on a TFT monitor panel must exceed these acceptable levels Pixels and S...

Страница 60: ...mage during shipment Pay all shipping charges EPI is not responsible for damage to inbound product that was not properly packaged EPI will pay the return shipment charges within one of the countries s...

Страница 61: ...GHTS YOU MAY HAVE OTHER RIGHTS WHICH MAY VARY FROM STATE TO STATE In the United States of America this limited warranty is only valid for Products purchased in the Continental United States Alaska and...

Страница 62: ...a UPS Call Tag to pick up the defective unit Step 6 Please review the following chart to see your EASE program qualifications WARRANTY PERIOD COVERAGE AT NO CHARGE CUSTOMER CHARGES Within the first t...

Страница 63: ...63 TCO DOCUMENT FOR TCO CERTIFIED MODELS...

Отзывы: