AOC G4309VX/D Скачать руководство пользователя страница 29

27

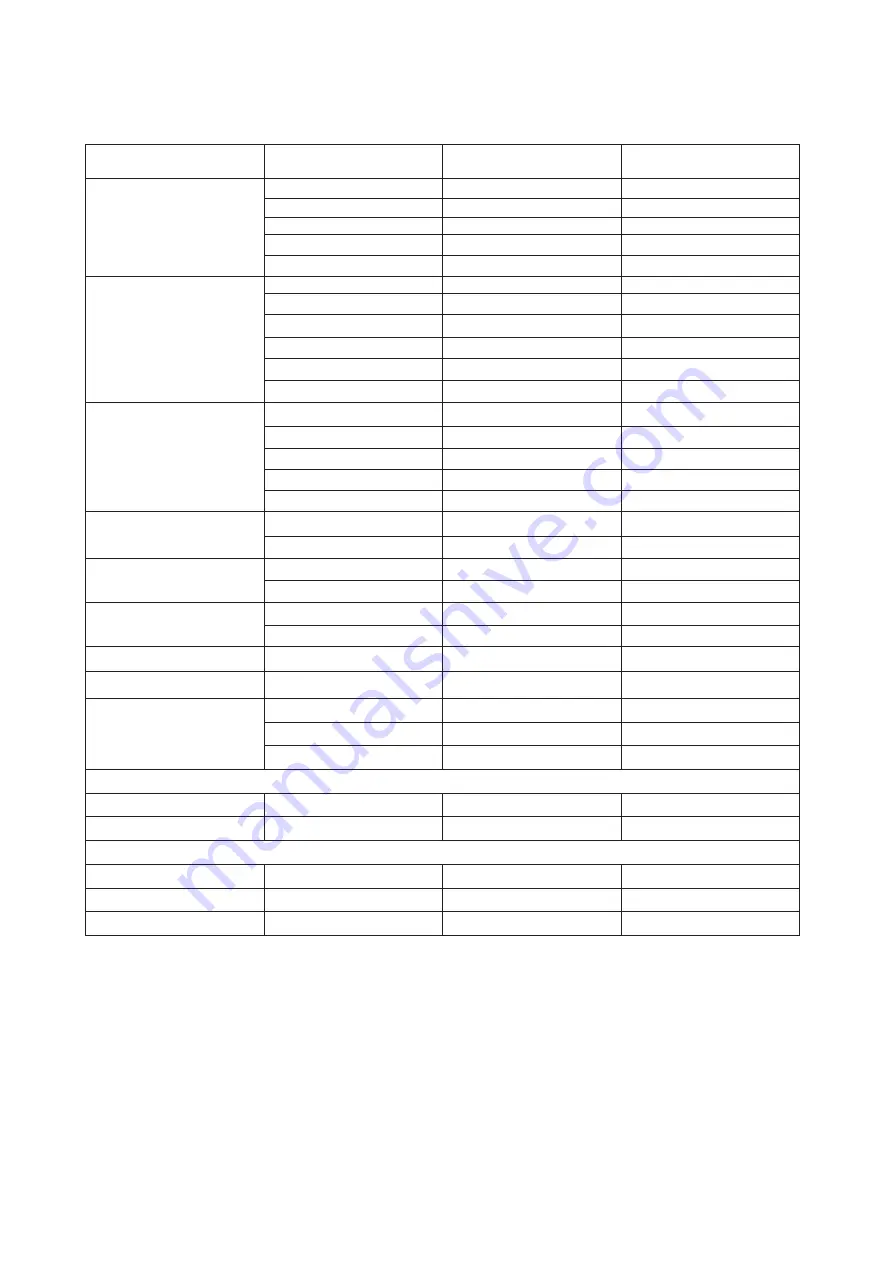
Preset Display Modes

STANDARD

RESOLUTION

HORIZONTAL 

FREQUENCY(kHz)

VERTICAL 

FREQUENCY(Hz)

VGA

640x480@60Hz

31.469

59.94

640x480@72Hz

37.861

72.809

640x480@75Hz

37.5

75

640x480@100Hz

50.313

99.826

640x480@120Hz

60.938

119.72

SVGA

800x600@56Hz

35.156

56.25

800x600@60Hz

37.879

60.317

800x600@72Hz

48.077

72.188

800x600@75Hz

46.875

75

800x600@100Hz

62.76

99.778

800x600@120Hz

76.302

119.972

XGA

1024x768@60Hz

48.363

60.004

1024x768@70Hz

56.476

70.069

1024x768@75Hz

60.023

75.029

1024x768@100Hz

80.448

99.811

1024x768@120Hz

97.551

119.989

SXGA

1280x1024@60Hz

63.981

60.02

1280x1024@75Hz

79.976

75.025

WXGA+

1440x900@60Hz

55.935

59.887

1440x900@60Hz

55.469

59.901

WSXGA

1680x1050@60Hz

65.29

59.954

1680x1050@60Hz

64.674

59.883

FHD

1920x1080@60Hz

67.5

60

QHD

2560x1440@120HZ

182.997

119.998

UHD

3840x2160@60HZ

135

60

3840x2160@120HZ

182.997

120.005

3840x2160@144HZ

222.056

143.989

IBM MODES

DOS

640x350@70Hz

31.469

70.087

DOS

720x400@70Hz

31.469

70.087

MAC MODES

VGA

640x480@67Hz

35

66.667

SVGA

832x624@75Hz

49.725

74.551

XGA

1024x768@75Hz

60.241

74.927

Содержание G4309VX/D

Страница 1: ...1 www aoc com 2021 AOC All Rights Reserved TM LCD Monitor User Manual G4309VX D...

Страница 2: ...ntagearm bevestigen 10 Adaptive Sync function 11 HDR 12 Adjusting 13 Hotkeys 13 Description of the remote control buttons 14 OSD Setting 15 Luminance 16 Color Setup 17 Picture Boost 18 OSD Setup 19 PI...

Страница 3: ...used as follows NOTE A NOTE indicates important information that helps you make better use of your computer system CAUTION A CAUTION indicates either potential damage to hardware or loss of data and...

Страница 4: ...ctrician install the correct outlet or use an adapter to ground the appliance safely Do not defeat the safety purpose of the grounded plug Unplug the unit during a lightning storm or when it will not...

Страница 5: ...ce the front of the product on the floor If you mount the monitor on a wall or shelf use a mounting kit approved by the manufacturer and follow the kit instructions Leave some space around the monitor...

Страница 6: ...t the stain instead of strong detergent which will cauterize the product cabinet When cleaning make sure no detergent is leaked into the product The cleaning cloth should not be too rough as it will s...

Страница 7: ...act conditions during operation Do not knock or drop the monitor during operation or transportation IThe power cords shall be safety approved For Germany it shall be H03VV F 3G 0 75 mm2 or better For...

Страница 8: ...te control Batteries Quick Start Warranty Card Power Cable HDMI Cable USB Cable DP Cable Base Not all signal cables will be provided for all countries and regions Please check with the local dealer or...

Страница 9: ...7 Setup Stand Base Please setup or remove the base following the steps as below Setup Remove...

Страница 10: ...hen you change the monitor s angle You are able to adjust the monitor as below 5 10 NOTE Do not touch the LCD screen when you change the angle It may cause damage or break the LCD screen WARNING 1 To...

Страница 11: ...er cord to the back of the display firmly 2 Turn off your computer and unplug its power cable 3 Connect the display signal cable to the video connector on the back of your computer 4 Plug the power co...

Страница 12: ...4 Steek 4 schroeven in de gaten en maakt ze vast 5 Sluit de kabels opnieuw aan Raadpleeg de gebruikershandleiding die bij de optionele wandmontagearm is geleverd voor instructies over de bevestiging a...

Страница 13: ...ury series RadeonTM R9 R7 200 series excluding R9 270 X R9 280 X Processors AMD RyzenTM 7 2700U AMD RyzenTM 5 2500U AMD RyzenTM 5 2400G AMD RyzenTM 3 2300U AMD RyzenTM 3 2200G AMD PRO A12 9800 AMD PRO...

Страница 14: ...ion on the compatibility of your device and content Please select OFF for the HDR function when you have no need for automatical activation function Note 1 Only the HDMI interface is available and the...

Страница 15: ...t key function Dint Point Downl When there is no OSD press Dial Point button to show hide Dial Point Image ratio Right When the OSD menu is disabled press the right key to switch the image ratio You c...

Страница 16: ...vel 6 Confirm the OSD adjustment Access the OSD menu 7 Access the OSD menu Confirm the OSD adjustment 8 Adjust the OSD options down 9 Open gaming mode 10 Exit OSD menu 11 Turn down the brightness 12 T...

Страница 17: ...ss Left or Right to navigate through the sub menu functions Once the desired function is highlighted press MENU button to activate it 3 Press Left or Right to change the settings of the selected funct...

Страница 18: ...ode Uniformity Uniformity Mode Gamma Gamma1 Adjust to Gamma 1 Gamma2 Adjust to Gamma 2 Gamma3 Adjust to Gamma 3 DCR Off Disable dynamic contrast ratio On Enable dynamic contrast ratio HDR O Set the HD...

Страница 19: ...l Enhance Enable Full Enhance Mode Nature Skin Enable Nature Skin Mode Green Field Enable Green Field Mode Sky blue Enable Sky blue Mode Auto Detect Enable AutoDetect Mode Off Disable Off Mode DCB Dem...

Страница 20: ...Bright Frame Frame Size 14 100 Adjust Frame Size Brightness 0 100 Adjust Frame Brightness Contrast 0 100 Adjust Frame Contrast H position 0 100 Adjust Frame horizontal Position V position 0 100 Adjust...

Страница 21: ...Timeout 5 120 Adjust the OSD Timeout DP Capability 1 1 1 2 1 4 If the DP video content supports DP1 2 1 4 please select DP1 2 1 4for DP Capability otherwise please select DP1 1 H Position 0 100 Adjust...

Страница 22: ...he screen location Right down Left up Left down Audio On PIP Audio Disable or Enable Audio Setup O Main Audio Swap On Swap Swap the screen source O non action Note When PBP is turned on HDR Mode and H...

Страница 23: ...il clearly adjusting from 50 to100 for clear picture 2 If picture is too white to be saw the detail clearly adjusting from 50 to0 for clear picture Low Input Lag On Off Closing the frame buffer reduce...

Страница 24: ...y 60Hz Extra Game Setting PIP Setting PIP Input Select Auto HDMI1 HDMI2 DP1 DP2 Select Input Signal Source Off timer 0 24hrs Select DC off time Image Ratio Wide 4 3 1 1 17 4 3 19 4 3 19 5 4 19 W 16 10...

Страница 25: ...23 Exit Picture Boost OSD Setup Luminance Color Setup Exit Extra Game Setting PIP Setting PIP Exit Exit the main OSD...

Страница 26: ...24 LED Indicator Status LED Color Full Power Mode White Active Standby mode Orange...

Страница 27: ...able or switch box We recommend plugging the monitor directly to the video card output connector on the back Picture Bounces Flickers Or Wave Pattern Appears In The Picture Move electrical devices tha...

Страница 28: ...t 125W Max brightness 100 contrast 100 315W Standby mode 0 5W Physical Characteristics Connector Type HDMI 2 DPx2 USB 4 USB PC USB upstream Earphone Signal Cable Type Detachable Environmental Temperat...

Страница 29: ...4x768 70Hz 56 476 70 069 1024x768 75Hz 60 023 75 029 1024x768 100Hz 80 448 99 811 1024x768 120Hz 97 551 119 989 SXGA 1280x1024 60Hz 63 981 60 02 1280x1024 75Hz 79 976 75 025 WXGA 1440x900 60Hz 55 935...

Страница 30: ...t 4 TMDS Data 1 12 TMDS Clock 5 TMDS Data 1Shield 13 CEC 6 TMDS Data 1 14 Reserved N C on device 7 TMDS Data 0 15 SCL 8 TMDS Data 0 Shield 16 SDA 20 Pin Color Display Signal Cable Pin No Signal Name P...

Страница 31: ...SA DDC STANDARD It allows the monitor to inform the host system of its identity and depending on the level of DDC used communicate additional information about its display capabilities The DDC2B is a...

Отзывы: