AOC e2360Sd Скачать руководство пользователя страница 37


37 

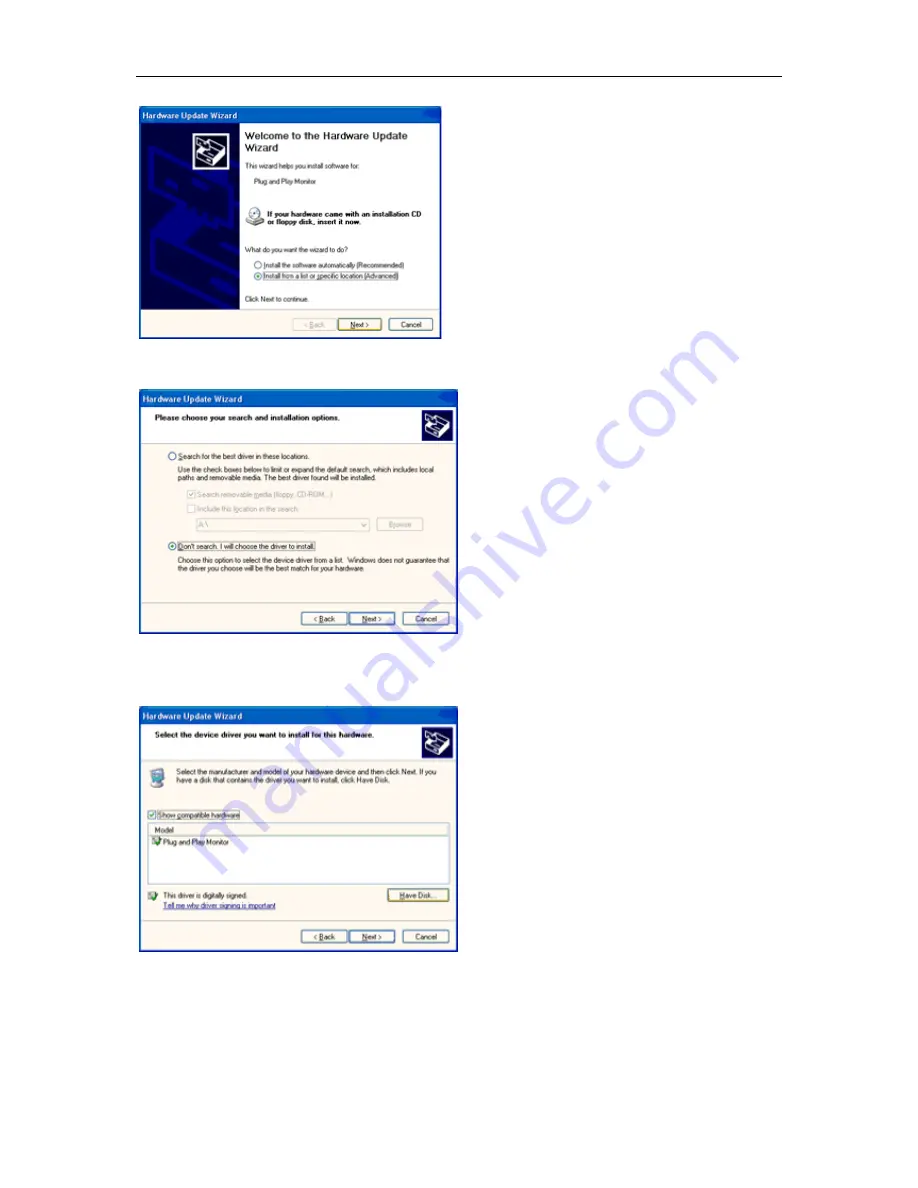
8. Select the 'Install from a list or specific location [advanced]' radio button and then click on the 'Next' button.   


9. Select the 'Don't Search. I will choose the driver to install' radio button. Then click on the 'Next' button.   


10. Click on the 'Have disk...' button, then click on the 'Browse...' button and then select the appropriate drive F: 
(CD-ROM Drive).   


11. Click on the 'Open' button, then click the 'OK' button.   
12. Select your monitor model and click on the 'Next' button. 
- If you can see the 'has not passed Windows® Logo testing to verify its compatibility with Windows® XP' message, 
please click on the 'Continue Anyway' button.   
13. Click on the 'Finish' button then the 'Close' button.   
14. Click on the 'OK' button and then the 'OK' button again to close the Display Properties dialog box. 

Содержание e2360Sd

Страница 1: ...3 LED Backlight...

Страница 2: ...Image Setup 21 Color Setup 23 Picture Boost 25 OSD Setup 27 Extra 29 Exit 31 LED Indicator 32 Driver 33 Monitor Driver 33 Windows Vista 33 Windows XP 35 Windows 2000 38 Windows ME 38 i Menu 39 e Save...

Страница 3: ...used as follows NOTE A NOTE indicates important information that helps you make better use of your computer system CAUTION A CAUTION indicates either potential damage to hardware or loss of data and...

Страница 4: ...the appliance safely Do not defeat the safety purpose of the grounded plug Unplug the unit during a lightning storm or when it will not be used for long periods of time This will protect the monitor...

Страница 5: ...n should be moved with care Never push any object into the slot on the monitor cabinet It could damage circuit parts causing a fire or electric shock Never spill liquids on the monitor Do not place th...

Страница 6: ...t the stain instead of strong detergent which will cauterize the product cabinet When cleaning make sure no detergent is leaked into the product The cleaning cloth should not be too rough as it will s...

Страница 7: ...plug IMMEDIATELY and contact a Service Center Make sure that the ventilating openings are not blocked by a table or curtain Do not engage the LCD monitor in severe vibration or high impact conditions...

Страница 8: ...onitor CD Manual Monitor Base Power Cable Analog Cable DVI Cable Not all signal cables Analog DVI cables will be provided for all countries and regions Please check with the local dealer or AOC branch...

Страница 9: ...9 Setup Stand Base Please setup or remove the base following the steps as below Setup Remove...

Страница 10: ...or then adjust the monitor s angle to your own preference Hold the stand so you will not topple the monitor when you change the monitor s angle You are able to adjust the monitor s angle from 5 to 20...

Страница 11: ...ore connecting 1 Connect the power cable to the AC port on the back of the monitor 2 Connect one end of the 15 pin DVI D Sub cable to the back of the monitor and connect the other end to the computer...

Страница 12: ...ble the wall mounting arm 3 Place the wall mounting arm onto the back of the monitor Line up the holes of the arm with the holes in the back of the monitor 4 Insert the 4 screws into the holes and tig...

Страница 13: ...13 Adjusting Setting Optimal Resolution Windows Vista For Windows Vista 1 Click START 2 Click CONTROL PANEL 3 Click Appearance and Personalization 4 Click Personalization...

Страница 14: ...14 5 Click Display Settings 6 Set the resolution SLIDE BAR to 1920 by 1080...

Страница 15: ...15 Windows XP For Windows XP 1 Click START 2 Click SETTINGS 3 Click CONTROL PANEL 4 Click Appearance and Themes 5 Double click DISPLAY...

Страница 16: ...Set the resolution SLIDE BAR to 1920 by 1080 Windows ME 2000 For Windows ME 2000 1 Click START 2 Click SETTINGS 3 Click CONTROL PANEL 4 Double click DISPLAY 5 Click SETTINGS 6 Set the resolution SLID...

Страница 17: ...t be available in all models 4 3 or Wide When there is no OSD press continuously to change 4 3 or wide image ratio If the product screen size is 4 3 or input signal resolution is wide format the hot k...

Страница 18: ...want to adjust any other function repeat steps 2 3 4 OSD Lock Function To lock the OSD press and hold the MENU button while the monitor is off and then press power button to turn the monitor on To un...

Страница 19: ...19 Luminance 1 Press Menu to display menu 2 Press or to select Luminance and press to enter 3 Press or to select submenu and press to enter...

Страница 20: ...ast from Digital register Eco mode Standard Standard Mode Text Text Mode Internet Internet Mode Game Game Mode Movie Movie Mode Sports Sports Mode Gamma Gamma1 Adjust to Gamma1 Gamma2 Adjust to Gamma...

Страница 21: ...21 Image Setup 1 Press Menu to display menu 2 Press or to select Image Setup and press to enter 3 Press or to select submenu and press to enter...

Страница 22: ...Clock to reduce Vertical Line noise Phase 0 100 Adjust Picture Phase to reduce Horizontal Line noise Sharpness 0 100 Adjust picture sharpness H Position 0 100 Adjust the horizontal position of the pi...

Страница 23: ...23 Color Setup 1 Press Menu to display menu 2 Press or to select Color Setup and press to enter 3 Press or to select submenu and press to enter...

Страница 24: ...M User Red Red Gain from Digital register Green Green Gain Digital register Blue Blue Gain from Digital register DCB Mode Full Enhance on or off Disable or Enable Full Enhance Mode Nature Skin on or o...

Страница 25: ...25 Picture Boost 1 Press Menu to display menu 2 Press or to select Picture Boost and press to enter 3 Press or to select submenu and press to enter...

Страница 26: ...100 Adjust Frame Size Brightness 0 100 Adjust Frame Brightness Contrast 0 100 Adjust Frame Contrast H position 0 100 Adjust Frame horizontal Position V position 0 100 Adjust Frame vertical Position B...

Страница 27: ...27 OSD Setup 1 Press Menu to display menu 2 Press or to select OSD Setup and press to enter 3 Press or to select submenu and press to enter...

Страница 28: ...exit H Position 0 100 Adjust the horizontal position of OSD V Position 0 100 Adjust the vertical position of OSD Timeout 5 120 Adjust the OSD Timeout Transparence 0 100 Adjust the transparence of OSD...

Страница 29: ...29 Extra 1 Press Menu to display menu 2 Press or to select Extra and press to enter 3 Press or to select submenu and press to enter...

Страница 30: ...ig yes or no Auto adjust the picture to default Off timer 0 24hrs Select DC off time Image Ratio wide or 4 3 Select wide or 4 3 format for display DDC CI yes or no Turn ON OFF DDC CI Support Reset Yes...

Страница 31: ...31 Exit 1 Press Menu to display menu 2 Press or to select Exit and press to enter 3 Press to exit Exit Exit the main OSD...

Страница 32: ...32 LED Indicator Status LED Color Full Power Mode Green or Blue Active off Mode Orange or red...

Страница 33: ...33 Windows Vista 1 Click Start and Control Panel Then double click on Appearance and Personalization 2 Click Personalization and then Display Settings 3 Click Advanced Settings Driver Monitor Driver...

Страница 34: ...w click Continue 5 Click Update Driver in the Driver tab 6 Check the Browse my computer for driver software checkbox and click Let me pick from a list of device drivers on my computer 7 Click on the H...

Страница 35: ...35 Windows XP 1 Start Windows XP 2 Click on the Start button and then click on Control Panel 3 Select and click on the category Appearance and Themes 4 Click on the Display Item...

Страница 36: ...nitor tab If the Properties button is inactive it means your monitor is properly configured Please stop installation If the Properties button is active click on Properties button Please follow the ste...

Страница 37: ...se button and then select the appropriate drive F CD ROM Drive 11 Click on the Open button then click the OK button 12 Select your monitor model and click on the Next button If you can see the has not...

Страница 38: ...e Open button then click on the OK button 10 Select your monitor model and click on the Next button 11 Click on the Finish button then the Close button If you can see the Digital Signature Not Found w...

Страница 39: ...e to i Menu software by AOC i Menu makes it easy to adjust your monitor display setting by using on screen menus instead of the OSD button on the monitor To complete installation please follow the ins...

Страница 40: ...ll wizard to complete software installation Under each of the four PC status you may choose from the pull down menu the desired time in minutes for your monitor to automatically shutdown The example a...

Страница 41: ...g tool it splits the desktop into different panes each pane displays a different window You only need to drag the window to a corresponding pane when you want to access it It supports multiple monitor...

Страница 42: ...ust the Contrast and Brightness Controls Press to auto adjust Make sure you are not using an extension cable or switch box We recommend plugging the monitor directly to the video card output connector...

Страница 43: ...1080 60 Hz Plug Play VESA DDC2B Input Connector D Sub 15 pin DVI D Input Video Signal Analog 0 7Vp p standard 75 OHM Positive DVI D Digital Interface Power Source 100 240V 50 60Hz Power Consumption A...

Страница 44: ...7 72 188 800 600 75Hz 46 875 75 XGA 1024 768 60Hz 48 363 60 004 1024 768 70Hz 56 476 70 069 1024 768 75Hz 60 023 75 029 SXGA 1280 1024 60Hz 63 981 60 02 1280 1024 75Hz 79 976 75 025 WXGA 1440 900 60Hz...

Страница 45: ...al Name Pin No Signal Name Pin No Signal Name 1 TMDS Data 2 9 TMDS Data 1 17 TMDS Data 0 2 TMDS Data 2 10 TMDS Data 1 18 TMDS Data 0 3 TMDS Data 2 4 Shield 11 TMDS Data 1 3 Shield 19 TMDS Data 0 5 Shi...

Страница 46: ...SA DDC STANDARD It allows the monitor to inform the host system of its identity and depending on the level of DDC used communicate additional information about its display capabilities The DDC2B is a...

Страница 47: ...e determined by turning the equipment off and on the user is encouraged to try to correct the interference by one or more of the following measures Reorient or relocate the receiving antenna Increase...

Страница 48: ...to a designated collection point for the recycling of waste electrical and electronic equipment The separate collection and recycling of your waste equipment at the time of disposal will help to cons...

Страница 49: ...ge during shipment Pay all shipping charges AOC International Europe BV is responsible neither for any damage or loss during inbound transport damage nor to inbound product that was not properly packa...

Страница 50: ...PRICE OF THE INDIVIDUAL UNIT WHOSE DEFECT OR DAMAGE IS THE BASIS OF THE CLAIM IN NO EVENT SHALL AOC INTERNATIONAL EUROPE BV BE LIABLE FOR ANY LOSS OF PROFITS LOSS OF USE OR FACILITIES OR EQUIPMENT OR...

Страница 51: ...product that was not properly packaged EPI will pay the return shipment charges within one of the countries specified within this warranty statement EPI is not responsible for any costs associated wi...

Страница 52: ...TION MAY NOT APPLY TO YOU ALTHOUGH THIS LIMITED WARRANTY GIVES YOU SPECIFIC LEGAL RIGHTS YOU MAY HAVE OTHER RIGHTS WHICH MAY VARY FROM STATE TO STATE In the United States of America this limited warra...

Страница 53: ...hipping charges EPI is not responsible for damage to inbound product that was not properly packaged EPI will pay the return shipment charges within one of the countries specified within this warranty...

Страница 54: ...DAMAGES SO THE ABOVE LIMITATION MAY NOT APPLY TO YOU ALTHOUGH THIS LIMITED WARRANTY GIVES YOU SPECIFIC LEGAL RIGHTS YOU MAY HAVE OTHER RIGHTS WHICH MAY VARY FROM STATE TO STATE In the United States of...

Страница 55: ...turn EASE registration forms by mail or fax Step 3 We will issue a Return Authorization Number upon verification into the program Step 4 A monitor will be advance shipped to your location Step 5 We wi...

Страница 56: ...t Some of the Environmental features of TCO Certified Displays Production facilities have an Environmental Management System EMAS or ISO 14001 Low energy consumption to minimize climate impact Restric...

Отзывы: