AOC E2343FK Скачать руководство пользователя страница 12


13

Wall Mounting 

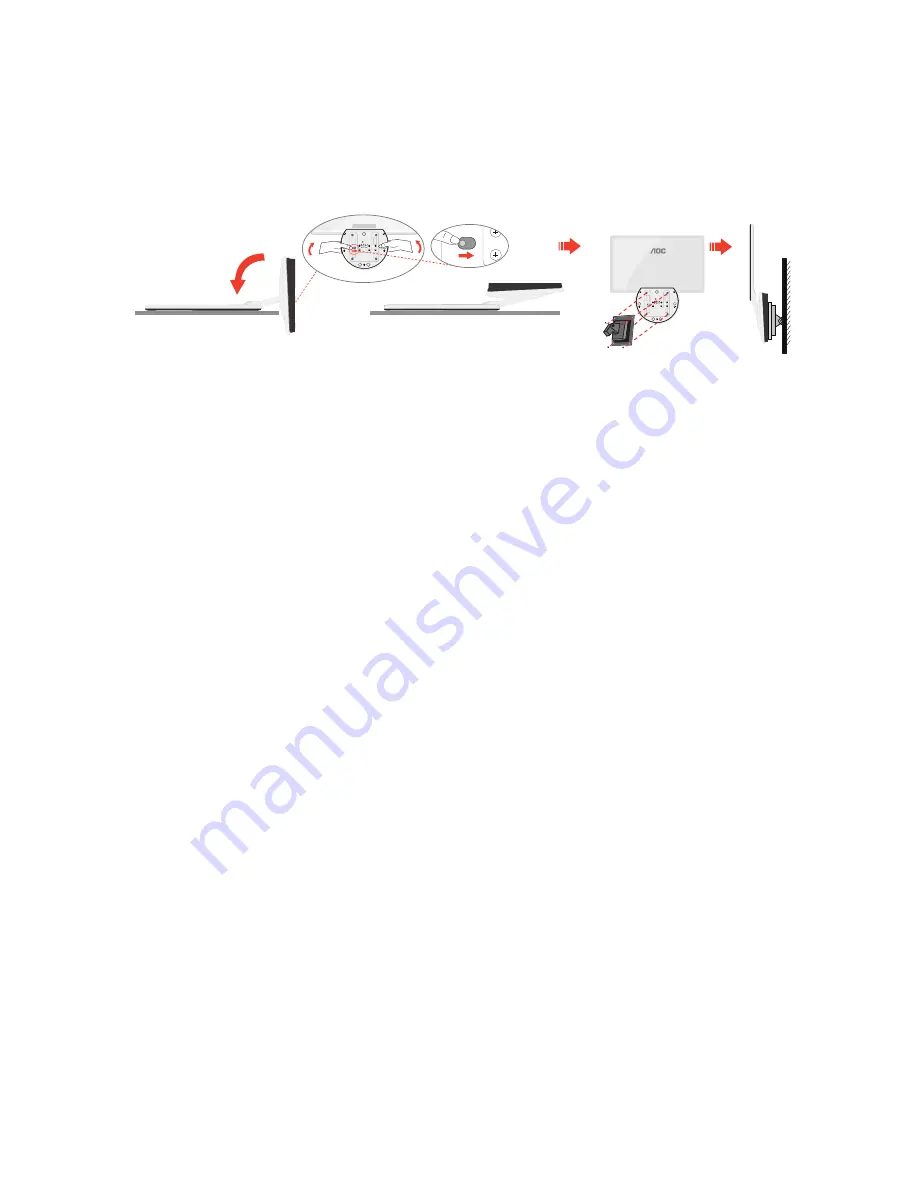
Preparing to Install An Optional Wall Mounting Arm.   

This


monitor


can


be


attached


to


a


wall


mounting


arm


you


purchase


separately.


Disconnect


power


before


this


procedure.


Follow


these


steps:


1


Place


monitor


on


the


firm


surface


(such


as,


table)


2


Use


your


hands


to


hold


the


monitor


base


3


Use


your


hands


to


fold


the


monitor


base


as


figure


instructed


above


by


switch


safety


lock


to


the


right


side


4


Once


the


monitor


base


begin


to


fold


you


can


release


the


safety


lock


(caution:


you


must


hear


“click”


after


you


fold


the


monitor


base


to


wall


mount


position


to


ensure


safety


lock


is


lock


properly.)


5


Follow


the


manufacturer's


instructions


to


assemble


the


wall


mounting


arm.


6


Place


the


wall


mounting


arm


onto


the


back


of


the


monitor.


Line


up


the


holes


of


the


arm


with


the


holes


in


the


back


of


the


monitor.


7


Insert


the


4


screws


into


the


holes


and


tighten.


8


Reconnect


the


cables.


Refer


to


the


user's


manual


that


came


with


the


optional


wall


mounting


arm


for


instructions


on


attaching


it


to


the


wall.


Noted


:


VESA


mounting


screw


holes


are


not


available


for


all


models,


please


check


with


the


dealer


or


official


department


of


AOC.


Содержание E2343FK

Страница 1: ...ME 2000 17 Hotkeys 18 OSD Setting 19 Luminance 20 Image Setup 22 Color Temperature 24 Color Boost 26 Picture Boost 28 OSD Setup 30 Extra 32 Reset 34 Exit 36 LED Indicator 37 Driver 38 Monitor Driver 3...

Страница 2: ...3 HG Declaration 58 EPEAT Declaration 59 Service 60 Warranty Statement for Europe 60 Warranty Statement for North South America excluding Brazil 62...

Страница 3: ...used as follows NOTE A NOTE indicates important information that helps you make better use of your computer system CAUTION A CAUTION indicates either potential damage to hardware or loss of data and...

Страница 4: ...the appliance safely Do not defeat the safety purpose of the grounded plug Unplug the unit during a lightning storm or when it will not be used for long periods of time This will protect the monitor f...

Страница 5: ...n should be moved with care Never push any object into the slot on the monitor cabinet It could damage circuit parts causing a fire or electric shock Never spill liquids on the monitor Do not place th...

Страница 6: ...wipe out the stain instead of strong detergent which will cauterize the product cabinet When cleaning make sure no detergent is leaked into the product The cleaning cloth should not be too rough as it...

Страница 7: ...plug IMMEDIATELY and contact a Service Center Make sure that the ventilating openings are not blocked by a table or curtain Do not engage the LCD monitor in severe vibration or high impact conditions...

Страница 8: ...signal cables Analog USB DVI and HDMI cables will be provided for all countries and regions Please check with the local dealer or AOC branch office for confirmation Monitor QSG CD Manual Power Cable...

Страница 9: ...the monitor base 3 Use your hands to fold the monitor base as figure instructed above by switch safety lock to the right side 4 Once the monitor base begin to fold you can release the safety lock caut...

Страница 10: ...then adjust the monitor s angle to your own preference Hold the stand so you will not topple the monitor when you change the monitor s angle You are able to adjust the monitor s angle from 5 to 18 NOT...

Страница 11: ...2 Connect one end of the 15 pin D Sub cable to the back of the monitor and connect the other end to the computer s D Sub port 3 4 Turn on your monitor and computer If your monitor displays an image i...

Страница 12: ...the safety lock caution you must hear click after you fold the monitor base to wall mount position to ensure safety lock is lock properly 5 Follow the manufacturer s instructions to assemble the wall...

Страница 13: ...14 Adjusting Setting Optimal Resolution Windows Vista For Windows Vista 1 Click START 2 Click CONTROL PANEL 3 Click Appearance and Personalization 4 Click Personalization...

Страница 14: ...15 5 Click Display Settings 6 Set the resolution SLIDE BAR to 1920 by 1080...

Страница 15: ...16 Windows XP For Windows XP 1 Click START 2 Click SETTINGS 3 Click CONTROL PANEL 4 Click Appearance and Themes 5 Double click DISPLAY...

Страница 16: ...Set the resolution SLIDE BAR to 1920 by 1080 Windows ME 2000 For Windows ME 2000 1 Click START 2 Click SETTINGS 3 Click CONTROL PANEL 4 Double click DISPLAY 5 Click SETTINGS 6 Set the resolution SLID...

Страница 17: ...ignal resolution is wide format the hot key is disable to adjust Eco Mode 4 3 or wide Menu Enter Power Auto Source Exit When the OSD is closed press Auto Source Exit button continuously about 2 second...

Страница 18: ...want to adjust any other function repeat steps 2 3 4 OSD Lock Function To lock the OSD press and hold the MENU button while the monitor is off and then press power button to turn the monitor on To un...

Страница 19: ...20 Luminance Press Menu to display menu Press or to select Luminance and press to enter Press or to select submenu press to enter and press or to adjust Press to exit...

Страница 20: ...gister Standard Standard Mode Text Text Mode Internet Internet Mode Game Game Mode Movie Movie Mode Eco mode Sports Sports Mode Gamma1 Adjust to Gamma1 Gamma2 Adjust to Gamma 2 Gamma Gamma3 Adjust to...

Страница 21: ...22 Image Setup Press Menu to display menu Press or to select Image Setup and press to enter Press or to select submenu press to enter and press or to adjust Press to exit...

Страница 22: ...re Clock to reduce Vertical Line noise Phase 0 100 Adjust Picture Phase to reduce Horizontal Line noise H Position 0 100 Adjust the horizontal position of the picture V Position 0 100 Adjust the verti...

Страница 23: ...24 Color Temperature Press Menu to display menu Press or to select Color Temperature and press to enter Press or to select submenu press to enter and press or to adjust Press to exit...

Страница 24: ...7300K Recall Normal Color Temperature from EEPROM Cool 9300K Recall Cool Color Temperature from EEPROM sRGB Recall SRGB Color Temperature from EEPROM Red Red Gain from Digital register Green Green Ga...

Страница 25: ...26 Color Boost Press Menu to display menu Press or to select Color Boost and press to enter Press or to select submenu press to enter and press or to adjust Press to exit...

Страница 26: ...e Nature Skin on or off Disable or Enable Nature Skin Mode Green Field on or off Disable or Enable Green Field Mode Sky blue on or off Disable or Enable Sky blue Mode AutoDetect on or off Disable or E...

Страница 27: ...28 Picture Boost Press Menu to display MENU Press or to select Picture Boost and press to enter Press or to select submenu press to enter and press or to adjust Press to exit...

Страница 28: ...Size Brightness 0 100 Adjust Frame Brightness Contrast 0 100 Adjust Frame Contrast H position 0 100 Adjust Frame horizontal Position V position 0 100 Adjust Frame vertical Position Bright Frame on or...

Страница 29: ...30 OSD Setup Press Menu to display menu Press or to select OSD Setup and press to enter Press or to select submenu press to enter and press or to adjust Press to exit...

Страница 30: ...ion 0 100 Adjust the horizontal position of OSD V Position 0 100 Adjust the vertical position of OSD Timeout 5 120 Adjust the OSD Timeout Transparence 0 100 Adjust the transparence of OSD Language Sel...

Страница 31: ...32 Extra Press Menu to display menu Press or to select OSD Setup and press to enter Press or to select submenu press to enter and press or to adjust Press to exit...

Страница 32: ...Source as Input Auto Config yes or no Auto adjust the picture to default Image Ratio wide or 4 3 Select wide or 4 3 format for display DDC CI yes or no Turn ON OFF DDC CI Support Off Timer 0 24hours...

Страница 33: ...34 Reset Press or to select YES or NO Press Menu to display menu Press or to select Reset and press to enter Press to exit...

Страница 34: ...35 Reset yes or no Reset the menu to default...

Страница 35: ...36 Exit Exit Exit the main OSD Press Menu to display menu Press or to select Exit and press to exit...

Страница 36: ...37 LED Indicator Status LED Color Full Power Mode White Active off Mode red...

Страница 37: ...38 Driver Monitor Driver Windows 7 1 Start Windows 7 2 Click on the Start button and then click on Control Panel 3 Click on the Display icon...

Страница 38: ...39 4 Ckick on the Change display settings button 5 Click the Advanced Settings button 6 Click the Monitor tab and then click the Properties button...

Страница 39: ...ab 8 Open the Update Driver Software Generic PnP Monitor window by clicking on Update Driver and then click the Browse my computer for driver software button 9 Select Let me pick from a list of device...

Страница 40: ...ROM drive 11 Select the xxx inf file and click the Open button Click the OK button 12 Select your monitor model and click the Next button The files will be copied from the CD to your hard disk drive...

Страница 41: ...42 Windows Vista 1 Click Start and Control Panel Then double click on Appearance and Personalization 2 Click Personalization and then Display Settings 3 Click Advanced Settings...

Страница 42: ...w click Continue 5 Click Update Driver in the Driver tab 6 Check the Browse my computer for driver software checkbox and click Let me pick from a list of device drivers on my computer 7 Click on the H...

Страница 43: ...44 Windows XP 1 Start Windows XP 2 Click on the Start button and then click on Control Panel 3 Select and click on the category Appearance and Themes 4 Click on the Display Item...

Страница 44: ...nitor tab If the Properties button is inactive it means your monitor is properly configured Please stop installation If the Properties button is active click on Properties button Please follow the ste...

Страница 45: ...se button and then select the appropriate drive F CD ROM Drive 11 Click on the Open button then click the OK button 12 Select your monitor model and click on the Next button If you can see the has not...

Страница 46: ...e Open button then click on the OK button 10 Select your monitor model and click on the Next button 11 Click on the Finish button then the Close button If you can see the Digital Signature Not Found w...

Страница 47: ...e to i Menu software by AOC i Menu makes it easy to adjust your monitor display setting by using on screen menus instead of the OSD button on the monitor To complete installation please follow the ins...

Страница 48: ...wizard to complete software installation Under each of the four PC status you may choose from the pull down menu the desired time in minutes for your monitor to automatically shutdown The example abov...

Страница 49: ...g tool it splits the desktop into different panes each pane displays a different window You only need to drag the window to a corresponding pane when you want to access it It supports multiple monitor...

Страница 50: ...fer to the Setting the Optimal Resolution If the initial screen the login screen does not appear contact the Service Center or your dealer Can you see Input Not Supported on the screen You can see thi...

Страница 51: ...he LED should either turn ON or OFF after hitting the CAPS LOCK key Missing one of the primary colors RED GREEN or BLUE Inspect the monitor s video cable and make sure that no pin is damaged Make sure...

Страница 52: ...0 x 1080 60 Hz Highest preset resolution 1920 x 1080 60 Hz Plug Play VESA DDC2B CI Input Connector Input Video Signal Power Source 100 240VAC 50 60Hz Active 28 W Typical Resolution Power Consumption S...

Страница 53: ...SVGA 800x600 56Hz 35 156 56 250 SVGA 800x600 60Hz 37 879 60 317 SVGA 800x600 72Hz 48 077 72 188 SVGA 800x600 75Hz 46 875 75 000 XGA 1024x768 60Hz 48 363 60 004 XGA 1024x768 70Hz 56 476 70 069 XGA 102...

Страница 54: ...in No Signal Name Pin No Signal Name Pin No Signal Name 1 TMDS Data 2 9 TMDS Data 1 17 TMDS Data 0 2 TMDS Data 2 10 TMDS Data 1 18 TMDS Data 0 3 TMDS Data 2 4 Shield 11 TMDS Data 1 3 Shield 19 TMDS Da...

Страница 55: ...SA DDC STANDARD It allows the monitor to inform the host system of its identity and depending on the level of DDC used communicate additional information about its display capabilities The DDC2B is a...

Страница 56: ...e determined by turning the equipment off and on the user is encouraged to try to correct the interference by one or more of the following measures Reorient or relocate the receiving antenna Increase...

Страница 57: ...on and recycling of your waste equipment at the time of disposal will help to conserve natural resources and ensure that it is recycled in a manner that protects human health and the environment For m...

Страница 58: ...cern for the conservation of natural resources as well as land ll protection AOC announces the launch of AOC monitor s packaging recycling program This program is designed to help you discard of your...

Страница 59: ...pping carton Insure it or assume the risk of loss damage during shipment Pay all shipping charges AOC International Europe GmbH is responsible neither for any damage or loss during inbound transport d...

Страница 60: ...STRICT LIABILITY OR OTHER THEORY SHALL NOT EXCEED THE PRICE OF THE INDIVIDUAL UNIT WHOSE DEFECT OR DAMAGE IS THE BASIS OF THE CLAIM IN NO EVENT SHALL AOC INTERNATIONAL EUROPE GMBH BE LIABLE FOR ANY L...

Страница 61: ...mage during shipment Pay all shipping charges EPI is not responsible for damage to inbound product that was not properly packaged EPI will pay the return shipment charges within one of the countries s...

Страница 62: ...GHTS YOU MAY HAVE OTHER RIGHTS WHICH MAY VARY FROM STATE TO STATE In the United States of America this limited warranty is only valid for Products purchased in the Continental United States Alaska and...

Отзывы: