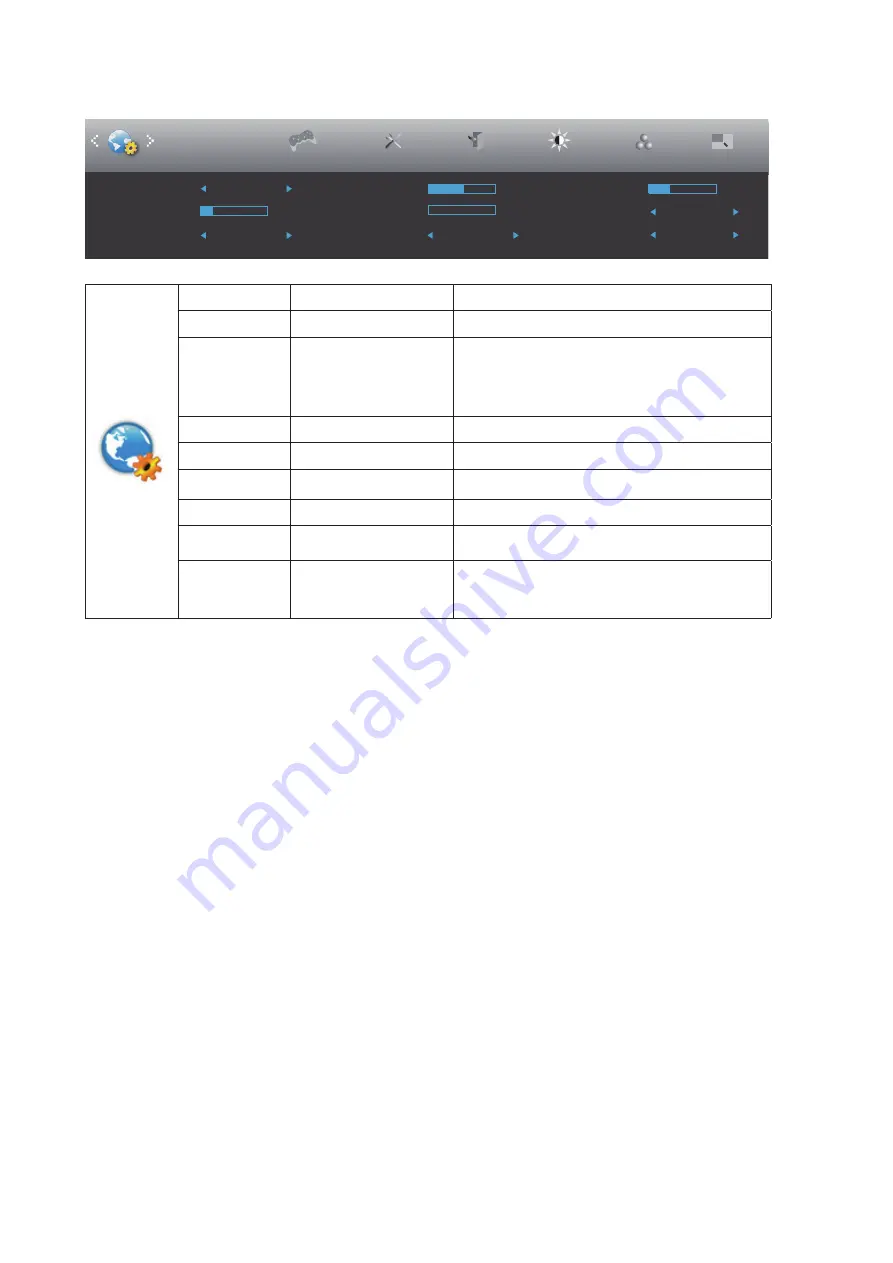
AOC CU34P2C Скачать руководство пользователя страница 20

18

OSD Setup

Exit

Extra

Luminance

Color Setup

H. Position

50

V. Position

0

Transparence

25

Language

English

Timeout

10

Break Reminder

Off

OSD Setup

Picture Boost

DP Capability 

1.1

USB

PIP Setting

PIP

Game Setting

2.0

USB Selection

Auto

Language 

Select the OSD language

Timeout 

5-120

Adjust the OSD Timeout

DP Capability

1.1 / 1.2

If the DP video content supports DP 1.2, please 

seclect DP1.2 for DP Capability , otherwise, 

please select DP1.1.

Please be noted that only DP1.2 support Adaptive-

Sync function

H. Position 

0-100 

Adjust the horizontal position of OSD

V. Position 

0-100

Adjust the vertical position of OSD

USB*

3.2Gen1 / 2.0 / Off

For model need to turn on/off USB power during 

power saving.

Transparence

0-100

Adjust the transparence of OSD

Break 
Reminder

On / O

ff

Break reminder if the user continuously work for 
more than 1hrs

USB Selection

Auto / USB C / USB up

*AUTO: Switch with display input source
*USB C/USB up: Fix up stream not change with 
input source.

Notes:

*USB C(DP Alt) signal input, and “USB” is set to “2.0”, the maximum resolution is 3440x1440@100Hz

.

Содержание CU34P2C

Страница 1: ...1 CU34P2C www aoc com 2022 AOC All Rights Reserved LCD Monitor User Manual ...

Страница 2: ...nnecting the Monitor 9 Wall Mounting 10 Adaptive sync function 11 Adjusting 12 Hotkeys 12 OSD Setting 13 Luminance 14 Color Setup 15 Picture Boost 16 OSD Setup 17 PIP Setting 18 Game Setting 19 Extra 20 Exit 21 LED Indicator 22 Troubleshoot 23 Specification 24 General Specification 24 Preset Display Modes 25 Pin Assignments 26 Plug and Play 27 ...

Страница 3: ...e used as follows NOTE A NOTE indicates important information that helps you make better use of your computer system CAUTION A CAUTION indicates either potential damage to hardware or loss of data and tells you how to avoid the problem WARNING A WARNING indicates the potential for bodily harm and tells you how to avoid the problem Some warnings may appear in alternate formats and may be unaccompan...

Страница 4: ...ectrician install the correct outlet or use an adapter to ground the appliance safely Do not defeat the safety purpose of the grounded plug Unplug the unit during a lightning storm or when it will not be used for long periods of time This will protect the monitor from damage due to power surges Do not overload power strips and extension cords Overloading can result in fire or electric shock To ens...

Страница 5: ...he monitor on a wall or shelf use a mounting kit approved by the manufacturer and follow the kit instructions Leave some space around the monitor as shown below Otherwise air circulation may be inadequate hence overheating may cause a fire or damage to the monitor To avoid potential damage for example the panel peeling from the bezel ensure that the monitor does not tilt downward by more than 5 de...

Страница 6: ...ut the stain instead of strong detergent which will cauterize the product cabinet When cleaning make sure no detergent is leaked into the product The cleaning cloth should not be too rough as it will scratch the screen surface Please disconnect the power cord before cleaning the product ...

Страница 7: ...r plug IMMEDIATELY and contact a Service Center Make sure that the ventilating openings are not blocked by a table or curtain Do not engage the LCD monitor in severe vibration or high impact conditions during operation Do not knock or drop the monitor during operation or transportation ...

Страница 8: ...t Warranty card Stand Base Power Cable USB Cable HDMI Cable DP Cable Not all signal cables HDMI DP USB Audio cables will be provided for all countries and regions Please check with the local dealer or AOC branch office for confirmation ...

Страница 9: ...7 Setup Base Please setup or remove the base following the steps as below Please place the monitor on a soft and flat surface to prevent the scratch Setup 4 Remove 1 4 2 3 ...

Страница 10: ...ou change the monitor s angle You are able to adjust the monitor as below 150 5mm 5 5 1 22 1 5 NOTE Do not touch the LCD screen when you change the angle It may cause damage or break the LCD screen Warning To avoid potential screen damage such as panel peeling ensure that the monitor does no t tilt downward by more than 5 degrees Do not press the screen while adjusting the angle of the monitor Gra...

Страница 11: ...he back of the display firmly 2 Turn off your computer and unplug its power cable 3 Connect the display signal cable to the video connector on the back of your computer 4 Plug the power cord of your computer and your display into a nearby outlet 5 Turn on your computer and display If your monitor displays an image installation is complete If it does not display an image please refer Troubleshootin...

Страница 12: ...the back of the monitor 4 Insert the 4 screws into the holes and tighten 5 Reconnect the cables Refer to the user s manual that came with the optional wall mounting arm for instructions on attaching it to the wall Noted VESA mounting screw holes are not available for all models please check with the dealer or official department of AOC 5 0 90 Display design may differ from those illustrated WARNIN...

Страница 13: ...as the below also could be checked by visiting www AMD com AMD Radeon RX 480 AMD Radeon RX 470 AMD Radeon RX 460 Radeon Pro Duo AMD Radeon R9 300 Series AMD Radeon R9 Fury X AMD Radeon R9 360 AMD Radeon R7 360 AMD Radeon R9 295X2 AMD Radeon R9 290X AMD Radeon R9 290 AMD Radeon R9 285 AMD Radeon R7 260X AMD Radeon R7 260 ...

Страница 14: ...s to display the OSD or confirm the selection Press about 2 second to turn off the monitor Volume Press Volume button to active volume adjustment bar Source Auto Exit When the OSD is closed press Source Auto Exit button will be Source hot key function When the OSD is closed press Source Auto Exit button continuously about 2 second to do auto configure Only for the models with D Sub ...

Страница 15: ...message of Clear Vision Demo on will be display on the screen for a duration of 5 seconds Press Menu or Exit button the message will disappear Press and hold button for 5 seconds again Clear Vision Demo will be off Clear Vision function provides the best image viewing experience by converting low resolution and blurry images into clear and vivid images Clear Vision Off Adjust the Clear Vision Weak...

Страница 16: ...ate it 3 Press Left or to change the settings of the selected function Press to exit If you want to adjust any other function repeat steps 2 3 4 OSD Lock Function To lock the OSD press and hold the MENU button while the monitor is off and then press power button to turn the monitor on To un lock the OSD press and hold the MENU button while the monitor is off and then press power button to turn the...

Страница 17: ...er Brightness 0 100 Backlight Adjustment Eco mode Standard Standard Mode Text Text Mode Internet Internet Mode Game Game Mode Movie Movie Mode Sports Sports Mode Reading Reading Mode Uniformity Uniformity Mode Gamma Gamma1 Adjust to Gamma 1 Gamma2 Adjust to Gamma 2 Gamma3 Adjust to Gamma 3 DCR Off Disable dynamic contrast ratio On Enable dynamic contrast ratio HDR Mode Off Adjust HDR Mode HDR Pict...

Страница 18: ...Recall SRGB Color Temperature from EEPROM User Restore Color Temperature from EEPROM DCB Mode Full Enhance On Off Disable or Enable Full Enhance Mode Nature Skin On Off Disable or Enable Nature Skin Mode Green Field On Off Disable or Enable Green Field Mode Sky blue On Off Disable or Enable Sky blue Mode AutoDetect On Off Disable or Enable AutoDetect Mode Off Disable DCB Mode DCB Demo On Off Disab...

Страница 19: ...Game Setting Bright Frame On Off Disable or Enable Bright Frame Frame Size 14 100 Adjust Frame Size Brightness 0 100 Adjust Frame Brightness Contrast 0 100 Adjust Frame Contrast H position 0 100 Adjust Frame horizontal Position V position 0 100 Adjust Frame vertical Position Note Adjust the brightness contrast and position of the Bright Frame for better viewing experience ...

Страница 20: ... select DP1 1 Please be noted that only DP1 2 support Adaptive Sync function H Position 0 100 Adjust the horizontal position of OSD V Position 0 100 Adjust the vertical position of OSD USB 3 2Gen1 2 0 Off For model need to turn on off USB power during power saving Transparence 0 100 Adjust the transparence of OSD Break Reminder On Off Break reminder if the user continuously work for more than 1hrs...

Страница 21: ...Select Content HDMI1 Sub Source Follow Input Select Content DP Size Small Middle Large Small Position Right Up Right Down Left Down Left Up Right Up Audio On Off Off Swap Swap the screen source Refer to the table below for main sub input source compability Sub Main HDMI1 DP USB C HDMI1 X V X DP V X V USB C X V X PxP color related adjustments can only be operated by main and sub is not supported So...

Страница 22: ...nd user can adjust from 50 to 100 or 0 to increase contrast for clear picture 1 If picture is too dark to be saw the detail clearly adjusting from 50 to100 for clear picture 2 If picture is too white to be saw the detail clearly adjusting from 50 to 0 for clear picture Low input Lag On Off Turn off frame buffer to decrease input lag Game Color 0 20 Game Color will provide 0 20 level for adjusting ...

Страница 23: ... Hz Extra PIP Setting PIP Game Setting Frame Counter Off Input Select Select Input Signal Source Off timer 0 24hrs Select DC off time Image Ratio Wide 4 3 1 1 movie1 movie2 Select image ratio for display DDC CI Yes or No Turn On Off DDC CI Support Reset Yes or No Reset the menu to default Frame Counter Off Right up Right Down Left Down Left Up Display V frequency on the corner selected ...

Страница 24: ...22 Exit Exit Luminance Color Setup Picture Boost OSD Setup Extra PIP Setting PIP Game Setting Exit Exit the main OSD ...

Страница 25: ...23 LED Indicator Status LED Color Full Power Mode White Active off Mode Orange ...

Страница 26: ...led Picture Is Fuzzy Has Ghosting Shadowing Problem Adjust the Contrast and Brightness Controls Press to auto adjust Make sure you are not using an extension cable or switch box We recommend plugging the monitor directly to the video card output connector on the back Picture Bounces Flickers Or Wave Pattern Appears In The Picture Move electrical devices that may cause electrical interference as fa...

Страница 27: ...0 185W Standby mode 0 5W Physical Characteristics Connector Type HDMI DP USB USB C Signal Cable Type Detachable Environmental Temperature Operating 0 40 Non Operating 25 55 Humidity Operating 10 85 non condensing Non Operating 5 93 non condensing Altitude Operating 0 5000m 0 16404ft Non Operating 0 12192m 0 40000ft Note USB C DP Alt signal input and USB is set to 2 0 the maximum resolution is 3440...

Страница 28: ...024x768 75Hz 60 023 75 029 SXGA 1280x1024 60Hz 63 981 60 020 1280x1024 75Hz 79 976 75 025 WXGA 1440x900 60Hz 55 935 59 887 1440x900 60Hz 55 469 59 901 WSXGA 1680x1050 60Hz 65 290 59 954 1680x1050 60Hz 64 674 59 883 HD 1920x1080 60Hz 67 5 60 QHD 2560x1080 60HZ 66 60 2560x1080 50HZ 56 25 50 2560x1080 120HZ 150 120 WQHD 3440x1440 60HZ 89 819 59 973 3440x1440 75HZ 111 875 74 983 3440x1440 100HZ 150 97...

Страница 29: ...12 TMDS Clock 5 TMDS Data 1Shield 13 CEC 6 TMDS Data 1 14 Reserved N C on device 7 TMDS Data 0 15 SCL 8 TMDS Data 0 Shield 16 SDA 20 Pin Color Display Signal Cable Pin No Signal Name Pin No Signal Name 1 ML_Lane 3 n 11 GND 2 GND 12 ML_Lane 0 p 3 ML_Lane 3 p 13 CONFIG1 4 ML_Lane 2 n 14 CONFIG2 5 GND 15 AUX_CH p 6 ML_Lane 2 p 16 GND 7 ML_Lane 1 n 17 AUX_CH n 8 GND 18 Hot Plug Detect 9 ML_Lane 1 p 19...

Страница 30: ...ESA DDC STANDARD It allows the monitor to inform the host system of its identity and depending on the level of DDC used communicate additional information about its display capabilities The DDC2B is a bi directional data channel based on the I2C protocol The host can request EDID information over the DDC2B channel ...

Отзывы: