


47
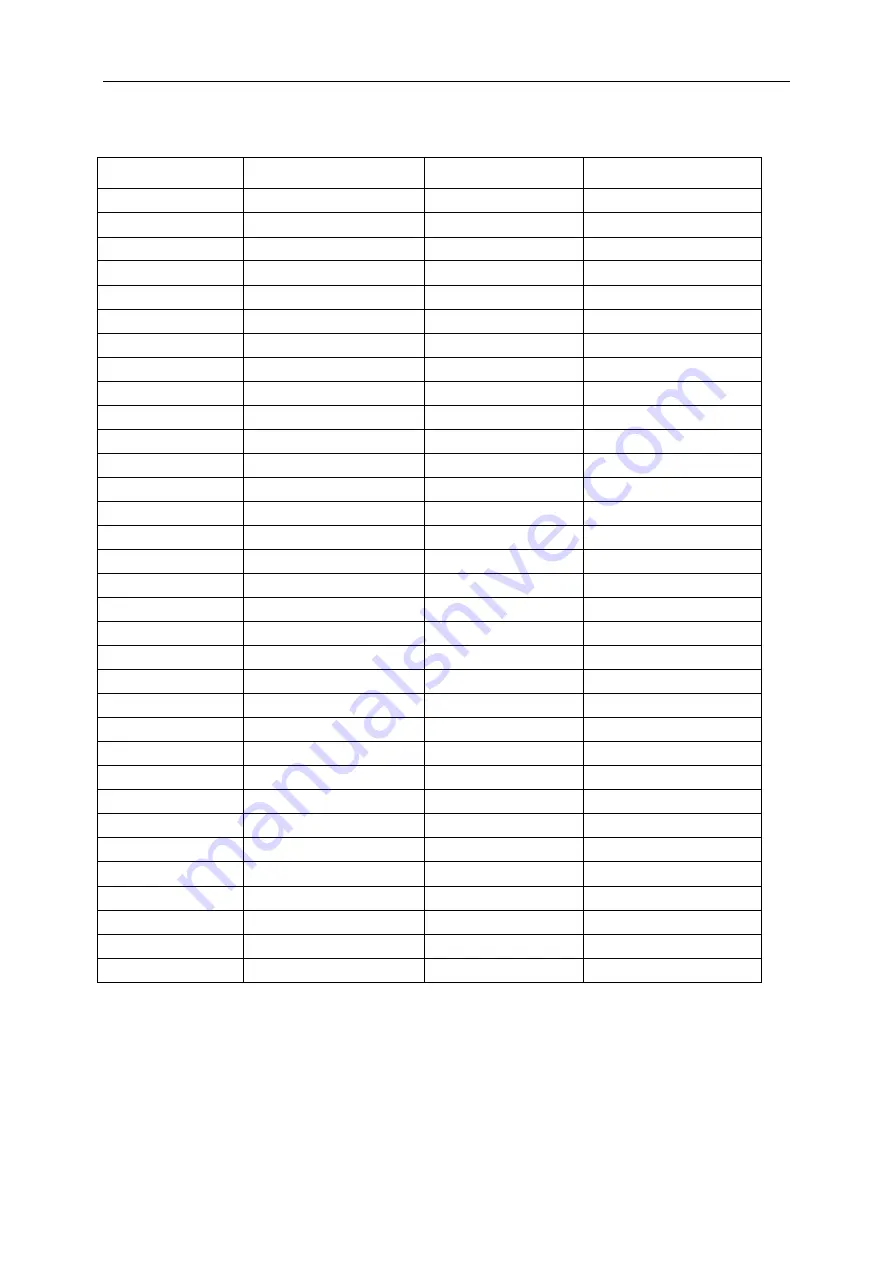
Preset Display Modes
STANDARD
RESOLUTION
HORIZONTAL
FREQUENCY(kHz)
VERTICAL
FREQUENCY(Hz)
VGA
640x480@60Hz
31.469
59.94
VGA
640x480@67Hz
35
66.667
VGA
640x480@72Hz
37.861
72.809
VGA
640x480@75Hz
37.5
75
VGA
640x480@100Hz
51.08
99.769
VGA
640x480@120Hz
61.91
119.518
DOS MODE
720x400@70Hz
31.469
70.087
DOS MODE
720x480@60Hz
29.855
59.710
SD
720x576@50Hz
31.25
50
SVGA
800x600@56Hz
35.156
56.25
SVGA
800x600@60Hz
37.879
60.317
SVGA
800x600@72Hz
48.077
72.188
SVGA
800x600@75Hz
46.875
75
SVGA
800x600@100Hz
63.684
99.662
SVGA
800x600@120Hz
76.302
119.97
SVGA
832x624@75Hz
49.725
74.551
XGA
1024x768@60Hz
48.363
60.004
XGA
1024x768@70Hz
56.476
70.069
XGA
1024x768@75Hz
60.023
75.029
XGA
1024x768@100Hz
81.577
99.972
XGA
1024x768@120Hz
97.551
119.989
SXGA
1280x1024@60Hz
63.981
60.02
SXGA
1280x1024@75Hz
79.975
75.025
Full HD
1920x1080@60Hz
67.5
60
FHD
1920x1080@100Hz
113.221
99.93
FHD
1920x1080@120Hz
137.26
119.982
QHD
2560x1080@60Hz
66.636
59.978
QHD
2560x1080@60Hz
67.173
59.976
QHD
2560x1080@75Hz
83.915
74.991
QHD
2560x1080@100Hz
113.235
99.943
QHD
2560x1080@120Hz
137.224
119.951
QHD
2560x1080@144Hz
166.544
143.945
QHD
2560x1080@200Hz
222.056
199.69
Содержание AG352QCX
Страница 1: ...LCD Monitor User Manual AG352QCX LED backlight www aoc com 2016 AOC All Rights Reserved ...
Страница 10: ...10 Setup Stand Base Please setup or remove the base following the steps as below Setup Remove ...
Страница 15: ...15 Set the resolution SLIDE BAR to Optimal preset resolution ...
Страница 17: ...17 Set the resolution SLIDE BAR to Optimal preset resolution ...
Страница 19: ...19 Set the resolution SLIDE BAR to Optimal preset resolution ...
Страница 31: ...31 Click on the Change display settings button Click the AdvancedSettings button ...
Страница 61: ...61 TCO DOCUMENT FOR TCO CERTIFIED MODELS ...


