AOC A2272PWHT Скачать руководство пользователя страница 27

27

USING THE ON-SCREEN KEYBOARD

• 

Enter text:

1.  Click on a text field. The on-screen keyboard opens. 
2.  Click on the keys to type.
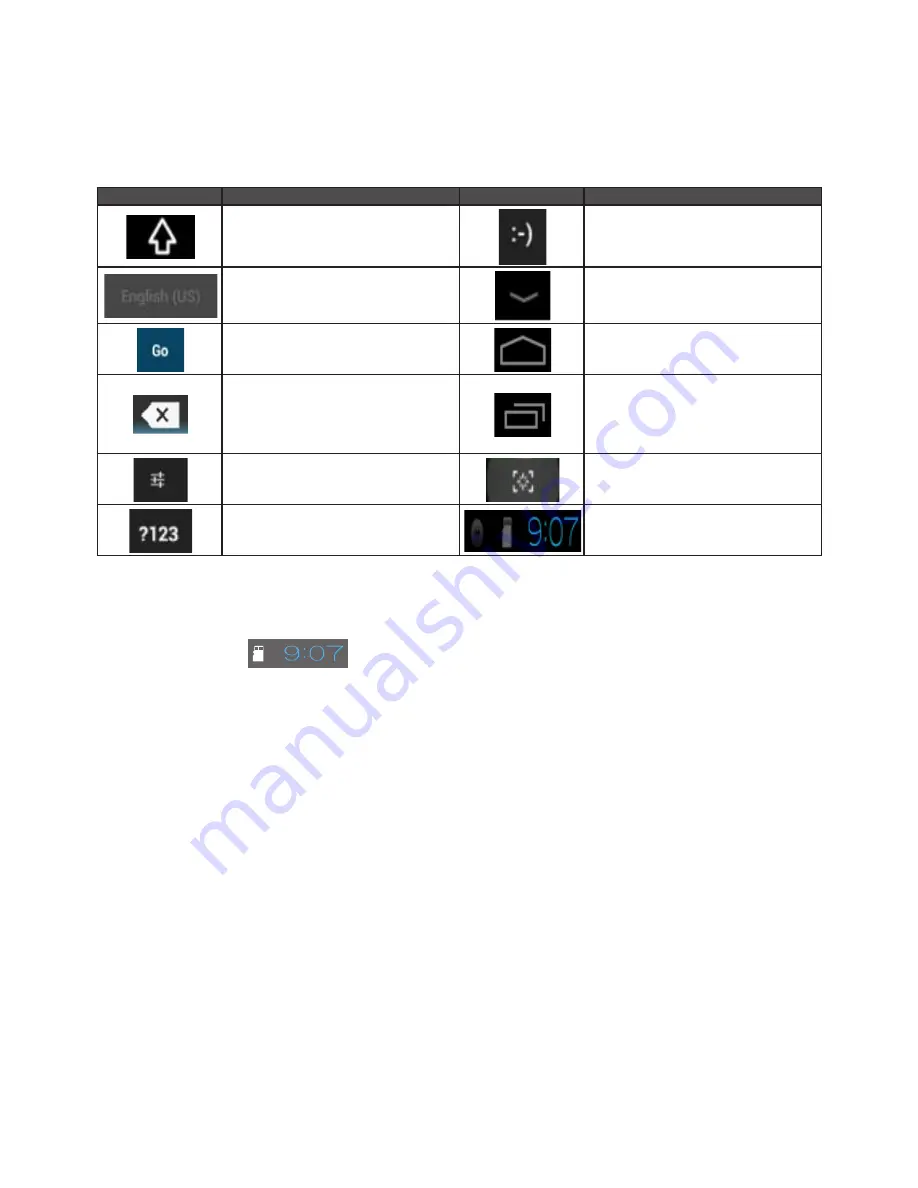
Key

Description

Key

Description

Switch to upper or lower case 
letters for English input.

Press to enter expression symbol. 
Long press to select from all 
expression symbols. 

Enter a space. 

Close the on-screen keyboard.

Enter your text..

Back to Android Home Screen

Single press to go backspace and 
delete one character. Long press 
to go backspace and delete whole 
characters. 

Display recently used application

Click for input options.

Snap for screen shot

Switch to the symbol keyboard..

Notification / Local Time / Settings

CONNECTING TO  NETWORK

• 

Turn on Wi-Fi and connect to the Wi-Fi network:

1.  Click on the 

 at the bottom-right of the screen. Click on the [Settings] to 

open the sub-menu.

2.  Select [NETWORKS], and check [Wi-Fi] to turn it on.
3.  Select [SCAN] to scan for available Wi-Fi networks nearby. The secured networks are 

indicated with a lock icon.

4.  Touch a network to connect it automatically, or touch [ADD NETWORK] to add new 

network manually.

5.  If the network is open, touch [Connect] to confirm for connecting to the network on the 

prompted window.

6.  If the network is secured, enter the password and touch [Connect] on the prompted 

window for connecting to the secured network. 

Содержание A2272PWHT

Страница 1: ...1 SMART All in One User Manual A2272PWHT www aoc com 2013 AOC All Rights Reserved...

Страница 2: ...ting Optimal Resolution 13 WindowsVista 13 Windows 8 14 Windows ME 2000 15 OPERATING INSTRUCTIONS 16 Hotkeys 16 OSD Setting 17 Luminance 18 Image Setup 19 Color Setup 20 Picture Boost 21 OSD Setup 22...

Страница 3: ...nput Not Support 47 APPENDIX 48 Plug And Play 48 Keyboard And Mouse 48 Specifications 50 Preset Display Modes 51 For HDMI 52 Pin Assignments 53 REGULATION 54 EUROPE 54 TAIWAN 55 USA 55 CANADA 56 MEXIC...

Страница 4: ...are used as follows NOTE A NOTE indicates important information that helps you make better use of your monitor CAUTION A CAUTION indicates either potential damage to hardware or loss of data and tell...

Страница 5: ...he grounded plug Unplug the unit during a lightning storm or when it will not be used for long periods of time This will protect the monitor from damage due to power surges Do not overload power strip...

Страница 6: ...a fire or electric shock Never spill liquids on the monitor Do not place the front of the product on the floor If you mount the monitor on a wall or shelf use a mounting kit approved by the manufactu...

Страница 7: ...t the stain instead of strong detergent which will cauterize the product cabinet When cleaning make sure no detergent is leaked into the product The cleaning cloth should not be too rough as it will s...

Страница 8: ...are not blocked by a table or curtain Do not engage the LCD monitor in severe vibration or high impact conditions during operation Do not knock or drop the monitor during operation or transportation...

Страница 9: ...o look at the full face of the monitor and then adjust the monitor s angle to your own preference Hold the stand so you will not topple the monitor when you change the monitor s angle You are able to...

Страница 10: ...ect the power cable to the AC port on the back of the monitor 2 Connect one end of the 15 pin D Sub cable to the back of the monitor and connect the other end to the computer s D Sub port 3 Optional R...

Страница 11: ...Android system While you under XP win7 win8 system before using Display Multi touch 2 points Function user need to connect basic wires power cable VGA cable USB cable Then user can fully enjoy Multi...

Страница 12: ...input controlled by the same USB keyboard mouse connected to the USB port at the back of monitor you need to connect a B type USB cable from this monitor to your PC USB Keyboard Mouse PC Setting up th...

Страница 13: ...13 ADJUSTING SETTING OPTIMAL RESOLUTION WindowsVista 1 Click START 2 Click CONTROL PANEL 3 Click Appearance and Personalization 4 Click Personalization...

Страница 14: ...14 5 Click Display Settings 6 Set the resolution SLIDE BAR to 1920 x 1080 Windows 8 1 Right click and click All apps at the bottom right of the screen 2 Set the View by to Category...

Страница 15: ...sonalization 4 Click DISPLAY 5 Set the resolution SLIDE BAR to 1920 x 1080 Windows ME 2000 1 Click START 2 Click SETTINGS 3 Click CONTROL PANEL 4 Double click DISPLAY 5 Click SETTINGS 6 Set the resolu...

Страница 16: ...d packing materials as they will come in handy if you ever have to ship your monitor For maximum protection repackage your monitor as it was originally packed at the factory To keep the monitor lookin...

Страница 17: ...hted press button to activate it If there is a sub menu press or button to navigate through the sub menu functions 3 Press or button to change the settings of the selected function Press button to exi...

Страница 18: ...tton to enter 4 Press or button to adjust 5 Press button to exit Main Menu Sub Menu Item Description Luminance Brightness 0 100 Backlight Adjustment Contrast 0 100 Contrast from Digital register Eco m...

Страница 19: ...s or button to select submenu and press button to enter 4 Press or button to adjust 5 Press button to exit Main Menu Sub Menu Item Description Image Setup Clock 0 100 Adjust picture Clock to reduceVer...

Страница 20: ...Recall Warm ColorTemperature from EEPROM Normal Recall Normal ColorTemperature from EEPROM Cool Recall Cool ColorTemperature from EEPROM sRGB Recall SRGB ColorTemperature from EEPROM User Red Red Gai...

Страница 21: ...ress button to enter 3 Press or button to select submenu and press button to enter 4 Press or button to adjust 5 Press button to exit Main Menu Sub Menu Item Description Picture Boost Frame Size 14 10...

Страница 22: ...ription OSD Setup H Position 0 100 Adjust the horizontal position of OSD V Position 0 100 Adjust the vertical position of OSD Timeout 5 120 Adjust the OSDTimeout Transparence 0 100 Adjust the transpar...

Страница 23: ...button to select submenu and press button to enter 4 Press or button to adjust 5 Press button to exit Main Menu Sub Menu Item Description Extra Input Select Auto D Sub HDMI Android Select input signal...

Страница 24: ...D Setup Extra 1 Press button to display menu 2 Press or button to select Exit and press button to enter Main Menu Sub Menu Item Description Exit Exit Exit the main OSD LED INDICATOR Status LED Color F...

Страница 25: ...isplay the source list 2 Select Android and press button to confirm the selection 3 Press button to display the selections D SUB HDMI Android The descriptions for function control Icon Description Sho...

Страница 26: ...ve the item from the Home Screen VIEWINGTHE APPS GALLERY 1 Click on the icon to view the applications 2 Click on the application to open it 3 Click on the icon to return to the Home Screen or click on...

Страница 27: ...ut options Snap for screen shot Switch to the symbol keyboard Notification LocalTime Settings CONNECTINGTO NETWORK Turn on Wi Fi and connect to the Wi Fi network 1 Click on the at the bottom right of...

Страница 28: ...t size Storage Available spaces View the available storage space Apps Downloaded View the downloaded applications On SD card Manage the applications stored on the SD card or internal storage Running V...

Страница 29: ...elect time zone Select the time zone for current region Use 24 hour format Set the time format to 24 hour Select date format Select the preference date format Accessibility Services Display the instal...

Страница 30: ...file on SD card device Insert SD card device The SD card device should not be write protected and Smart Monitor can read it 2 Start system updates as below path Settings About System updates Local up...

Страница 31: ...31 DRIVER MONITOR DRIVER Windows 8 1 Start Windows 8 2 Right click and click All apps at the bottom right of the screen 3 Click on the Control panel icon...

Страница 32: ...32 4 Set the View by to Large icons or Small icons 5 Click on the Display icon...

Страница 33: ...33 6 Click on the Change display settings button 7 Click the Advanced Settings button...

Страница 34: ...34 8 Click the Monitor tab and then click the Properties button 9 Click the Driver tab...

Страница 35: ...e Update Driver Software Generic PnP Monitor window by clicking on Update Driver and then click the Browse my computer for driver software button 11 Select Let me pick from a list of device drivers on...

Страница 36: ...ick the Open button Click the OK button 14 Select your monitor model and click the Next button The files will be copied from the CD to your hard disk drive 15 Close all open windows and remove the CD...

Страница 37: ...37 3 Click on the Display icon 4 Click on the Change display settings button 5 Click the Advanced settings button...

Страница 38: ...r tab and then click the Properties button 7 Click the Driver tab 8 Open the Update Driver Software Generic PnP Monitor window by clicking on Update Driver and then click the Browse my computer for dr...

Страница 39: ...rive letter designator for the CD ROM drive 11 Select the xxx inf file and click the Open button Click the OK button 12 Select your monitor model and click the Next button The files will be copied fro...

Страница 40: ...40 WindowsVista 1 Click Start and Control Panel Then double click on Appearance and Personalization 2 Click Personalization and then Display Settings 3 Click Advanced Settings...

Страница 41: ...he message Windows needs is displayed as shown in the figure below click Continue 5 Click Update Driver in the Driver tab 6 Check the Browse my computer for driver software checkbox and click Let me p...

Страница 42: ...on then select the appropriate drive F CD ROM Drive 9 Click on the Open button then click on the OK button 10 Select your monitor model and click on the Next button 11 Click on the Finish button then...

Страница 43: ...e to i Menu software by AOC i Menu makes it easy to adjust your monitor display setting by using on screen menus instead of the OSD button on the monitor To complete installation please follow the ins...

Страница 44: ...l wizard to complete software installation Under each of the four PC statuses you may choose the desired time in minutes from the pull down menu for your monitor to automatically shutdown The example...

Страница 45: ...ool it splits the desktop into different panels and each panel displays a different window You only need to drag the window to a corresponding panel when you want to access it It supports multiple mon...

Страница 46: ...rly Adjust the maximum resolution and frequency that the monitor can handle properly Make sure the AOC Monitor Drivers are installed Picture Is Fuzzy Has Ghosting Shadowing Problem Adjust the Contrast...

Страница 47: ...requency is not correct the screen shows vertical stripes and the picture has not correct width PHASE adjusts the phase of the pixel clock signal With a wrong phase adjustment the picture has horizont...

Страница 48: ...as set by theVideo Electronics Standards Association VESA and The Swedish Confederation Employees NUTEK This feature is designed to conserve electrical energy by reducing power consumption when there...

Страница 49: ...49 OS Keys Windows OS Android OS x x x x x x x x x x x x x x x x x x...

Страница 50: ...Signal Analog 0 7Vp p standard 75 OHM positive or negative HDMI 0 7Vp p standard 75 OHM positive or negative Power Source 100 240VAC 50 60Hz Environmental Considerations OperatingTemp 0 to 40 C Stora...

Страница 51: ...800x600 72Hz 48 077 72 188 800x600 75Hz 46 875 75 000 XGA 1024x768 60Hz 48 363 60 004 1024x768 70Hz 56 476 70 069 1024x768 75Hz 60 023 75 029 SXGA 1280x1024 60Hz 63 981 60 020 1280x1024 75Hz 79 976 75...

Страница 52: ...469 59 940 27 000 576P 50Hz for Digital only 31 250 50 000 27 000 720P 50Hz for Digital only 37 500 50 000 74 250 720P 60Hz for Digital only 45 000 60 000 74 250 1080P 50Hz for Digital only 56 250 50...

Страница 53: ...15 DDC Serial Clock 8 B Ground 1 3 5 7 9 11 13 15 17 19 2 4 6 8 10 12 14 16 18 19 Pin Color Display Signal Cable PIN NO DESCRIPTION PIN NO DESCRIPTION 1 TMDS Data 2 11 TMDS data Shield 2 TMDS Data 2...

Страница 54: ...nd and using spread spectrum modulation techniques Harmonized EN covering essential requirements under article 3 2 of the R TTE Directive EN 301 893 Broadband Radio Access Networks BRAN 5 GHz high per...

Страница 55: ...be determined by turning the equipment off and on the user is encouraged to try to correct the interference by one of the following measures Reorient or relocate the receiving antenna Increase the se...

Страница 56: ...5850 MHz and that these radars could cause interference and or damage to LE LAN devices Avertissement i les dispositifs fonctionnant dans la bande 5 150 5 250 MHz sont r serv s uniquement pour une uti...

Страница 57: ...e exposi o da Taxa de Absor o Espec fica referente a campos el tricos magn ticos e eletromagn ticos de radiofrequ ncia de acordo com as resolu es n 303 2002 e 533 2009 Este produto atende s diretrizes...

Страница 58: ...s not responsible for any radio or TV interference caused by unauthorized modification to this equipment It is the responsibilities of the user to correct such interference It is the responsibility of...

Страница 59: ...ignated collection point for the recycling of waste electrical and electronic equipment The separate collection and recycling of your waste equipment at the time of disposal will help to conserve natu...

Страница 60: ...enough during transport Put the RMA number on the address label Put the RMA number on the shipping carton AOC International Europe B V is not responsible for any damaged during transport due to improp...

Страница 61: ...ACT TORT WARRANTY STRICT LIABILITY OR OTHER THEORY SHALL NOT EXCEED THE PRICE OF THE INDIVIDUAL UNIT WHOSE DEFECT OR DAMAGE IS THE BASIS OF THE CLAIM IN NO EVENT SHALL AOC INTERNATIONAL EUROPE B V BE...

Страница 62: ...e RMA number on the address label Put the RMA number on the shipping carton Insure it or assume the risk of loss damage during shipment Pay all shipping charges EPI is not responsible for damage to in...

Страница 63: ...AL OR CONSEQUENTIAL DAMAGE IN THE UNITED STATES OF AMERICA SOME STATES DO NOT ALLOW THE EXCLUSION OR LIMITATION OF INCIDENTAL OR CONSEQUENTIAL DAMAGES SO THE ABOVE LIMITATION MAY NOT APPLY TOYOU ALTHO...

Страница 64: ...eturn Authorization Number upon verification into the program Step 4 A monitor will be advance shipped to your location Step 5 We will issue a UPS Call Tag to pick up the defective unit Step 6 Please...

Отзывы: