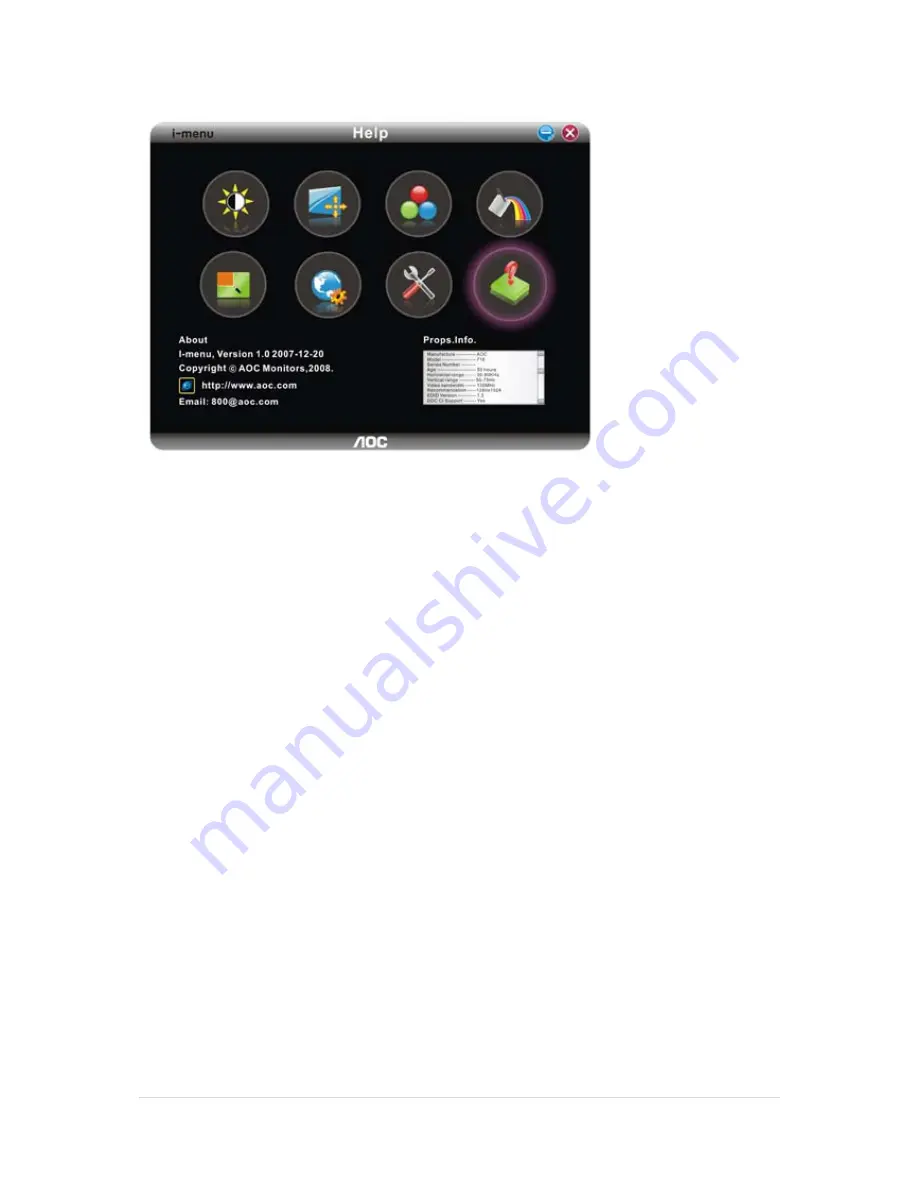
AOC 931Fwa Скачать руководство пользователя страница 23

٢٣

 | 

P a g e


8. Help 


On this page, you can find the information of the monitor . Welcome to link our website and send email to us if you have any 
problem.  

Compatibility :


i-menu supports major graphic cards of ATI, Nvidia, Intel, VIA(S3). Please contact with us if your graphic card was not 
supported i-menu software.  


DRIVER INSTALLATION GUIDE 


Windows 2000


1. Start Windows® 2000  
2. Click on the 'Start' button, point to 'Settings', and then click on 'Control Panel'.  
3. Double click on the 'Display' Icon.  
4. Select the 'Settings' tab then click on 'Advanced...'.  
5. Select 'Monitor'  
- If the 'Properties' button is inactive, it means your monitor is properly configured. Please stop installation.  
- If the 'Properties' button is active. Click on 'Properties' button. Please follow the steps given below.  
6. Click on 'Driver' and then click on 'Update Driver...' then click on the 'Next' button.  
7. Select 'Display a list of the known drivers for this device so that I can choose a specific driver', then click on 
'Next' and then click on 'Have disk...'.  
8. Click on the 'Browse...' button then select the appropriate drive F: ( CD-ROM Drive).  
9. Click on the 'Open' button, then click on the 'OK' button.  
10. Select your monitor model and click on the 'Next' button.  
11. Click on the 'Finish' button then the 'Close' button.  
If you can see the 'Digital Signature Not Found' window, click on the 'Yes' button.  

Содержание 931Fwa

Страница 1: ...١ P a g e AOC MONITOR USER S GUIDE 931Fwa SAFETY INTRODUCTION 2 SETUP 4 ADJUSTING 7 DRIVER INSTALLATION GUIDE 23 PRODUCT INFORMATION 25 TROUBLESHOOT 28 ...

Страница 2: ...f any must be used in order to comply with the emission limits 3 The manufacturer is not responsible for any radio or TV interference caused by unauthorized modification to this equipment It is theresponsibilities of the user to correct such interference WEEE Declaration Disposal of Waste Equipment by Users in Private Household in the European Union This symbol on the product or on its packaging i...

Страница 3: ... not accommodate the three wire plug have an electrician install the correct outlet or use an adapter to ground the appliance safely Do not defeat the safety purpose of the grounded plug Unplug the unit during a lightning storm or when it will not be used for long periods of time This will protect the monitor from damage due to power surges Do not overload power strips and extension cords Overload...

Страница 4: ...ecommended to look at the full face of the monitor then adjust the monitor s angle to your own preference Hold the stand so you do not topple the monitor when you change the monitor s angle You are able to adjust the monitor s angle from 5 to 20 NOTE Do not touch the LCD screen when you change the angle It may cause damage or break the LCD screen ...

Страница 5: ...able to the AC port on the back of the monitor 2 Connect one end of the 15 pin D Sub cable to the back of the monitor and connect the other end to the computer s D Sub port 3 Connect the audio cable to audio in port on the back of the monitor 4 Turn on your monitor and computer If your monitor displays an image installation is complete If it does not display an image see Troubleshooting ...

Страница 6: ...ns to assemble the wall mounting arm 3 Place the wall mounting arm onto the back of the monitor Line up the holes of the arm with the holes in the back of the monitor 4 Insert the 4 screws into the holes and tighten 5 Reconnect the cables Refer to the user s manual that came with the optional wall mounting arm for instructions on attaching it to the wall Noted VESA mounting screw holes are not ava...

Страница 7: ...up 1 Eco mode 2 Volume 3 Power Button Indicator 4 Source Auto Exit 5 Menu Enter OSD Settings Press the MENU button to activate the OSD window Press or to navigate through the functions Once the desired function is highlighted press the MENU buttonto activate it If the function selected has a sub menu press or again to navigate through the sub menu functions Once the desired function is highlighted...

Страница 8: ... to adjust volume Only for the models with speakers Source hot key When the OSD is closed press Auto Source button will be Source hot key function Only for the models with dual or more inputs Press Source button continuously to select the input source showed in the message bar press Menu Enter button to change to the source selected Auto configure hot key When the OSD is closed press Auto Source b...

Страница 9: ...gent color management 1 How to use Color Boost Five color enhancement settings To accommodate various display needs Color Boost also offers 5 different color enhancement modes Full Enhance Natural Skin Green Field Sky Blue and Auto Detect Please go to the fourth icon labeled Color Boost in the OSD menu and select one of the five settings you desire to be turned on Full Enhance When Full Enhance is...

Страница 10: ...ore natural and truer colors Natural Skin setting is ideal for viewing human portrait and detailed skin texture Green Field When Green Field is turned on the green color is enriched so that football field and mountain landscape would look more natural and fresh Green Field setting is ideal for watching mountain scenery and outdoor sports ...

Страница 11: ... use Picture Boost Users can change the color settings of a self selected zone on the screen The size and position of the selected zone can also be adjusted Picture Boost is located in the fifth icon labeled Picture Boost in the OSD menu Turn on Bright Frame to select a zone on the screen to be enhanced Please note when adjust or turn on any one of the DCB features the rest of color settings inclu...

Страница 12: ...he LCD module The higher the original CR the higher DCR can be achieved DCR is great for watching movie or video contents How to Use DCR Go to the first OSD icon labeled Luminance turn on or off DCR as desires DCR boosts the contrasts between lightness darkness and enables the viewer to see more layers and details of the picture especially in the darker areas Please note when DCR is on DCB will be...

Страница 13: ...a 3 DCR Off Disable dynamic contrast ratio On Enable dynamic contrast ratio Image Setup Clock 0 100 Adjust picture Clock to reduce Vertical Line noise Phase 0 100 Adjust Picture Phase to reduce Horizontal Line noise H Position 0 100 Adjust the verticalposition of the picture V Position 0 100 Adjust the horizontal position of the picture Color Temp Warm 6500K Recall Warm Color Temperature from EEPR...

Страница 14: ...position of OSD V Position 0 100 Adjust the horizontal position of OSD Timeout 5 120 Adjust the OSD Timeout Transparence 0 100 Adjust the transparence of OSD Language Select the OSD language Extra Input Select Auto Select to Auto Detect input signal Analog Select Analog Sigal Source as Input Digital Select Digital Sigal Source as Input Auto Config yes or no Auto adjust the picture to default Image...

Страница 15: ... i menu software Installation Welcome to use i menu software by AOC i menu makes it easy to adjust your monitor display setting by menus on the screen instead of OSD button on the monitor Please click here to setup the software To complete installation please follow the installation guide Using i menu 1 Luminance ...

Страница 16: ... Gamma1 Adjust to Gamma1 Gamma2 Adjust to Gamma 2 Gamma3 Adjust to Gamma 3 DCR Off Disable dynamic contrast ratio On Enable dynamic contrast ratio Reset Reset the current page Remarks 1 If DCR is set to on the other 4 items of Luminance cannot be adjusted 2 If anyone of DCR Color Boost and Bright Frame of Picture Boost is set to on the others are set to off automatically 3 The Brightness and Contr...

Страница 17: ...100 Adjust picture Clock to reduce Vertical Line noise Phase 0 100 Adjust Picture Phase to reduce Horizontal Line noise H Position 0 100 Adjust the verticalposition of the picture V Position 0 100 Adjust the horizontal position of the picture Reset Reset the current page ...

Страница 18: ...erature from EEPROM sRGB Recall SRGB Color Temperature from EEPROM User Red Red Gain from Digital register Green Green Gain Digital register Blue Blue Gain from Digital register Reset Reset the menu to default Remarks 1 When User is chosen you can change the monitor color to your desired color by setting the value of R G B 2 When sRGB is chosen the Brightness Contrast and Gamma can not be adjusted...

Страница 19: ...Field Mode Sky blue on or off Disable or Enable Sky blue Mode AutoDetect on or off Disable or Enable AutoDetect Mode Demo Disable or Enable Demo Reset Reset the menu to default Remarks 1 There is only one item can be set to on except Demo If you set any item to on the others are changed to off automatically 2 If anyone of DCR Color Boost and Bright Frame of Picture Boost is set to on the others ar...

Страница 20: ...Frame Brightness Contrast 0 100 Adjust Frame Contrast H position 0 100 Adjust Frame horizontal Position V position 0 100 Adjust Frame vertical Position Reset Reset the menu to default Remarks 1 Only when Bright Frame is set to on the other 5 items can be adjusted 2 If anyone of DCR Color Boost and Bright Frame of Picture Boost is set to on the others are set to off automatically ...

Страница 21: ...٢١ P a g e 6 Setting ...

Страница 22: ...٢٢ P a g e 7 Extra ...

Страница 23: ...he Properties button is inactive it means your monitor is properly configured Please stop installation If the Properties button is active Click on Properties button Please follow the steps given below 6 Click on Driver and then click on Update Driver then click on the Next button 7 Select Display a list of the known drivers for this device so that I can choose a specific driver then click on Next ...

Страница 24: ...steps below 7 Click on the Driver tab and then click on Update Driver button 8 Select the Install from a list or specific location advanced radio button and then click on the Next button 9 Select the Don t Search I will choose the driver to install radio button Then click on the Next button 10 Click on the Have disk button then click on the Browse button and then select the appropriate drive F CD ...

Страница 25: ...Input Video Signal Analog 0 7Vp p standard 75 OHM Power Source 100 240VAC 50 60Hz Power Consumption Active 37 W Standby 2 W Speakers 2 x 2W Physical Characteristics Connector Type 15 pin Mini D Sub Signal Cable Type Detachable Dimensions Weight Height with base 374 mm Width 454 mm Depth 220 mm Weight monitor only 4 1 kg Weight with packaging 5 8 kg Environmental Temperature Operating 0 to 40 Non O...

Страница 26: ...٧۶٨ 48 363 60 XGA 1024 ء ٧۶٨ 56 476 70 XGA 1024 ء ٧۶٨ 60 02 75 XGA 1024 ء ٧۶٨ 48 78 60 XGA 1024 ء ٧۶٨ 60 241 75 SXGA 1280 ء ١٠٢۴ 64 60 SXGA 1280 ء ١٠٢۴ 80 75 WXGA 1440 ء ٩٠٠ 55 93 60 WXGA 1440 ء ٩٠٠ 70 637 75 Pin Assignments Pin Number 15 Pin Side of the Signal Cable 1 Video Red 2 Video Green 3 Video Blue 4 N C 5 Detect Cable 6 GND R 7 GND G 8 GND B 9 5V 10 Ground 11 N C 12 DDC Serial data 13 H sy...

Страница 27: ...Power 22 TMDS Clock Shield 7 DDC Data 15 Ground for 5V 23 TMDS Clock 8 N C 16 Hot Plug Detect 24 TMDS Clock Plug and Play Plug Play DDC2B Feature This monitor is equipped with VESA DDC2B capabilities according to the VESA DDC STANDARD It allows the monitor to inform the host system of its identity and depending on the level of DDC used communicate additional information about its display capabilit...

Страница 28: ...as far away from the monitor as possible Use the maximum refresh rate your monitor is capable of at the resolution your are using Monitor Is Stuck In Active Off Mode The Computer Power Switch should be in the ON position The Computer Video Card should be snugly seated in its slot Make sure the monitor s video cable is properly connected to the computer Inspect the monitor s video cable and make su...

Отзывы: