AOC 24B1XH5 Скачать руководство пользователя страница 28


28 

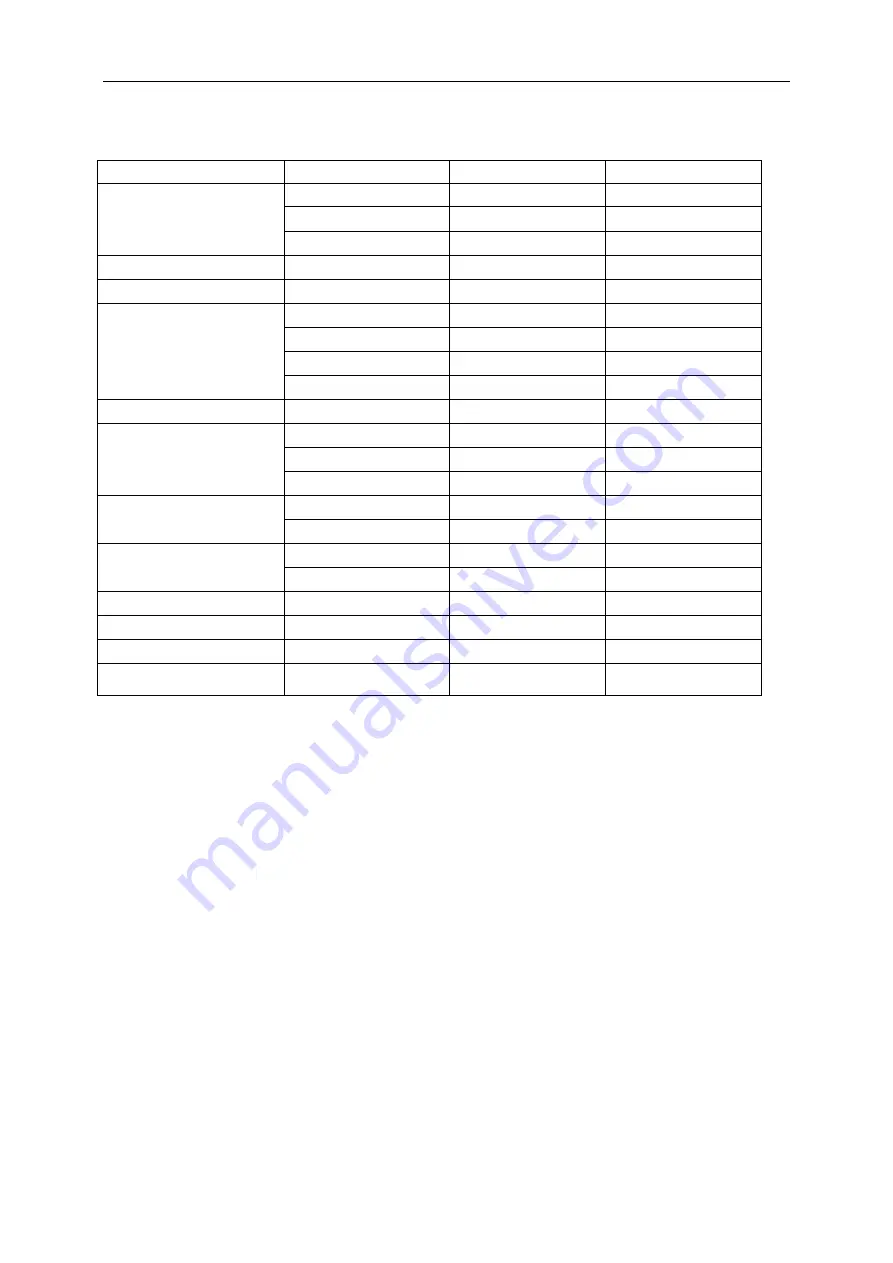
Preset Display Modes 


Standard 

Resolution 

H. Frequency (kHz) 

V. Frequency (Hz) 

VGA 

640x480@60Hz 

31.469 

59.94 

640x480@72Hz 

37.861 

72.809 

640x480@75Hz 

37.5 

75 

MAC MODES VGA 

640x480@67Hz 

35 

66.667 

IBM MODE 

720x400@70Hz 

31.469 

70.087 

SVGA 

800x600@56Hz 

35.156 

56.25 

800x600@60Hz 

37.879 

60.317 

800x600@72Hz 

48.077 

72.188 

800x600@75Hz 

46.875 

75 

MAC MIDE SVGA 

835 x 624@75Hz 

49.725 

74.5 

XGA 

1024x768@60Hz 

48.363 

60.004 

1024x768@70Hz 

56.476 

70.069 

1024x768@75Hz 

60.023 

75.029 

SXGA 

1280x1024@60Hz 

63.981 

60.02 

1280x1024@75Hz 

79.976 

75.025 

WSXG 

1280x720@60HZ 

45 

60 

1280x960@60HZ 

60 

60 

WXGA+ 

1440x900@60Hz 

55.935 

59.876 

WSXGA+ 

1680x1050@60Hz 

65.29 

59.954 

FHD 

1920x1080@60Hz 

67.5 

60 

FHD 

(for HDMI) 

1920x1080@75Hz 

83.89 

74.97 


Содержание 24B1XH5

Страница 1: ...1 LCD Monitor User Manual 24B1XH5 LED backlight www aoc com 2020 AOC All Rights Reserved...

Страница 2: ...le 10 Connecting the Monitor 11 Adjusting 12 Hotkeys 12 OSD Setting 14 Luminance 15 Image Setup 16 Color Setup 17 Picture Boost 18 OSD Setup 19 Extra 20 Exit 21 LED Indicator 21 Driver 22 i Menu 22 e...

Страница 3: ...used as follows NOTE A NOTE indicates important information that helps you make better use of your computer system CAUTION A CAUTION indicates either potential damage to hardware or loss of data and...

Страница 4: ...damage due to power surges Do not overload power strips and extension cords Overloading can result in fire or electric shock To ensure satisfactory operation use the monitor only with UL listed comput...

Страница 5: ...nufacturer A product and cart combination should be moved with care Never push any object into the slot on the monitor cabinet It could damage circuit parts causing a fire or electric shock Never spil...

Страница 6: ...t the stain instead of strong detergent which will cauterize the product cabinet When cleaning make sure no detergent is leaked into the product The cleaning cloth should not be too rough as it will s...

Страница 7: ...are not blocked by a table or curtain Do not engage the LCD monitor in severe vibration or high impact conditions during operation Do not knock or drop the monitor during operation or transportation...

Страница 8: ...cables Analog HDMI cables CD manual will be provided for all countries and regions Please check with the local dealer or AOC branch office for confirmation CD Manual Warranty card Base Adapter Power...

Страница 9: ...9 Setup Base Please setup or remove the base following the steps as below Please place the monitor on a soft and flat surface to prevent the scratch Setup Remove...

Страница 10: ...the monitor and then adjust the monitor s angle to your own preference Hold the stand so you will not topple the monitor when you change the monitor s angle You are able to adjust the monitor s angle...

Страница 11: ...back of the monitor 2 Connect one end of the 15 pin D Sub cable to the back of the monitor and connect the other end to the computer s D Sub port 3 Optional Requires a video card with HDMI port Connec...

Страница 12: ...e When there is no OSD press hotkey continuously to change 4 3 or wide image ratio If the product screen size is 4 3 or input signal resolution is wide format the hot key is disable to adjust Auto Exi...

Страница 13: ...essage of Clear Vision Demo on will be display on the screen for a duration of 5 seconds Press Menu or Exit button the message will disappear Press and hold button for 5 seconds again Clear Vision Dem...

Страница 14: ...ion repeat steps 2 3 4 OSD Lock Function To lock the OSD press and hold the MENU button while the monitor is off and then press power button to turn the monitor on To un lock the OSD press and hold th...

Страница 15: ...to exit Contrast 0 100 Contrast from Digital register Brightness 0 100 Backlight Adjustment Eco mode Standard Standard Mode Text Text Mode Internet Internet Mode Game Game Mode Movie Movie Mode Sports...

Страница 16: ...4 Press or to adjust 5 Press AUTO to exit Clock 0 100 Adjust picture Clock to reduce Vertical Line noise Phase 0 100 Adjust Picture Phase to reduce Horizontal Line noise Sharpness 0 100 Adjust picture...

Страница 17: ...ser Recall User Color Temperature from EEPROM DCB Mode Full Enhance ON OFF Disable or Enable Full Enhance Mode Nature Skin ON OFF Disable or Enable Nature Skin Mode Green Field ON OFF Disable or Enabl...

Страница 18: ...Enable Disable Bright Frame Frame Size 14 100 Adjust the Size of the Frame Brightness 0 100 Brightness Adjustment for Enhance Area Contrast 0 100 Contrast Adjustment for Enhance Area H position 0 100...

Страница 19: ...to adjust 5 Press AUTO to exit Language Select the OSD language Timeout 5 120 Adjust the OSD timeout V Position 0 100 Adjust the vertical position of the OSD Transparence 0 100 Adjust the OSD H Posit...

Страница 20: ...t Input Select Auto Auto Detect input signal D SUB Select D SUB signal source as input HDMI Select HDMI signal Source as input Auto Config Yes No Auto adjust the picture to default Off Timer 0 24 hrs...

Страница 21: ...xit 1 Press MENU Menu to display menu 2 Press or to select Exit and press MENU to enter 3 Press AUTO to exit Exit Exit the main OSD LED Indicator Status LED Color Full Power Mode White Power Saving Or...

Страница 22: ...lcome to i Menu software by AOC i Menu makes it easy to adjust your monitor display setting by using on screen menus instead of the OSD button on the monitor To complete installation please follow the...

Страница 23: ...l wizard to complete software installation Under each of the four PC statuses you may choose the desired time in minutes from the pull down menu for your monitor to automatically shutdown The example...

Страница 24: ...ool it splits the desktop into different panels and each panel displays a different window You only need to drag the window to a corresponding panel when you want to access it It supports multiple mon...

Страница 25: ...efer to the Setting the Optimal Resolution If the initial screen the login screen does not appear contact the Service Center or your dealer Can you see Input Not Supported on the screen You can see th...

Страница 26: ...ED GREEN or BLUE Inspect the monitor s video cable and make sure that no pin is damaged Make sure the monitor s video cable is properly connected to the computer Screen image is not centered or sized...

Страница 27: ...scan Size Maximum 296 46 mm Optimal preset resolution 1920x1080 60Hz Plug Play VESA DDC2B CI Input Connector D Sub 15 pin HDMI Power Source 19Vdc 1 31A Power Consumption Typical Brightness 90 Contrast...

Страница 28: ...6 25 800x600 60Hz 37 879 60 317 800x600 72Hz 48 077 72 188 800x600 75Hz 46 875 75 MAC MIDE SVGA 835 x 624 75Hz 49 725 74 5 XGA 1024x768 60Hz 48 363 60 004 1024x768 70Hz 56 476 70 069 1024x768 75Hz 60...

Страница 29: ...14 V sync 7 GND G 15 DDC Serial clock 8 GND B 19 Pin Color Display Signal Cable Pin No Signal Name Pin No Signal Name 1 TMDS Data 2 11 TMDS Clock Shield 2 TMDS Data 2 Shield 12 TMDS Clock 3 TMDS Data...

Страница 30: ...SA DDC STANDARD It allows the monitor to inform the host system of its identity and depending on the level of DDC used communicate additional information about its display capabilities The DDC2B is a...

Отзывы: