AOC 2436Swa Скачать руководство пользователя страница 6

۶

 | 

P a g e


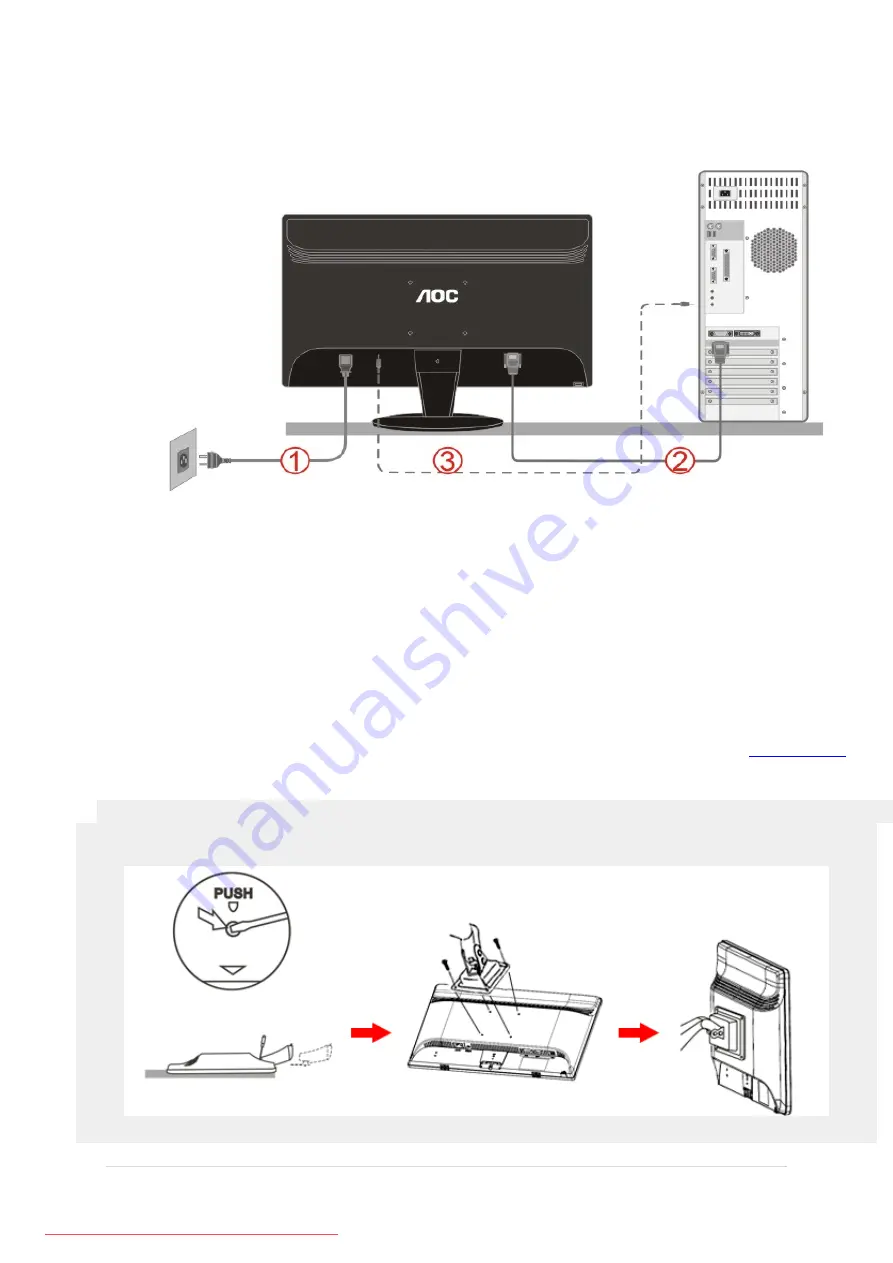
Cable Connections On Back of Monitor and Computer


1. Power 
2. Analog (DB-15 VGA cable)  
3.Audio 
  

To protect equipment, always turn off the PC and LCD monitor before connecting.  

1.  Connect the power cable to the AC port on the back of the monitor.  
2.  Connect one end of the 15-pin D-Sub cable to the back of the monitor and connect the other end to the 

computer's D-Sub port.  

3.  Connect the audio cable to audio in port on the back of the monitor  
4.  Turn on your monitor and computer.  

If your monitor displays an image, installation is complete. If it does not display an image, please refer 

Troubleshooting

.


Preparing to Install An Optional Wall Mounting Arm.  

Downloaded from ManualMonitor.com Manuals

Содержание 2436Swa

Страница 1: ...P a g e AOC MONITOR USER S GUIDE 2436Swa SAFETY INTRODUCTION 2 SETUP 4 ADJUSTING 7 DRIVER INSTALLATION GUIDE 15 PRODUCT INFORMATION 22 TROUBLESHOOT 24 Downloaded from ManualMonitor com Manuals...

Страница 2: ...ong periods of time This will protect the monitor from damage due to power surges Do not overload power strips and extension cords Overloading can result in fire or electric shock To ensure satisfacto...

Страница 3: ...l scratch the screen surface Please disconnect the power cord before cleaning the product If the product is emitting a strange smell sound or smoke disconnect the power plug IMMEDIATELY and contact a...

Страница 4: ...P a g e SETUP Please setup or remove the base following the steps as below Downloaded from ManualMonitor com Manuals...

Страница 5: ...or s angle to your own preference Hold the stand so you will not topple the monitor when you change the monitor s angle You are able to adjust the monitor s angle from 5 to 20 NOTE Do not touch the LC...

Страница 6: ...2 Connect one end of the 15 pin D Sub cable to the back of the monitor and connect the other end to the computer s D Sub port 3 Connect the audio cable to audio in port on the back of the monitor 4 T...

Страница 7: ...onnect the cables Refer to the user s manual that came with the optional wall mounting arm for tions on attaching it to the wall Noted VESA mounting screw holes are not available for all models please...

Страница 8: ...P a g e 4 Click Personalization 5 Click Display Settings 6 Set the resolution SLIDE BAR to 1920 by 1080 Downloaded from ManualMonitor com Manuals...

Страница 9: ...P a g e For Windows XP 1 Click START 2 Click SETTINGS 3 Click CONTROL PANEL 4 Click Appearance and Themes 5 Double click DISPLAY Downloaded from ManualMonitor com Manuals...

Страница 10: ...esolution SLIDE BAR to 1920 by 1080 For Windows ME 2000 1 Click START 2 Click SETTINGS 3 Click CONTROL PANEL 4 Double click DISPLAY 5 Click SETTINGS 6 Set the resolution SLIDE BAR to 1920 by 1080 Down...

Страница 11: ...3format or Wide format When the input resolution is wide format the aspect ratio hotkey is disabled When the main menu or sub menu is active the key functions as to select up or increase value Auto Do...

Страница 12: ...P a g e Eco mode DCR Standard Text Internet Game Movie Sports DCR Standard Downloaded from ManualMonitor com Manuals...

Страница 13: ...P a g e TEXT INTERNET Game Downloaded from ManualMonitor com Manuals...

Страница 14: ...ports Notes When Eco mode is not set as Standard Contrast and Brightness can not be adjusted When DCR is set as On Contrast Brightness Eco mode and Gamma can not be adjusted Downloaded from ManualMoni...

Страница 15: ...ctive Click on Properties button Please follow the steps given below 6 Click on Driver and then click on Update Driver then click on the Next button 7 Select Display a list of the known drivers for th...

Страница 16: ...y a list of all the drivers in a specific location so you can choose the driver you want then click on Next and then click on Have Disk 8 Click on the Browse button select the appropriate drive F CD R...

Страница 17: ...e Advanced button 6 Select Monitor tab If the Properties button is inactive it means your monitor is properly configured Please stop installation If the Properties button is active click on Properties...

Страница 18: ...r button 8 Select the Install from a list or specific location advanced radio button and then click on the Next button 9 Select the Don t Search I will choose the driver to install radio button Then c...

Страница 19: ...passed Windows Logo testing to verify its compatibility with Windows XP message please click on the Continue Anyway button 13 Click on the Finish button then the Close button 14 Click on the OK butto...

Страница 20: ...erties button is deactivated it means the configuration for your monitor is completed The monitor can be used as is If the message Windows needs is displayed as shown in the figure below click Continu...

Страница 21: ...ROM Drive 8 Select your monitor model and click on the Next button 9 Click Close Close OK OK on the following screens displayed in sequence I_MENU Welcome to i Menu software by AOC i Menu makes it eas...

Страница 22: ...Input Video Signal Analog 0 7Vp p standard 75 OHM Power Source 100 240VAC 50 60Hz Power Consumption Typical 49 W Standby 1 W USB Downstream port A type To USB device loading 100mA off timer 0 24hours...

Страница 23: ...9 725 74 550 XGA 1024 768 60Hz 48 363 60 004 XGA 1024 768 70Hz 56 476 70 069 XGA 1024 768 75Hz 60 023 75 029 XGA 1024 768 75Hz 60 241 74 927 1280 960 60Hz 60 000 60 000 SXGA 1280 1024 60Hz 63 981 60 0...

Страница 24: ...the initial screen the login screen does not appear contact the Service Center or your dealer Can you see Input Not Supported on the screen You can see this message when the signal from the video car...

Страница 25: ...erly connected to the computer Screen image is not centered or sized properly Adjust H Position and V Position or press hot key AUTO Picture has color defects white does not look white Adjust RGB colo...

Отзывы: