AOC 2217V Скачать руководство пользователя страница 17

What is DCR?   
Dynamic Contrast Ratio (DCR) auto adjusts the brightness of the screen so users can see the darker areas of the displayed content 
in more depths. By increasing the darkness of the dark areas and the brightness of the bright areas, contrast ratio is uplifted to 
exceed 2000:1. DCR value varies subject to the original CR values of the LCD module. The higher the original CR, the higher DCR 
can be achieved. DCR is great for watching movie or video contents.   
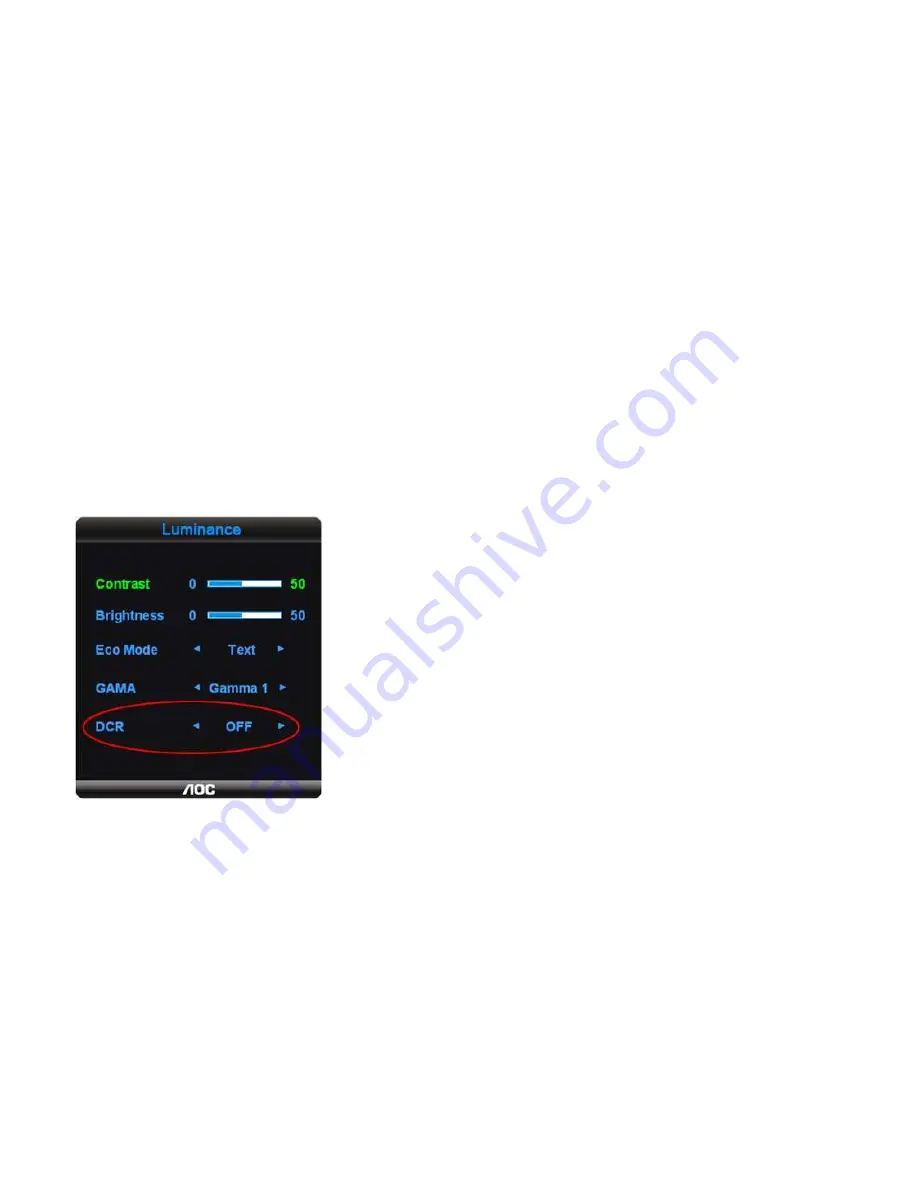
  

How to Use DCR?   
Go to the first OSD icon labeled "Luminance", turn on or off DCR as desires. DCR boosts the contrasts between lightness & darkness 
and enables the viewer to see more layers and details of the picture, especially in the darker areas. Please note when DCR is on, 
DCB will be disabled. 


Содержание 2217V

Страница 1: ...tips and solutions for common problems Product Information lists the technical specifications of the monitor National Conventions The following subsections describe notational conventions used in this...

Страница 2: ...onable protection against harmful interference in a residential installation This equipment generates uses and can radiate radio frequency energy and if not installed and used in accordance with the i...

Страница 3: ...r other household waste Instead it is your responsibility to dispose of your waste equipment by handing it over to a designated collection point for the recycling of waste electrical and electronic eq...

Страница 4: ...r home consult your dealer or local power company The monitor is equipped with a three pronged grounded plug a plug with a third grounding pin This plug will fit only into a grounded power outlet as a...

Страница 5: ...th hard things 3 Setup Setup the stand and base Please setup or remove the base following below steps Adjusting Viewing Angle For optimal viewing it is recommended to look at the full face of the moni...

Страница 6: ...NOTE Do not touch the LCD screen when you change the angle It may cause damage or break the LCD screen Attaching the Cables Cable Connections On Back of Monitor and Computer...

Страница 7: ...to the back of the monitor and connect the other end to the computer s D Sub port 3 Optional Requires a video card with DVI port Connect one end of the 24 pin DVI cable to the back of the monitor and...

Страница 8: ...assemble the wall mounting arm 3 Place the wall mounting arm onto the back of the monitor Line up the holes of the arm with the holes in the back of the monitor 4 Insert the 4 screws into the holes an...

Страница 9: ...ouble click DISPLAY 5 Click SETTINGS 6 Set the resolution SLIDE BAR to 1680 by 1050 External Controls Press the power button to turn the monitor on or off The other control knobs are located at front...

Страница 10: ...To un lock the OSD press and hold the Left button while the monitor is off and then press power button to turn the monitor on Eco Mode hot key Press the Eco key continuously to select the Eco mode of...

Страница 11: ...olor Boost DCB is an advanced color adjustment technology Through analyzing RGB signals DCB creates more vivid and natural images to suit various color environment needs DCB has two types of color enh...

Страница 12: ...ment settings To accommodate various display needs Color Boost also offers 5 different color enhancement modes Full Enhance Natural Skin Green Field Sky Blue and Auto Detect Please go to the fourth ic...

Страница 13: ...fully enriched thus all colors become more vibrant Nature Skin When Natural Skin is turned on the red and yellow colors are enriched automatically thus presents human skin with more natural and truer...

Страница 14: ...pe would look more natural and fresh Green Field setting is ideal for watching mountain scenery and outdoor sports Sky Blue When Sky Blue is turned on the color blue is being fine tuned so that the sk...

Страница 15: ...nge the color settings of a self selected zone on the screen The size and position of the selected zone can also be adjusted Picture Boost is located in the fifth icon labeled Picture Boost in the OSD...

Страница 16: ...Disclaimer DCB aftereffects are subject to the resolution and quality of the display content hence may look different than the above illustrations DCR Adjustment...

Страница 17: ...d 2000 1 DCR value varies subject to the original CR values of the LCD module The higher the original CR the higher DCR can be achieved DCR is great for watching movie or video contents How to Use DCR...

Страница 18: ...ence may look different than the above illustrations Function Control Illustration Luminance Adjust Range Description Brightness 0 100 Backlight Adjustment Contrast 0 100 Contrast from Digital registe...

Страница 19: ...sition 0 100 Adjust the horizontal position of the picture Color Temp Warm 6500K Recall Warm Color Temperature from EEPROM Normal 7300K Recall Normal Color Temperature from EEPROM Cool 9300K Recall Co...

Страница 20: ...Setup H Position 0 100 Adjust the verticalposition of OSD V Position 0 100 Adjust the horizontal position of OSD Timeout 5 120 Adjust the OSD Timeout Transparence 0 100 Adjust the transparence of OSD...

Страница 21: ...active the other two function is turned off accordingly LED Indicators Status LED Color Full Power Mode Green or Blue Active off Mode Orange or red How to use i menu software Installation Welcome to...

Страница 22: ...Adjust Range Description Contrast 0 100 Contrast from Digital register Brightness 0 100 Backlight Adjustment Eco mode Standard Standard Mode Text Text Mode Internet Internet Mode Game Game Mode Movie...

Страница 23: ...dynamic contrast ratio Reset Reset the current page Remarks 1 If DCR is set to on the other 4 items of Luminance cannot be adjusted 2 If anyone of DCR Color Boost and Bright Frame of Picture Boost is...

Страница 24: ...k to reduce Vertical Line noise Phase 0 100 Adjust Picture Phase to reduce Horizontal Line noise H Position 0 100 Adjust the verticalposition of the picture V Position 0 100 Adjust the horizontal posi...

Страница 25: ...B Recall SRGB Color Temperature from EEPROM User Red Red Gain from Digital register Green Green Gain Digital register Blue Blue Gain from Digital register Reset Reset the menu to default Remarks 1 Whe...

Страница 26: ...ce Mode Nature Skin on or off Disable or Enable Nature Skin Mode Green Field on or off Disable or Enable Green Field Mode Sky blue on or off Disable or Enable Sky blue Mode AutoDetect on or off Disabl...

Страница 27: ...t and Bright Frame of Picture Boost is set to on the others are set to off automatically 5 Picture Boost Picture Boost Adjust Range Description Bright Frame on or off Disable or Enable Bright Frame Fr...

Страница 28: ...ion Reset Reset the menu to default Remarks 1 Only when Bright Frame is set to on the other 5 items can be adjusted 2 If anyone of DCR Color Boost and Bright Frame of Picture Boost is set to on the ot...

Страница 29: ...7 Extra...

Страница 30: ...8 Help On this page you can find the information of the monitor Welcome to link our website and send email to us if you have any problem...

Страница 31: ...k on Driver and then click on Update Driver then click on the Next button 7 Select Display a list of the known drivers for this device so that I can choose a specific driver then click on Next and the...

Страница 32: ...stop installation If the Properties button is active click on Properties button Please follow the steps below 7 Click on the Driver tab and then click on Update Driver button 8 Select the Install from...

Страница 33: ...e monitor No Plug Play In order for the Plug Play feature of the monitor to work you need a Plug Play compatible computer video card Check with your computer manufacturer Also check the monitor s vide...

Страница 34: ...ake sure that none of the pins arebent Make sure the monitor s video cable is properly connected to the computer Screen image is not centered or sized properly Adjust H Position and V Position or pres...

Страница 35: ...terface TMDS Power Source 100 240VAC 50 60Hz Power Consumption Active 49 W Standby 2 W Physical Characteristics Connector Type 15 pin Mini D Sub DVI D Signal Cable Type Detachable Dimensions Weight He...

Страница 36: ...70 087 VGA 640 480 60Hz 31 469 59 940 Mac mode 640 480 67Hz 35 000 66 667 VGA 640 480 72Hz 37 861 72 809 VGA 640 480 75Hz 37 500 75 000 Dos mode 720 400 70Hz 31 469 70 087 SVGA 800 600 56Hz 35 156 56...

Страница 37: ...75Hz 60 289 74 893 VESA Mode 1280 960 60Hz 60 000 60 000 SXGA 1280 1024 75Hz 63 981 60 020 SXGA 1280 1024 75Hz 79 976 75 025 WXGA 1440 900 75Hz 55 935 59 887 WXGA 1440 900 75Hz 70 635 74 984 WSXGA 168...

Страница 38: ...Data 5 6 DDC Clock 14 5V Power 22 TMDS Clock Shield 7 DDC Data 15 Ground for 5V 23 TMDS Clock 8 N C 16 Hot Plug Detect 24 TMDS Clock Plug and Play Plug Play DDC2B Feature This monitor is equipped wit...

Отзывы: