AnyTone AT-D868UV Скачать руководство пользователя страница 7

After making these changes, you are now ready to write this personalized code 
plug to your radio.  The first thing you should do is 

SAVE

 the modified file with a 

unique name.  Some people like to use a file name that included the date the file
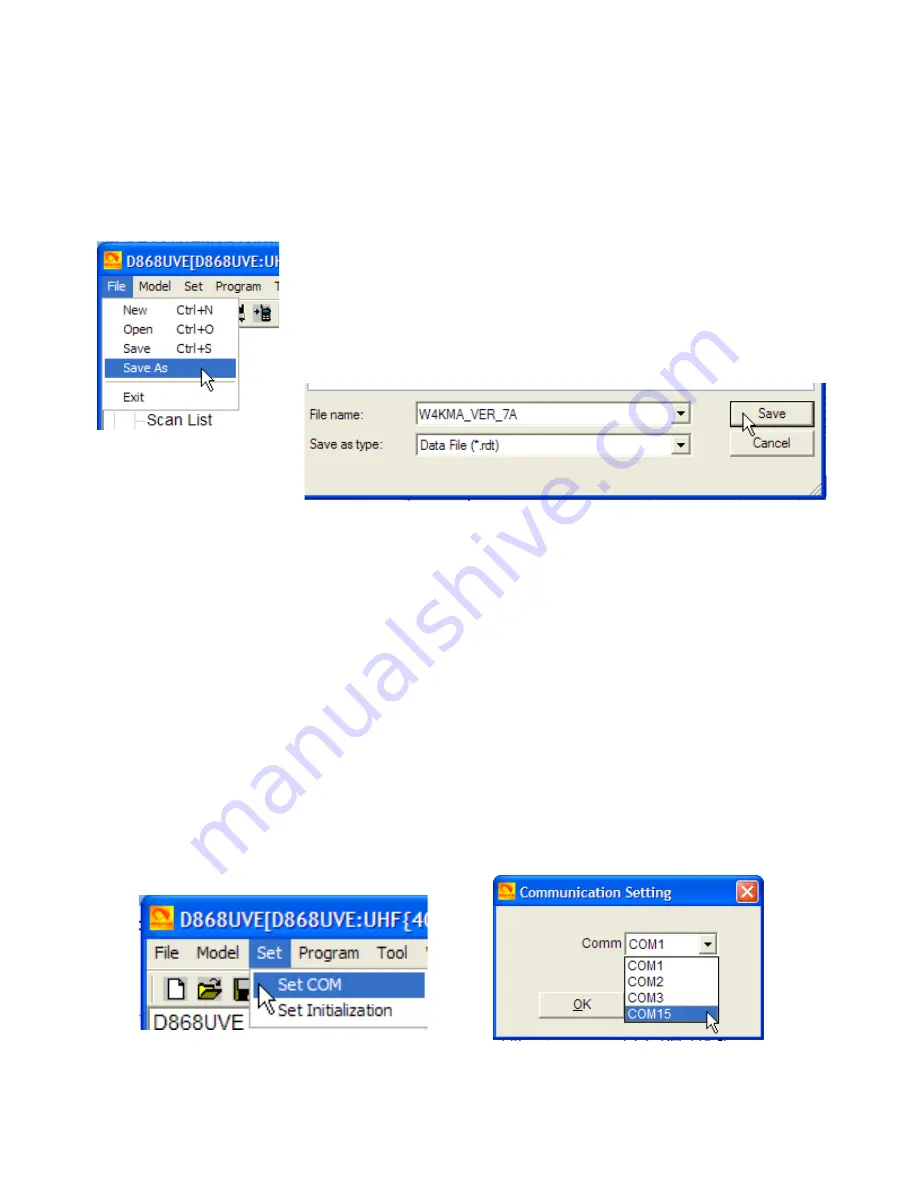
was modified.  To save your file with a unique name, click 

File

 and 

Save As

.  

Then type in a unique name, choose a location to save to and click 

Save

, as 

seen below.


Now that your file is saved, you can write it to your radio.  Before you can read 
from or write to the radio, you 

must

 install the Windows driver.  This driver is 

included with other files, each time a firmware update is released.  This driver is 
required for updating firmware, so if you have already done that, you've already 
installed the driver.  On the off chance you're only reading this section on 
installing a code plug, 

install the driver

.  It's file name is 

PC_cable_GD_VirtualComDriver 1.0.1.2118

.

With the radio turned off (always have the radio off when connecting the USB 
cable), attach the cable to both the radio and the computer.  Turn the radio 

ON


and allow it to cycle through the Power-on Screen.  Choose 

Set

 and

 Set Com

.  

From the drop down box that opens, choose the required Com Port (this is 
usually the last one in the list).  Then click 

OK

.


Содержание AT-D868UV

Страница 1: ...After writing firmware to the radio the update will not take affect until the radio is re booted This is a key pad procedure not just a simple power on power off All versions of firmware updates can b...

Страница 2: ...dio and the computer Press and hold both the PTT button and the orange PF3 button and turn on the radio The red LED light near the on off switch will blink slowly The radio is now ready to accept the...

Страница 3: ...ld both the PTT button and the PF1 button located just below the PTT button while powering on the radio The screen will ask for you to Confirm After the CPU re boot the screen will return to the setti...

Страница 4: ...e sure to update the Radio ID List to show your DMR MARC ID number and name Two other options that should be checked are the information on the start up screen and the assignment of functions to vario...

Страница 5: ...own choose Radio ID List and fill in your specific information as shown in the example below Another option to check is the Welcome Screen or Power on screen This is an option that shows custom inform...

Страница 6: ...list The last option that I personally check is the assignment of button functions I have my own preference for this assignment and I can check the borrowed file and quickly make changes if needed Hi...

Страница 7: ...all the Windows driver This driver is included with other files each time a firmware update is released This driver is required for updating firmware so if you have already done that you ve already in...

Страница 8: ...in the next window and click OK You will see the writing progression on your screen With a large Digital Contact List the process will not be quick After a successful write you will see this screen an...

Отзывы: