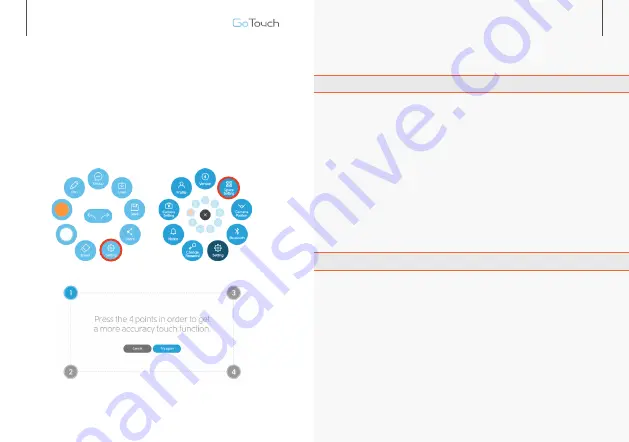
7. 카메라 위치를 맞춘 후 Setting → Space Setting →
화면에 나오는 순서대로 네포인트를 찍어서 화면영역을 지정하면
GoTouch Setting이 끝납니다.
Select ‘Setting’ - ‘Space Setting’.
Then follow the onscreen instructions to calibrate the Stylus position.
Now, it is your own personal digital whiteboard.
3. 설치방법
Getting Started
12
주의 사항
1. 직사광선이 있는 장소는 지양합니다.
야외, 창가 쪽, 할로겐 근처 등
2. 카메라를 평평한 장소 또는 움직이지 않는 곳에 올려주세요.
중심이 맞지 않는 곳에 올려둘 경우 위치 지정한 영역이 틀어져
다시 Setting을 진행해야 할 수 있습니다.
3. 프로젝터의 발열을 주의해주세요.
프로젝터 고열에 의해서 제품에 오작동이 일어날 수 있습니다.
4. 펜을 45도 눕혀서 사용해주세요.
세워서 사용할 시 펜에서 나오는 빛을 정확하게 인식할 수 없게 됩니다.
Safety and Precautions!
1. Avoid using GoTouch in direct sunlight or under a light bulb.
2. Please put the camera on a flat surface. If the location of the
camera changes, you must re-calibrate.
3. Always be aware of the projector’s temperature. Long-term
damage can be incurred by high temperature of the projector.
4. Please hold a pen at a 45 degree angle. Holding the pen uplight
prevents the camera from detecting the light from the pen.
3. 설치방법
Getting Started
13


