background image


User Manual 

III 


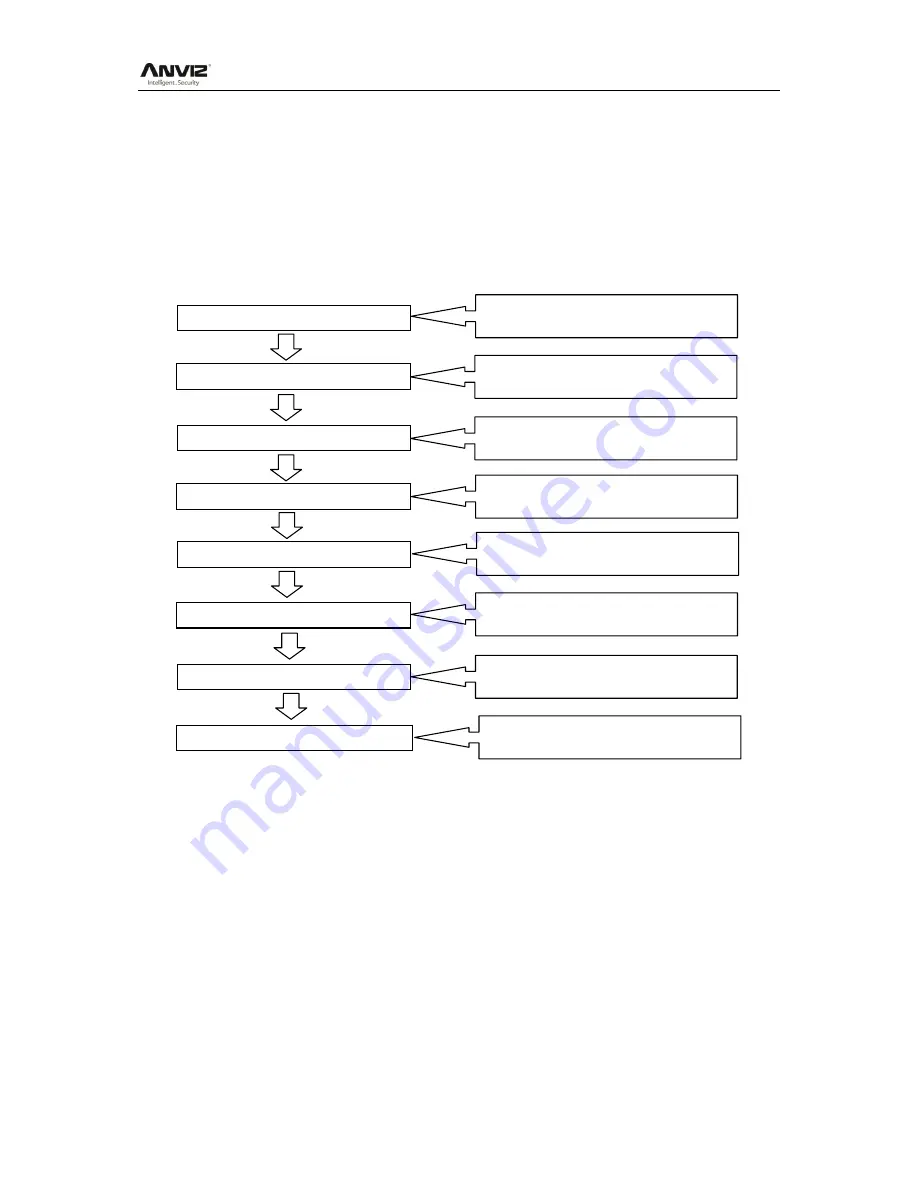
Software Operation flowchart 

This software includes: System Parameter, Department Management, Employee Maintenance, 

Shift Management, Employee Leave, and Statistic Report, etc. It is not enough to only understand 

the function of each module, but to know the relationship between the modules and the system 

operation flowchart. Therefore, you can get the correct report. 

Employee Software operation flowchart is as follows: 


1. 

When running the software for the first time, please set parameters including company name, 

time attendance rule, statistic rule for early, late, and overtime etc. Make sure the system 

parameter complies with the enterprise management requirement .When finishing the 

parameters configuration; you do not need to modify the configuration unless the 

management rules change. 

2. 

Normally, there are many departments in one company and all departments need to be 

inputted manually, unlike importing the employee list directly. Department setup should be 

completed before employee maintenance. 

3. 

When running the software for the first time, please put the employee information in a Text file 

(*. txt) or MS Excel file (*.xls) format according to the requested format. For the requested 

1.  System Parameter 

2. Department management 

3. Employee Maintenance 

4. Shift Management 

5. Employee Schedule 

6. Record Collection 

7. Exception Management 

8. Statistic Calculate 

Track and calculate records report. 
Create the T&A report 

Forgot clock in/out Collective late/early. 

Collect records from the device or import 
the backup record file 

Allocate employee shift or temporary shift 

Set timetable and shift. 

Add, delete and modify employee. 
Import and transfer employee 

Add, delete and modify departments. 

Set T&A rule statistic rule, company name 
and leaving class 

Содержание T50

Страница 1: ... 2001 2013 Anviz Global Inc T50 User Manual V1 4 ...

Страница 2: ...d access control products for enterprises with its strong function and accuracy Please read the user manual carefully before installation You will have a general understanding of our products functions and will be able to obtain basic knowledge regarding installation debugging maintenance application and management to better use this product Our product adopts the latest fingerprint and RFID recog...

Страница 3: ...management rules change 2 Normally there are many departments in one company and all departments need to be inputted manually unlike importing the employee list directly Department setup should be completed before employee maintenance 3 When running the software for the first time please put the employee information in a Text file txt or MS Excel file xls format according to the requested format F...

Страница 4: ...gotten to clock in out When the above cases happens please address right way in the software to ensure the accuracy of the statistic report 8 After all the above mentioned operations are finished you can calculate and get the report You can get different statistic reports such as the report of all employees the report of a department employee and the report of a certain time period In the software...

Страница 5: ...18 3 System Installation 20 3 1 Running Environment 20 3 2 System Installation 20 4 Background Management 24 4 1 Log in System 24 4 2 System 25 4 2 1 Parameters Settings 25 4 2 2 Administrators 27 4 2 3 Administrator s Password Set 28 4 2 4 Modified Record Log 28 4 2 5 Managing Log 29 4 2 6 Set Database Link 29 4 2 7 Exit System 30 4 3 HR Management 30 4 3 1 Department Management 30 4 3 2 Employee...

Страница 6: ...ommunication 54 5 1 Communication Management Software 54 5 1 1 Add Unit 54 5 1 2 Modify Unit 55 5 1 3 Delete Unit 56 5 1 4 Right Key Menu 56 5 1 5 Synchronize Time 59 5 1 6 Time zone Group settings 60 5 1 7 Device Parameter Settings 61 5 1 8 Ring Settings 63 5 1 9 Auto Update the T A Status 63 5 1 10 Download new Record 64 5 1 11 Download all Record 64 5 1 12 Backup Employees 65 5 1 13 Resume Empl...

Страница 7: ...ent PW Setting 79 5 6 5 Database Linking Setting 80 5 6 6 Exit System 81 5 7 User Interface Configuration 81 5 7 1 Interface Skin Color 81 5 7 2 Change the Software Language 81 5 7 3 Set Quick Access Button 81 6 FAQ 84 6 1 Fingerprint has enrolled but often gets failure in identification 84 6 2 The machine cannot connect with PC 84 6 3 No records found even though employee has clocked in out 85 6 ...

Страница 8: ...User Manual 8 Chapter 1 Product Introduction The main theme of this chapter is the advantage of this T A as well as function introduction ...

Страница 9: ...nviz optical fingerprint reader Scratch proof Unbreakable and Durable Will accept all kinds of fingerprints Stylish blue LCD Musical buzzer Works as a Stand alone Standard 1000 fingerprints Standard 50000 records Multiple identification method fingerprint only ID password ID fingerprint Standard RS485 Wiegand26 output dry contact output optional TCP IP network interface Optional Anviz SC021 access...

Страница 10: ...tic Sensor Optical CMOS FP Capacity 1000 Record Capacity 50000 Resolution 500DPI Scan Area 18 22 MM Communication Method RS 485 TCP IP USB Identification Method FP ID PSW ID FP Identification Time 1 s FRR 0 001 FAR 0 00001 Temperature 10 60 Working Current 130mA Sleeping Current 20uA ESD 15000V ...

Страница 11: ...User Manual 11 Chapter 2 Operation Guide This chapter is mainly about appearance illustration and relevant system settings such as how to add and delete users etc ...

Страница 12: ...ult interface as following 2 3 Management Menu In order to manage data you need to enter management menu Press OK M key to password verification interface Input management password default is 12345 Press OK M key to confirm Device will make 4 prompt sounds and enter management menu Press 0 key to switch between different options in the interface above ...

Страница 13: ...FP registration Select FP1 or FP2 and press OK M to confirm Start FP registration Place finger needed to register on scanner window After a short beep move finger away The LCD interface will show as following Place the same finger on scanner window again After a short beep move your finger away If success device will sound 4 short beeps The interface will show OK like this If registration fails de...

Страница 14: ... 1 2 Password registration Press 0 and switch to PW option Press OK M to confirm and start password registration Input user password through keypad max 6 digit Press OK M to confirm and device will sound two short beeps which prompts input password again After inputting password twice press OK M to confirm And device will sound 4 short beeps indicating success ...

Страница 15: ...Input the user ID needed to be deleted i e 000001 Press OK M to confirm Device will sound 4 short beeps indicating the user deletion is successful 2 3 3 Set Date time Press 0 to select TIME option Press OK M to enter setting interface Input the date with number key Press OK M to confirm And then set time as following ...

Страница 16: ... enter admin password setting interface Input admin password through keypad 6 digits Press OK M to confirm and device will sound two short beeps which prompts input password again After inputting the same password twice press OK M to confirm And device will sound 4 short beeps indicating success If the two passwords are different the device will sound a long beep indicating the password modificati...

Страница 17: ... If device sounds 4 short beeps prompting verification is successful If device sounds a long beep prompting verification failed 2 3 5 2 Fingerprint Verification In default interface place registered finger on scanner window After a short beep move the finger away If device sounds 4 short beeps prompting verification is successful If device sounds a long beep prompting verification failed ...

Страница 18: ...ord 12345 press the Initialization Button until you hear beeps The operation will not delete any user data stored in the device 2 3 7 Reset Restarts Device Press the Reset button at the button of the device until the LCD goes out Now release the button the device will restart Notice Resetting will not delete any information or settings stored in the device ...

Страница 19: ...User Manual 19 Chapter3 System Installation This chapter mainly discusses the installation and un installation of T A software as well as the hardware and operation system requirement ...

Страница 20: ... hardware space COM Port CD ROM CD ROM needed in installation VGA support 800 600 resolution and above Operating system Microsoft Windows 2000 XP recommended Microsoft Windows Vista Microsoft Windows 7 3 2 System Installation Please insert disc into CD ROM and the disc will automatically run the Guide interface If not please run Guide interface exe in the root directory of the disc The following w...

Страница 21: ...User Manual 21 Please select local dialect Select installation path default as D click Next month Please confirm the installation list and click Install Click Yes ...

Страница 22: ...User Manual 22 The installation will be done after seconds see the picture below Click Finish to close the installation program and an icon will be added to the desktop ...

Страница 23: ...agement The main theme of this chapter is how to collect attendance records from different terminals with management software and generate different reports The background software can manage employee information set rules of attendance etc ...

Страница 24: ... desktop to start the attendance background management program The log in interface will pop up as follows The default administrator s name is Admin and password is empty Log into the system and the following interface will be displayed The main interface includes three parts 1 System menu Includes the whole function module information 2 Shortcut button Shortcut button of common function module ar...

Страница 25: ...the transition standard to calculate the late to work early to leave free overtime items minute is the good transition standard of hours and working day Late for work as how many minutes can be set when no clock in on duty early to leave as how many minutes when no clock out for off duty Free overtime work can also be calculated on the base that how many minutes working after off duty time Shift e...

Страница 26: ...corresponding unit Accumulate by times Only calculate the total times display the accumulated times in report Notice The setting of stat Rules above will directly affect the statistical result Please make above setting according to the true status of your company to ensure the accuracy of reports Leave class Click page Leave class following shows Add new leave class Click Append input the name of ...

Страница 27: ... need to set the privileges for every administrator with which the administrator can modify the operation items after he log in the software there are all the items in the Items operable list in above picture such as Employee maintenance Shifts settings Calculating and Report we can set different privileges for different administrators so as to divide and manage the task systematically 2 After you...

Страница 28: ...stem Administrator s Password Set following springs Input the original password in Old Pwd enter the new password in New Pwd enter again in Confirm Pwd and click OK to finish 4 2 4 Modified Record Log Click menu System Modified Record Log following springs Select department employee No and time range click Search and those records which match the above condition will be displayed ...

Страница 29: ... range then click Search to see what operations have been done by this administrator within the selected time range which makes it possible that the multi administrators can use the software at the same time 4 2 6 Set Database Link This system adopts the database interface of Microsoft ADO The acquiescence database is Access2000 The defaulted is att2003 mdb under the main setup directory You can s...

Страница 30: ... correctness of the database 4 2 7 Exit System Click Exit System in System menu The following menu springs Click OK to exit management software and return to Windows system 4 3 HR Management Click HR Management on the main menu following springs 4 3 1 Department Management Click Department Management in the HR Management menu springs the following window ...

Страница 31: ...department you just added in the Department operable Department modification Choose the department click Modify and input the new department name then click Save Delete the department Choose the department click Delete and then click OK to complete Notice Repetition of department name is not allowed if there are employees existing in the deleted department those employees will be automatically tra...

Страница 32: ...he shifts for this employee if the checkbox of Rest On Holiday is checked thus for those holidays even there are shifts on those days for the employee those shifts will be invalid And if there are time attendance records of this employee those records will be deemed as free overtime 2 Employee No is exclusive as well as the first digit cannot be 0 Employee s modification Choose the employee click ...

Страница 33: ...ification will take effect and be saved Click Show all columns to display all fields in the list Click Export Data and following window will prompt Please select your target directory of your export file format txt or xls and the file name Click Save to confirm the operation Notice Exported Excel file can be used as backup information and can be imported again 4 4 Attendance Management Click TA ma...

Страница 34: ...e period between On duty and Off duty required in the company rule For instance the company rule requires the working hours be 08 00 12 00 and 13 00 17 00 so 08 00 12 00 and 13 00 17 00 are two timetables If such a shift needs to be setup these two timetables should be setup first Here we use time table morning to indicate 08 00 12 00 and time table afternoon to indicate 13 00 17 00 so two timetab...

Страница 35: ... Besides Begin Clock in Time and End Clock in Time can be more than one day meaning End Clock in Time can be before Begin Clock in Time but it can t be longer than 24 hours Late error allowance means how many minutes after On duty are treated as late Early error allowance means how many minutes before End Clock in Time are treated as early Count as work day and Count as work time XXX minutes are u...

Страница 36: ...ht shift 20 00 04 00 Other information can be setup according to practical situations Please note there should be no blank left Shift Maintenance Click Shift Maintenance and the following window pops up Add a shift Click Append and enter corresponding shit information in Shift Name such as normal shift Cycle 1 Cycle Unit week and click Add select the timetables and time range required in this shif...

Страница 37: ...shift to be modified and click Modify and enter new information in Shift Name etc click Save to complete Delete a shift Select the shift to be deleted and click Delete Example Three shifts Add Three shifts Shift Note It is assumed that the shift goes around every week cycle every three weeks and employee is on holiday every Saturday and Sunday Step 1 Click Append enter Three shifts in Shift Name s...

Страница 38: ...d make corresponding operation in the springing window see the result below Click OK to complete the working hour setting for the second week The third week night shift from Monday to Friday Click Add make corresponding operation in the springing window see the result below Click OK to complete the working hour setting for the third week After the completion of above steps please don t forget to c...

Страница 39: ...of normal class click Add button and then click OK in Pic above to finish the adding of new shifts Note If the cycle unit of scheduling is week and the amount of cycle is more than 2 the starting date should setup as Sunday If the cycle unit of scheduling is month and the amount of cycle is more than 2 the starting date should setup as 1st day of a month Deletion of the shifts Select the shifts in...

Страница 40: ... be saved Click Save and the temporary scheduling will be saved Delete Delete the selected timetable Clear Delete all the timetables in the current time range Cancel Delete the existing temporary scheduling in the selected time range 4 4 4 Attendance Records Click Attendance Records in TA management menu the following appears Inquiry of attendance record Select the department employee the beginnin...

Страница 41: ...tically Attendance records exporting If the user need to lead out the attendance record only need to click export you can lead out the data inquired File format txt xls Click Modify Log and the log modifying window will be called for reviewing the modification log of time and attendance records 4 4 5 Attendance Calculating and Report Inquiry of report form ...

Страница 42: ... the original attendance records Shift Exceptions Display Employee s attendance result in the scheduled time period Other Exceptions Display Employee s leave out and overtime etc Calculated Items Display all Employee s calculated items such as normal actual late early absent overtime etc Note When dealing with Out calculation there should be Out back and only Out and Out back in one shift can be c...

Страница 43: ...ge the selected attendance record to a new state Manually deal with the attendance record according to the practical situation Delete selected Mark the record as manual deleting deleting when save it Cancel operation for selected Cancel revision to this record Deal with and save You can save the records that have been treated If you want to see the changed records you can click modified record log...

Страница 44: ...d through Modified Record Log in System Right Click in Shift Exceptions the following shortcut menu will pop up Other Exceptions Calculated Items the following shortcut menu will pop up The operation is the same as stated above Report Click Report and the following menu will pop up Attendance Report Calculate employee s attendance record Daily Report Calculate employee s daily attendance record ...

Страница 45: ... Manual 45 General Report Calculate all employee s attendance items such as normal actual late early absent overtime etc Exceptions Report Calculate employee s out overtime business leave personal leave etc ...

Страница 46: ...User Manual 46 Create a Report for Current Grid Print preview of the current displayed grid For example Attendance Report ...

Страница 47: ...port Click Export and the displayed data of grid in the current window will be exported to a file txt or xls It has the same function as Export Data when right clicking in each grid Exceptions dealt with Click Exception and the following menu will pop up Click options one by one in the menu and the following modules will pop up respectively Append record Late Early Collectively Business Leave leav...

Страница 48: ...he proper department employee ID beginning time ending time leave type and click save when ready Modification of employee away on business or leave Select the appointed employee whom you want to make this modification to and click Modify Then you can modify the relative information click Save when ready Deletion of employee away on business or leave Select the appointed employee and the relative i...

Страница 49: ...rtment thus the employees in the department will be listed in the employee list select the employees whom you want to add records on to then select record s state and time then click OK to finish 4 5 4 Dealing with Collectively Late Leaving When collectively coming late leaving early takes place for some allowable reasons you can use this function Click Dealing with Collectively Late Leaving in Ex...

Страница 50: ...h can be in txt or MS Excel xls formats then click open to get back to above window click OK to start The definition of txt data format as follows This format of file only can import the employee info of ID Name and department The format of data must follow Employee ID Tab Name Tab Department The information each employee takes one line no blank line between one another This format of file can imp...

Страница 51: ...fter the clearance the system will prompt asking you to compress the database as following shows select OK to finish Note you can only clear the data of one month ago 4 6 4 Compress Database Click Compress Database in Data Maintenance menu to compress and repair the database 4 6 5 Backup Database For ensuring the safety of data and recoverability we advise you to back up the database regularly Cli...

Страница 52: ...ialize the system 4 7 External Program Management Click Device Management on the main menu following springs 4 7 1 Connect to Time Attendance Machine Click Device Management Connect to Time Attendance Machine the system will prompt the communication interface between the software and the time attendance machine More details please reference the Communication chapter ...

Страница 53: ...User Manual 53 Chapter5 Communication The chapter is mainly about how to add delete and set communication between PC and terminal ...

Страница 54: ...assword is not empty you should enter the password first Enter the password and click the button OK to login If you enter the wrong password 3 times the software will automatically close When you enter a wrong password a message box pops up as follows Click the button OK And then try to enter the correct password 5 1 Communication Management Software 5 1 1 Add Unit Click the button Add Unit Follow...

Страница 55: ...status which is from this machine will be On duty USB Connect the terminal via USB cable LAN Input the terminal s IP address The default IP address is 192 168 0 218 LAN Client Only communication with the PC Server which has server IP COM Connect with COM port RS485 Connect with RS485 need select com port number in the system Click the button OK to save the information Can see a saffron yellow term...

Страница 56: ...ready exists in the software the following message box pops up Click the button OK to set the Unit information again 5 1 3 Delete Unit Choose the T A unit and then click the button Delete Unit Following message box pops up Click the button OK to delete or click the button Cancel to cancel 5 1 4 Right Key Menu Select terminal icon right click and perform the menu ...

Страница 57: ...device ID and click OK to save you can check the device ID in the setting menu of the terminal 5 1 4 2 Set the Network Parameter Click Setting Network Parameter and open the window Select the check box and then modify the parameters Click the button OK to save 5 1 4 3 Device Information Display terminal information as follows Click the button Retrieve to retrieve the terminal information Click the...

Страница 58: ...f you do not input the employee ID the system prompts message Input message not compete Click Add Message button to add the message Click Read message you will see the message in the Message List And you can select one message and click Delete Selected Messages to delete the message One window pops up as follows Click OK to confirm deletion Click Cancel to cancel the deletion Click Delete All Mess...

Страница 59: ...o delete manager Click Cancel to cancel the delete operation 5 1 4 7 Download Logs Click Download logs the main interface will show as follow 5 1 4 8 Checking Logs Browse administration operations in period of time 5 1 5 Synchronize Time Synchronize the terminal s time with the computer time Click the button Synchronize Time 2011 09 06 14 57 10 1 1 Download logs successfully Records 1 success 1 20...

Страница 60: ...e time zone number And then you will see the time zone settings If you want to modify the time zone you can just set the parameters again and click the button Set to save Group settings Select the group number and then you can see which time zones are arranged in this group If you want to modify the group settings you can just change the time zone number and then click the button Set to save 2009 ...

Страница 61: ...date FP Template Enable Disable the function of FP template update Workcode Prompt Enable Disable the prompt of workcode during verification Ring function Enable Disable the ring function before using the Ring time settings Wiegand Mode Wiegand26 Anviz Wiegand Encrypted wiegand and Fixed Wiegand area code Fixed Wiegand area code 0 254 If you upload one fingerprint to two terminals the same fingerp...

Страница 62: ...rmat yy mm dd mm dd yy dd mm yy Time format There are two kinds time format 24 hour and 12 hour Click the button OK to save the settings Following message box pops up Click the button OK to confirm or click the button Cancel to cancel The operation information in the main interface is as follows Click the button Display Default setting to see the terminal s default settings 5 1 7 1 Initialize Devi...

Страница 63: ...click the button Add to add the ring time to the Ring time list You can also click the button Delete to delete the ring time from the Ring time list Click the button OK to save the settings Following operation information displays in the main interface 5 1 9 Auto Update the T A Status Automatic switchover status for attendance device 2011 08 25 13 57 32 Setting ring time 2011 08 25 13 57 33 1 Head...

Страница 64: ...ange for IN status click Exit button to save and exit the interface 5 1 10 Download new Record Click the button Download new record Following message box pops up Click the button OK to confirm or click the button Cancel to cancel Following information shows on the main interface 5 1 11 Download all Record Click the button Download all record 2011 08 25 15 12 11 1 Head office Reading attendance rec...

Страница 65: ... Following message box pops up Click the button OK to confirm or click the button Cancel to cancel The operation information displays on the main interface as follows Notice You can stop back upping the employee by click the button on the right bottom corner Following message box pops up 2011 08 25 15 15 07 Back upping employees 2011 08 25 15 15 07 Backup employee 1 Head office 2011 08 25 15 15 08...

Страница 66: ...nformation displays as follows Notice 1 Please make sure that the User ID is existent in the terminal 2 You can stop recovering the employee by click the button Stop on the right bottom corner 5 2 Record Supervision Get the records from the terminal real time 19 15 08 07 Get back employees 2011 08 25 15 08 07 Get back employees 1 Head office 1 Head office No such ID existed recovery failed 2011 08...

Страница 67: ... in the Real Time Monitoring Records Information as follows When the employee clock in or out the value of Check in Times or the Check out times increases one And the following window which includes the employee ID Name Department and Position pops up 5 2 2 Prohibit Real time Click the button Prohibit real time to stop the real time monitoring You can see the begin time and end time of the real ti...

Страница 68: ...n Add modify employee info window as follow Notice The No is exclusive as well as the first digit cannot be 0 And the administrator s name will show as red color You can also add pictures for employee There are two ways to add pictures 1st way Click button choose employee s picture stored in PC and open Edit picture window as following ...

Страница 69: ...hen save Make sure there is camera equipment installed in your PC Click button open Pictures shooting window as following Choose camera equipment and click the button Take Pic to take a photo Edit the photo by Cut down function and then click the button Save to save Click the button to delete the employee photo Fingerprint registration Use the external USB fingerprint reader OA99 to enroll the fin...

Страница 70: ...n the terminal s fingerprint scanner window and then click the button enroll to enroll the fingerprint Click the button OK to save or click the button Cancel to cancel 5 3 2 Modify Employee Modify employee operation is to modify the employee information in the window Add Modify employee Info 5 3 3 Delete Employee Delete the employee from the database ...

Страница 71: ...en click the button Transfer Department The window Employee Transfer pops up Select the department and then click the button OK to confirm or click the button Cancel to cancel 5 3 5 Set Privilege We can only upload the employee to the authorized terminal Choose the employee from employee info list you can choose some or all the employee by using the button Shift or Ctrl on your computer s keypad C...

Страница 72: ... And then the employee B s privilege will be as same as the employee A Choose the employees from employee info list you can choose some or all the employees by using the button Shift or Ctrl on your computer s keypad Click the button Copy Privilege The Copy Function and Privilege window pops up Input the one employee s ID And then you can click the button to browse the employee s privilege in the ...

Страница 73: ...es from employee info list You can choose some or all the employees by using the button Shift or Ctrl on your computer s keypad Click the button Download FP Following message box pops up Click the button OK to confirm or click the button Cancel to cancel The operation information shows on the main interface as follows 5 3 8 Upload User Template Upload the employee information and fingerprints to t...

Страница 74: ...ton OK to confirm or click the button Cancel to cancel The operation information shows on the main interface as follows 5 3 10 Employee Checking Search the employee information Search the employee information by the employee ID Employee Name and Terminal Click Check Employee button to check the employee s information 5 3 11 Department Management Move the cursor to the department list and then clic...

Страница 75: ...g to be modified Click Modify dept The Input Department Name window pops up Input the department name Click the button OK to confirm or click the button Cancel to cancel Delete Dept Choose the department which is going to be deleted Click the right button of your mouse and then click the Delete dept Following message box pops up Click the button OK to confirm or click the button Cancel to cancel R...

Страница 76: ...d Search Set the Begin Date and End Date as follows Click the button Search record to search the record 5 4 2 Export Record Set the export format export file and time format Export format 3 formats optional text file txt CSV file csv Excel files xls ...

Страница 77: ...ce symbol bit After setting completed click Export record button open Save as window choose save file directory input file name click Save button The system prompts as follow Click the button OK to confirm 5 5 U Disk Management Program U disk management program mainly manages the data from U disk to database To read the attendance record you must make sure all data store under Anviz C folder in th...

Страница 78: ...late backup to U plate 5 6 System Settings Click the icon on the top left corner the menu pops up as follows 5 6 1 Basic Parameter Settings Click the Basic Parameter Setting The Basic Parameter Setting pops up Com port Communication delay time 1 5 sec The default time is 3s Network Communication delay time 1 20 sec The default time is 5s IP Port Communication port Communication failed automaticall...

Страница 79: ...he Timing Downloading Record window pops up Enable this function by choosing the Run Timing Download Record You can set 5 time point Please use the button to set a time And then click the button Add to add the time to the Downloading Time Click the button OK to save the setting 5 6 4 Management PW Setting Click the Management PW Setting The Modify management password window pops up Old password De...

Страница 80: ...ata Link Properties window pops up Click button beside 1 Select or enter a database name to choose the linking database directory And then choose database name click Open button to confirm database linking and exit to Data link properties interface If the database has set User name and password already we must input User name and password in 2 Enter information to log on to the database After comp...

Страница 81: ... The style is Windows XP system style 5 7 2 Change the Software Language Choose the language in the option 5 7 3 Set Quick Access Button Move the cursor to the icon Synchronize time Click the mouse s right button It prompts Click the item Add to Quick Access Toolbar And then you can see the quick access button on the toolbar as follows Move the cursor to the quick access button And then click the ...

Страница 82: ...User Manual 82 Click the item Remove from the Quick Access Toolbar ...

Страница 83: ...User Manual 83 Chapter6 FAQ Frequently asked questions and answers ...

Страница 84: ...fer to illustration of pressing finger 7 Latent fingerprint on the surface of sensor Clean sensor surface Adhesive tapes recommended 8 Not enough finger pressure Place the finger evenly on the sensor with moderate pressure 9 Influence by fingerprint image change Enroll fingerprint again Please refer to illustration of pressing finger 10 Fingerprint not enrolled yet Place enrolled finger 6 2 The ma...

Страница 85: ... abnormal Restart the machine or change the fingerprint module 6 5 We do not use the ID fingerprint mode to verify Reason Solution 1 Wrong ID entered Enter the right ID 2 This user has no right to use 1 1 identification method Set 1 1 identification method for this user 6 6 The unit beeps automatically when no one punches in out Reason Solution 1 Direct sun light or too bright light Avoid direct s...

Отзывы: