

NOTES ON INSTALLATION
If you intend to use our
Bluetooth® adapter kit
install the extension cable provided with the kit. Refer to the Bluetooth®
instructions
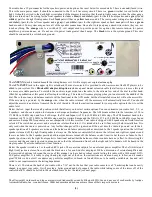
The front of your new radio is a dimensionally exact copy of the original, so it will install the same way that the original radio
did. The radio is much smaller when viewed from the back than the original was, so the original mounting bracket won't fit.
Included with your radio is a 9 inch backstrap that can be easily cut and bent to any shape or size. It should be attached to the
threaded ¼ -20 stud on the back of the radio near the antenna jack and to the Plenum Chamber Bracket directly behind the
radio. Pull the outer knobs from the control shafts. Remove the backrings and the outer shaft nuts. Remove the control shaft
escutcheons. Do not remove or loosen the inner shaft nuts! Position the radio in the dash, replace the control shaft escutcheons
over the control shafts and secure in place with the shaft nuts. Do not over-tighten! Replace the backrings and outer knobs.
DIAGNOSTICS
No Sound:
Check for a good fuse with proper rating. When the radio is turned on, the orange wire should have 12 volts present.
Radio will mute when no station is received. Make sure antenna is plugged into the proper jack. If an option is plugged in, make
sure it’s not on. Before installation make sure the switch on the back of the radio is set for the correct speaker option and
country.
Weak or No Reception:
Check continuity between the center pin of the antenna plug and the antenna mast. It should read 0
ohms (like a short) Next, check continuity between the center pin of the antenna plug and the car body. It should not read (like
an open circuit). If you’re in a metal building, reception may be limited. Try it outside.
Ignition Noise:
Usually caused by an ungrounded antenna shield. The base of the antenna must make good contact with the car
body. This problem often shows up after a good paint job! Make sure the engine grounding straps are in place, clean and tightly
bonded to the frame.
Distortion:
Check to see if your speakers can handle at least 45 watts RMS. Small speakers that can only reproduce high
frequency will distort on bass notes. Make sure speakers are properly installed. Make sure that no speaker is grounded. Every
speaker lead should measure about 6 volts to ground with the radio on and volume low. Resistance in the DC power input
wiring can cause the amplifiers to “starve”. If distortion seems to increase with volume, measure the voltage on the orange wire.
If the voltage drops when the volume is raised, it is an indication of resistance between the battery and the radio – usually at the
fuse block, but sometimes in the ignition switch. If the backstrap is not bolted to a clean metal ground, try running a heavy
ground wire from the ground lug on the radio directly to the firewall.
Radio shuts off after a few minutes:
The radio has thermal protection built in to prevent damage from excessive heat. Possible
causes are shorted or grounded speaker wires. See if any unused wires can touch anything. Make sure the heater or defroster
duct isn’t blowing directly on the radio.
Dial pointer issues:
If power is interrupted while the dial pointer is moving or saving its position, the dial pointer may get
“lost” or become misaligned. If this happens, turn the tuning knob to either end. The dial pointer will reset itself.
3 (end)


