background image

Elevate

TM

 Original Corner Assembly Instructions

5

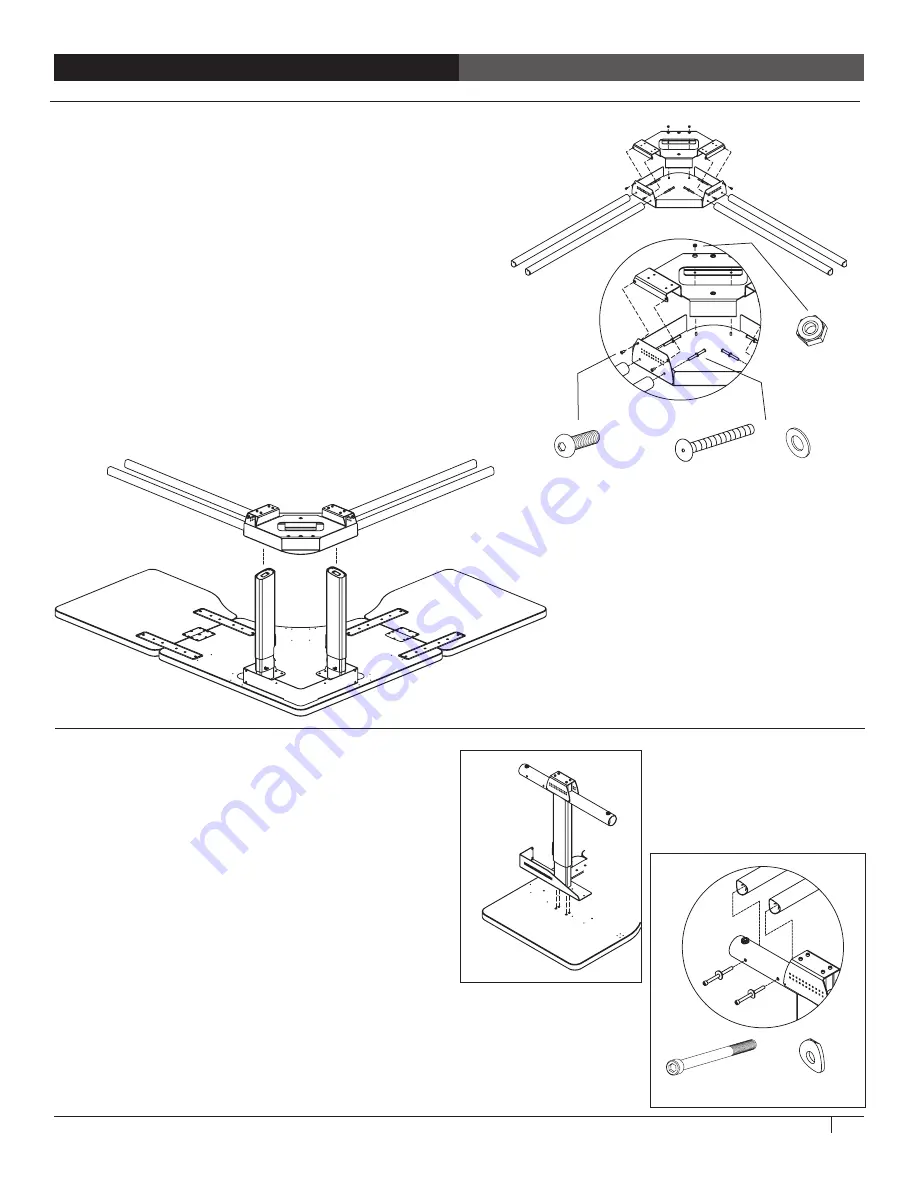
STEP 9

Install the Outside Leg Assemblies

ƒ

  Align one Outside Leg Assembly with the hole array on 

the Top Assembly.  Make sure that the Leg Gusset is to the 

outside of the table and the cable is to the inside of the 

table. Also verify that the slot on the leg lines up with the 

hole in the base tube.  (See the image on Step 6.) 

ƒ

  Tilt this Outside leg Assembly into place with the top of 

its Cap Screws seated into the notches on the shelf.  But 

don't attach with wood screws...not yet.  [Image A]

ƒ

  Loosely attach the Cross Tubes into this Leg Assembly 

using 4" Cap Screws and Curved Washers.  Make sure that 

the curves at the ends of the Cross Tubes line up with the 

round Base Tube.  [Image B]

ƒ

  Repeat for the other outside leg.

STEP 8

Assemble the Corner Base Assembly

ƒ

  Attach a pair of Cross Tubes to one side of the Corner 

Shelf Cap using two Flat Washers and two 3.5" Bolts.  

Tighten the fasteners all the way.

ƒ

  Repeat for the second pair of Cross Tubes.

ƒ

  Align the Leg Plate over the Corner Shelf Cap and slide 

into place.  Using a 7/16" socket, open end wrench, 

adjustable wrench, or the Anthro three-way wrench, 

tighten four Lock Nuts onto the threaded pins.

ƒ

  Secure the side of the Leg Plate to the Corner Shelf 

Cap using 1/2" Button Head Cap Screws.  Drive the 

screws from the outside in.

ƒ

  Lift this Corner Base Assembly over the center legs and 

seat them in place, but don’t attach them!

3.5" Bolt 

325-5194-00

Flat Washer

325-5379-00

1/2" Button Head Cap Screw 

325-5003-00

Lock Nut 

325-5259-00

A

4" Cap Screw

325-5166-00

Curved Washer

225-3522-00

B

Содержание Elevate Original Corner

Страница 1: ... Fax 800 325 0045 email sales anthro com anthro com Outside the U S Tel 503 691 2556 Fax 503 691 2409 Elevate TM Original Corner CAUTION Moving parts can crush Use care when operating Part Number ELBCzz xx4 November 2013 CAUTION This table holds up to 300 lbs of distributed weight and 90 lbs over one leg ...

Страница 2: ...Tube 4 125 5317 00 05 4 Locking Caster 6 150 5065 00 06 Velcro Tie not shown 4 175 5121 03 Product Quantity Part Number 07 3 5 Grommet 2 175 5147 00 08 Basetube End Cap 4 175 5158 32 09 Wire Managment Clip 3 175 5188 00 10 Crosstube End Cap 4 175 5190 32 11 Shelf Gusset X 1 225 2269 00 12 Shelf Gusset Y 1 225 2270 00 13 Cableway 2 225 2282 00 14 Junction Plate 4 225 2463 00 15 Draw Latch Plate X 2...

Страница 3: ... C Repeat for the second latch assembly and junction plates on the other wing Tighten all Phillips screws Product Quantity Part Number 26 20mm Socket Head Cap Screw 16 325 5272 00 27 6 9x1 Flat Hd Screw 44 325 5716 00 28 3 4 Phillips Head Screw 4 325 5370 00 29 Flat Washer 4 325 5379 00 30 Zip Tie Screw Mount 4 400 5152 00 31 Keypad Assembly 1 Keypad 400 5357 00 Keypad Slider 400 5358 00 32 2 mete...

Страница 4: ...e Leg Assembly to the Top Assembly using 1 Button hd PB Screws STEP 6 Assemble the Outside Legs Align a leg with the opening on the base tube so that the welded slot bracket on the legs is facing the hole on the base tube and that the cord comes out the top Attach with four Socket Head Cap Screws Repeat for the other leg Align each shelf gusset with a leg as shown so that the side of the gusset do...

Страница 5: ...s line up with the round Base Tube Image B Repeat for the other outside leg STEP 8 Assemble the Corner Base Assembly Attach a pair of Cross Tubes to one side of the Corner Shelf Cap using two Flat Washers and two 3 5 Bolts Tighten the fasteners all the way Repeat for the second pair of Cross Tubes Align the Leg Plate over the Corner Shelf Cap and slide into place Using a 7 16 socket open end wrenc...

Страница 6: ... is against the shelf Using four silver 3 4 Phillips Head Screws attach the Keypad and its housing to the table Plug the power cords into the control boxes STEP 11B Install Cable Ties Insert Cable Clips into the Table and route cords through them Make sure that cords will clear sharp edges and pinch points when the legs are in motion Plug the Keypad Cable into the Control Box Insert a Cable Clip i...

Страница 7: ...s is a lot easier if you lock the casters first With the help of another person carefully rotate the Table onto its casters Plug the power cord into the Control Boxes and an outlet Insert a cable clip into the base tube closest to the Control Boxes and route the power cord through it STEP 12 Install the Cable Troughs Align each cable trough with the flanges on each leg gusset and the pre drilled h...

Страница 8: ...Equipment Now add your Anthro accessories and install your equipment A word of caution the height range of Elevate may be longer than the cords on your equipment Equipment that is mounted in a SideRack w Caster or Equipment Shelf for example will not move up and down with the table Raise and lower the table to its highest and lowest positions when all equipment is installed to make sure that the c...

Отзывы: