Antelope zenstudio+ Скачать руководство пользователя страница 18

18

AuraVerb is a powerful and flexible algorithmic reverb effect powered by the Zen Custom 
FPGA-based DSP. It provides near zero-latency effect monitoring without taxing your CPU. 
AuraVerb can also be used as a hardware effect from your DAW. That way you can take advantage 
of its rich and unique sound while mixing or mastering.

By default the effect is switched off.

Quick Start 

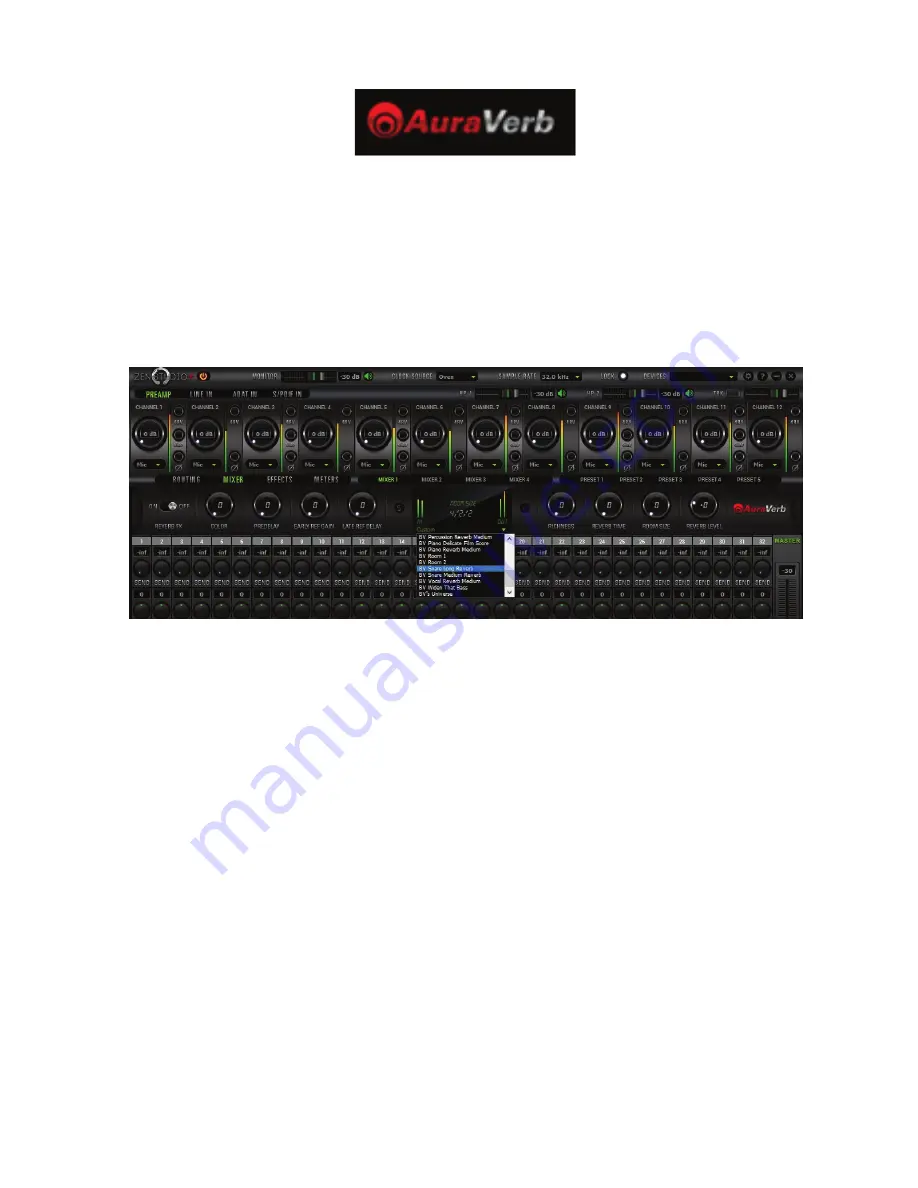
AuraVerb appears as a pre-fader send effect on the Zen ’s Mixer 1. To send a signal to the 
reverb, turn up the send control on a mixer channel and use the reverb output level to adjust the 
return to the mixer’s master channel. To hear the reverb, route the mixer output to your monitors 
by clicking and dragging MIX 1 [1] [2] to MONITOR [1] [2] on the routing matrix. Fine tune the 
reverb mix by balancing between the dry signal on the mixer channel’s fader and the reverb 
Output Level knob. 

AuraVerb Parameters 

• 

Color

AuraVerb’s Color control allows you to adjust the overall tone of the reverb. On “0” the space 
created is darker, like a lushly carpeted area. On “100” the reverb sounds the brightest, which can 
add some sizzle to a lead vocal, for example. 

• 

PreDelay 

PreDelay is a common function on most reverb effects and allows you to create a bit of space 
between the source and the onset of reverb by controlling the amount of delay time that 
precedes the initial reverberated sound. This parameter is used to place the reverberated signal 

Содержание zenstudio+

Страница 1: ...1 Portable Thunderbolt USB Audio Interface Owner s Manual...

Страница 2: ......

Страница 3: ...ide 9 6 Front Rear and Side Panels Explained 6 1 Front Panel Explained 10 6 2 Rear Panel Explained 12 6 3 Side Panel Explained 13 7 Software Control Panel 14 8 Advanced User Tips 23 9 In the box 23 10...

Страница 4: ......

Страница 5: ...e power cables with wet hands Make sure the device is switched off when plugging unplugging it to from the power source Avoid placing things on the cabinet or using the device in a narrow and poorly v...

Страница 6: ...le mixes but also reach the sound of legendary studios and hardware classics while exclusively working in the box The interface features an integrated Talkback function allowing easy and fast communic...

Страница 7: ...2 Individually assignable stereo headphone outputs 32 Channels at 192kHz I O via Thunderbolt 24 Channels at 192kHz I O via proprietary USB 16 Channels I O via ADAT 2 Channels I O via S PDIF Talkback...

Страница 8: ...e button Mac OS 1 Connect the Thunderbolt TB or the USB cable to the TB or USB port on your computer 2 Download the Zen Studio launcher from http en antelopeaudio com products zen studio plus 3 Start...

Страница 9: ...auncher will automatically download the Software Control Panel 4 You will be greeted by an Activation Screen If you already have an Antelope Audio account click on Use existing Antelope ID Enter your...

Страница 10: ...the touchscreen 4 Power button Toggles standby operation state Clicking and holding for two seconds allows you to enter sub menu of the device Mic Gain Control rotary controls adjusts Mic Gain Clock...

Страница 11: ...ee subsequent screens display the current input trim state of each of the 12 preamplifiers Note Be aware that there might be a protective film over the display which dims the illumination feel free to...

Страница 12: ...log Outputs on top A connector enables you to attach breakout cables each with 8 lines 15 D SUB 25pinTASCAM Analog Inputs on bottom A connector enables you to attach breakout cables each with 8 lines...

Страница 13: ...phantom power over combo XLR 21 AD Inserts Two TRS insert points L R for connecting analog gear such as dynamics processors or EQ s just before the A D conversion 6 3 Side Panel Explained 22 ADAT Inpu...

Страница 14: ...be copied from whichever input you select to whichever output you select In order to select multiple tracks hold Shift button and click on the input channels then drag and drop Right clicking on the...

Страница 15: ...lose 11 PREAMP ADAT IN S PDIF IN Section 12 Headphone HP 1 volume slider Mute button 13 Headphone HP 2 volume slider Mute button 14 Talkback button indicator light Talkback volume fader 15 ROUTING MIX...

Страница 16: ...pdown menu please ensure your selection from the dropdown menu matches the type of signal being inputted 22 Peak Meter 23 Phase Inverse button 24 Stereo Link 25 48V Phantom Power 26 Gain 27 Signal Ind...

Страница 17: ...ute Pan Stereo Link Volume Level fader control and a Master Fader so you can easily make a stereo mix plus an Auxiliary send in order to use AuraVerb 1 Fader double click to reset to zero 2 Fader Leve...

Страница 18: ...channel To hear the reverb route the mixer output to your monitors by clicking and dragging MIX 1 1 2 to MONITOR 1 2 on the routing matrix Fine tune the reverb mix by balancing between the dry signal...

Страница 19: ...and can nicely thicken a track when increased Late Reflection Delay Among other things AuraVerb calculates reflected energy from the side walls and ceiling of the virtual space Late Reflection Delay...

Страница 20: ...Studio Effects tab allows you to stack up to 8 effects viewable in pairs on each channel strip You can choose between EQs Compressors Vintage Guitar Amps and Cabinets ZenStudio comes with the growing...

Страница 21: ...rce that you wish to be represented on the displays 1 Meter Source Dropdown tab allows you to select 2 Clip Light Indicates when you are overloading the input of the channels Preamp Mix 2 L R Thunderb...

Страница 22: ...t 1 Indicator Light 6 Talkback Headphones Out 2 Indicator Light 7 Talkback Monitor Outs 8 Oscillator 1 Mute 9 Oscillator Level 10 Oscillator 2 Mute 11 Volume Knob Mode 12 Reamp Volume 13 Line Out Volu...

Страница 23: ...2 ch 88 2 kHz 32 ch 24 ch 8 ch total 4 ch per line 2 ch 96 kHz 32 ch 24 ch 8 ch total 4 ch per line 2 ch 176 4 kHz 32 ch 24 ch 4 ch total 2 ch per line 2 ch 192 kHz 32 ch 24 ch 4 ch total 2 ch per li...

Страница 24: ...es right click on the Zen Studio then click properties before then moving to the advanced tab Then repeat the above by checking the DAW s sample as well as the Zen Studio Connectivity If you believe t...

Страница 25: ...l Windows Only Have you checked the input and output routing is correct in your DAW Is the Zen Studio device selected in the relevant sound card section of the DAW s preferences If the Zen Studio does...

Страница 26: ...lock Output 1 x Outputs 75 Ohms 3Vpp on BNC 32 192kHz Atomic Clock Input 1 10MHz Input 75 Ohms 1Vpp on BNC D A Monitor Converter Dynamic Range 118 dB THD N 98 dB D A Converter Dynamic Range 118 dB THD...

Страница 27: ...k Live Chat Connect with a customer support agent directly via the website http www antelopeaudio com en support Click on Antelope Tab on the right hand side of the webpage Hours of Operation 7 00 a m...

Страница 28: ...28 Notes...

Страница 29: ...29 Notes...

Страница 30: ......

Страница 31: ......

Страница 32: ...32 Portable Thunderbolt USB Audio Interface Owner s Manual www AntelopeAudio com...

Отзывы: