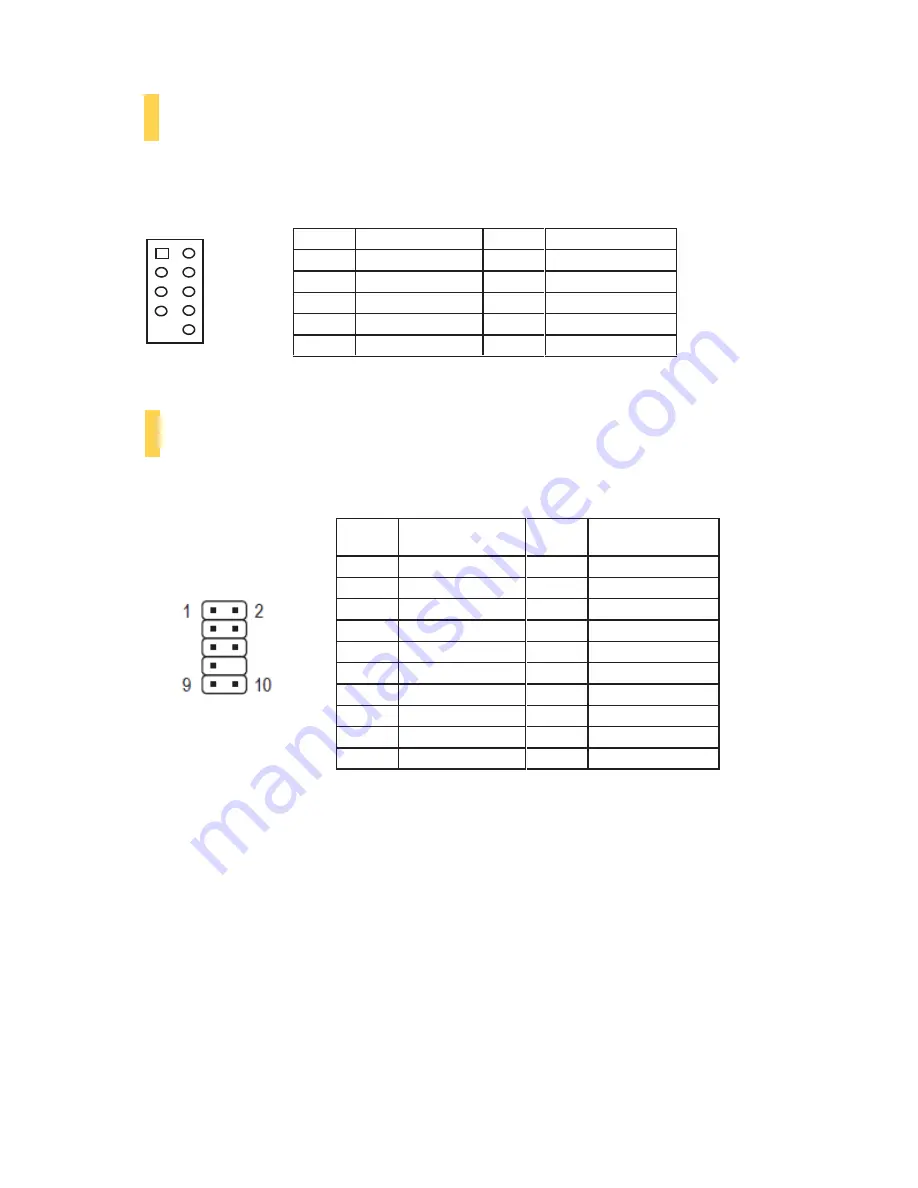
Antec VSK-1000 Скачать руководство пользователя страница 14

12 


Pin


Signal Names


Pin


Signal Names


1


USB Power 1


2


USB Power 2


3


Negative Signal 1


4


Negative Signal 2


5


Positive Signal 1


6


Positive Signal 2


7


Ground 1


8


Ground 2


9


Key (No Connection)


10


Empty Pin


Pin


Signal Names


(HDA)


Pin


Signal Names


(AC’97)


1


MIC2 L


1


MIC In


2


AGND


2


GND


3


MIC2 R


3


MIC Power


4


AVCC


4


NC


5


FRO-R


5


Line Out (R)


6


MIC2_JD


6


Line Out (R)


7


F_IO_SEN


7


NC


8


Key (no pin)


8


Key (no pin)


9


FRO-L


9


Line Out (L)


10


LINE2_JD


10


Line Out (L)


3.1


USB


2.0


Connect the front I/O panel USB cable to the USB header pin on your motherboard. Check the motherboard user’s 
manual to ensure that it matches the table below: 


3.2


AC’97


/


HD


A

UDIO 

P

ORTS


There is an Intel® standard 10-pin AC’97 connector and an Intel® 10-pin HDA (High Definition Audio) connector 
linked to the front panel of the case.  


You can connect either the AC’97 or the HDA connector, depending on your motherboard. Locate the internal audio 
connectors from your motherboard or sound card and connect the corresponding audio cable. Consult your 
motherboard or sound card manual for the pin-out positions. Even if your system supports both standards, only use one 
connector. 


1     2 

9    10 

Содержание VSK-1000

Страница 1: ...www sotmarket ru Antec VSK 1000 8 800 775 98 98...

Страница 2: ...V S K 1 0 0 0 INTUITIVE DESIGN WITH EXCEPTIONAL VALUE U S E R M A N U A L...

Страница 3: ...come with a power supply unit PSU Make sure you choose a power supply that is compatible with your computer components and has a long enough power harness to reach your motherboard and peripheral dev...

Страница 4: ...nternal 3 5 Device Installation 8 2 5 External 5 25 Device Installation 9 2 6 External 3 5 Device Installation 9 2 7 Internal 2 5 Device Installation 9 2 8 Cable Management 10 SECTION 3 FRONT I O PORT...

Страница 5: ...3 INTRODUCTION SECTION 1...

Страница 6: ...e Bays 11 Drive Bays 6 x internal 3 5 3 x external 5 25 1 x external 3 5 1 x internal bottom mounted 2 5 SSD drive Expansion Slots 8 Motherboard Size Mini ITX microATX Standard ATX Front I O Panel 2 x...

Страница 7: ...5 1 3 INCLUDED SCREWS A Motherboard standoff 10 6 preinstalled B Power supply expansion slot screw 12 C Hard drive motherboard screw 21 D Optical drive screw 12...

Страница 8: ...6 HARDWARE INSTALLATION SECTION 2...

Страница 9: ...TION 1 With the case on its side align your power supply with the power supply mounting location near the top panel of the case Note Power supplies with fans on the bottom of the power supply will nee...

Страница 10: ...rovided holes this is normal and won t affect its functionality 4 Remove your motherboard by lifting it up 5 Install standoffs as needed and put the motherboard back in 6 Screw in your motherboard to...

Страница 11: ...XTERNAL 3 25 DEVICE INSTALLATION 1 Press on the three tabs to release the front bezel The bezel should swing outward like a door 2 Lay the bezel face down to access the drive bay covers 3 Remove the d...

Страница 12: ...8 CABLE MANAGEMENT There is a cable management compartment behind the 3 5 drive cage You can tuck or route excess cables in this compartment 1 Remove the right enclosure panel 2 Locate the cable manag...

Страница 13: ...11 FRONT I O PORTS SECTION 3...

Страница 14: ...e front I O panel USB cable to the USB header pin on your motherboard Check the motherboard user s manual to ensure that it matches the table below 3 2 AC 97 HD AUDIO PORTS There is an Intel standard...

Страница 15: ...rforming any work please refer to your motherboard user s manual or your motherboard manufacturer s website to be sure of the pin out needed for your connector We strongly recommend making a notated d...

Страница 16: ...at let you choose the speed best suited to your need The default fan speed setting is Low 140 mm TwoCool Specifications Size 140 x 25 mm TwoCool Rated Voltage 12V Operating Voltage 10 8V 13 2 V Speed...

Страница 17: ...s You can install two 120 mm fans to the fan cages in front of the hard drive bays To install the front fans 1 Remove the front bezel as described in section 2 5 2 Secure your 120 mm fan s to the fan...

Страница 18: ...tel 31 0 10 462 2060 fax 31 0 10 437 1752 Customer Support US Canada 1 800 22ANTEC customersupport antec com Europe 31 0 10 462 2060 europe techsupport antec com www antec com Copyright 2011 Antec Inc...

Страница 19: ...2 Antec VSK 1000...

Отзывы: