background image


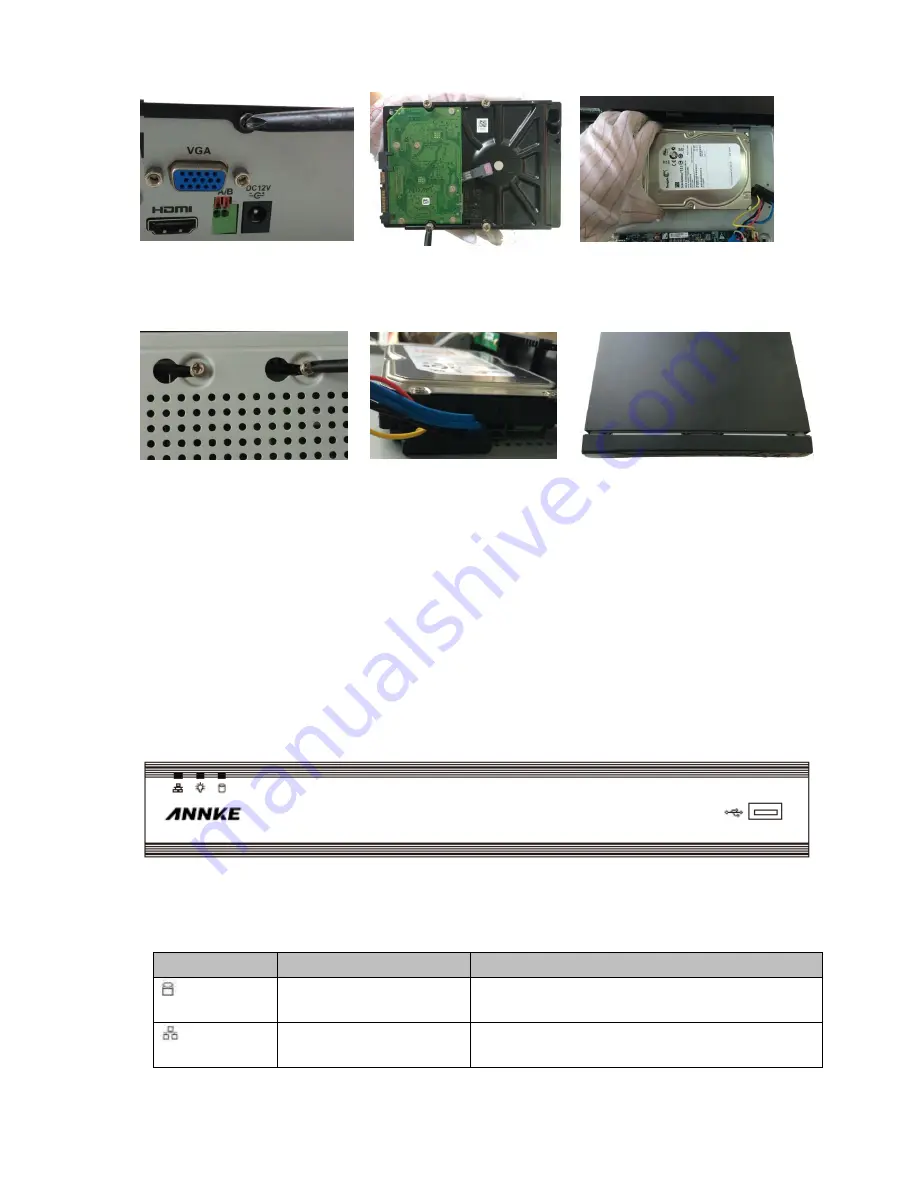
  Loosen  the  screws  of  the  upper 

cover and side panel.   


Fix  four  screws  in  the  HDD 

(Turn just three rounds).


Place the HDD in accordance with the 

four holes in the bottom.


Turn  the  device  upside  down  and 

then turn the screws in firmly.   


Connect  the  HDD  cable  and 

power cable.         


Put  the  cover  in  accordance  with  the 

clip and then place the upper cover back. 

Secure  the  screws  in  the  rear  panel  and 

the side panel.           

Note: 


You can connect the HDD data cable and the power cable first and then fix the HDD in the 

device. 


Please pay attention to the front cover. It adopts the vertical sliding design. You need to 

push the clip first and then put down. 

4.


Front Panel 

The front panel is shown as in Figure 1. 


Figure 1 

Please refer to the following sheet for front panel button information. 

Icon 

Name 

Function   


HDD status indicator 

light   

The blue light is on when the HDD is malfunction.   


Network status indicator 

light   

The blue light is on when the network connection is 

abnormal.   

Содержание HD SERIES

Страница 1: ...HD DVR Series Quick Start Guide Version 1 1 0 ...

Страница 2: ...fety rules 1 Check Unpacked DVR When you receive the DVR from the forwarding agent please check whether there is any visible damage The protective materials used for the package of the DVR can protect most accidental clashes during transportation Then you can open the box to check the accessories Please check the items in accordance with the list on the warranty card Remote control is optional Fin...

Страница 3: ... panel and the side panel Note You can connect the HDD data cable and the power cable first and then fix the HDD in the device Please pay attention to the front cover It adopts the vertical sliding design You need to push the clip first and then put down 4 Front Panel The front panel is shown as in Figure 1 Figure 1 Please refer to the following sheet for front panel button information Icon Name F...

Страница 4: ... port 8 RS 485 input port 9 Power socket 10 GND port 6 Local Login After system booted up default video display is in multiple window mode Click Enter or left click mouse you can see the login interface See Figure 3 System consists of three accounts Username admin Password admin administrator local and network Username 888888 Password 888888 administrator local only Username default Password defau...

Страница 5: ...ps up warning information to ask you whether install webrec cab control or not Please click yes button If you can t download the ActiveX file please modify your IE security setup After installation the interface is shown as below See Figure 4 Please input your user name and password Default factory name is admin and password is admin Note For security reasons please modify your password after you ...

Страница 6: ... your smart phone Search EasyViewerLite download it and install iOS Open App Store app in your smart phone Search EasyViewerLite download it and install As in Figure 3 5 select the first icon to enter camera select the second icon to enter door ...

Страница 7: ...7 Figure 3 5 Main Menu Enter camera you will see Live Preview interface in Figure 3 by default Figure 3 6 Click on system displays main menu interface in Figure 3 ...

Страница 8: ...etc Device Manager In Device Manager you can add device modify device info remotely configure device control alarm output view HDD and delete You also can import device list on cloud end Click on added device in the list you can see its functional buttons Add Device To add device Step 1 In device manager interface click on to enter add device interface see 错误 未找 到引用源 Figure 3 8 Parameter Note ...

Страница 9: ...nputting complete domain name address and analysis is done by QuickDDNS IP Domain name for normal environment add device by inputting its IP address or third party domain name Name Device name SN P2P type input SN QuickDDN type input complete domain name IP Domain name type input IP address or complete third party domain name Note Just input SN code on the NVR to add IP cameras which are already c...

Страница 10: ...rface All the designs and software here are subject to change without prior written notice All trademarks and registered trademarks mentioned are the properties of their respective owners If there is any uncertainty or controversy please refer to the final explanation of us Please visit our website or contact your local service engineer for more information ...

Страница 11: ...11 For further queries regarding the product please refer to contact Customer care support here Visit http www annke com Tech support support annke com ...

Отзывы: