9
Rev. 5.0 06/2008
MWR -n-
MWR -n-
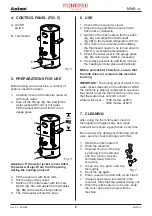
4. CONTROL PANEL (FIG. 5)
A - On/Off
switch
B - Thermostat
5. PREPARATIONS FOR USE
Before taking a new machine, a number of
actions need to be taken.
1. Carefully rinse out the internal reservoir
with clean water.
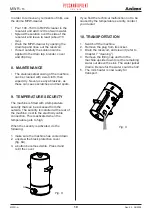
2. Take off the fill cap (fig. 6A) and fill the
water jacket with cold or hot water.
Fill the jacket till the text 'MAX' in the
gauge
glass.
Attention: If the water jacket is over filled ,
the water will eject from the fill opening
during the heating process!
3. Fill the reservoir with fresh milk.
4. Put the plug in the socket.
5. Switch on the milk-heater with the main
switch (fig. 6A) and adjust the thermostat
(fig. 6B) to the desired tempe rature.
6. The milk-heater will start to heat.
6. USE
1. Check if the reservoir is clean!
2. Close the tap and fill the reservoir with
fresh milk or Glühwein.
3. Switch on the milk heater with the switch
(fig. 6A) and adjust the thermostat
(fig.6B) to the desired temperatu re (85°C).
4. If the milk is not consumed immediately,
the thermostat needs to be turned down to
68-72°C (constant pasteurisa tion).
5. Check the water level in the gauge glass
(fig. 6C) during use. Refill in necessary.
6. It is always possible to add fresh milk as
the heating will take place automatically.
Milk is perishable! Therefore, ensure that
the milk does not remain in the reservoir
too long.
IMPORTANT: The boiling point of water in the
water jacket, depends on the altitude at which
the machine is placed, compared to sea-level.
Be careful to set the thermostat in such a way
that the water does not start to boil!
Water will boil at: - 1500 meters at 95°C
- 3000 meters at 90°C
7. CLEANING
After using the the milk heater, clean it
thoroughly and hygieni cally, as a clean
reservoir will ensure a good drink, every time.
Do not apply any detergent containing lemon
juice, as lemon reacts strongly with milk.
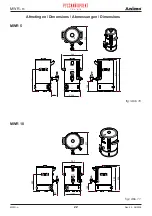
1. Switch the milk heater off.
2. Drain the reservoir.
3. Unscrew the top of the tap
by turning it to the left and
pull the silicon washer
vertically away from the
screw
top.
4. Clean the tap parts and tap
thoroughly.
5. Re-fit the tap again.
6. Clean, reservoir and lid with a soft brush.
7. Always keep some clean water in the
reservoir, this stops the washer drying out.
8. When the milk heater is not in use, keep
the cover open at an angle with the
machine.
A
B
max
min
D
A
B
C
Fig. 5
Fig. 6
Fig. 7

