
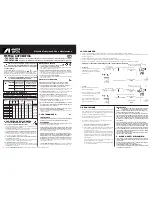

TOF-5B/6B & TOF-5RB/6RB
Le parti indicate sono soggette ad usura.
No. Descrizione
Qtà.
No.
Descrizione
Qtà.
1
SET UGELLO ARIA
1
11
O’RING
1
1-2 SET UGELLO ARIA
(TOF-5RB/6RB)1
12
CONTRODADO
1
2
SET PISTONE
1
13
DADO REG. MATERIALE 1
2-1 SET UGELLO MATERIALE
1
14
MOLLA
1
2-2 SET PISTONE
1
3
CORPO
1
4
SEDE GUARNIZIONE
1
5
MOLLA PISTONE
1
6-1 SET REGOLAZIONE VENTAGLIO 1
6-2 TAPPO
(TOF-5RB/6RB)
1
7
SUPPORTO
1
8
DADO ESAGONALE
1
9
VITE CON FORO ESAGONALE
1
10
RACCORDO
2 (3-R)
3
6
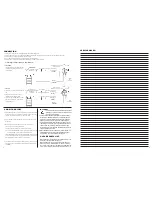
6. MAINTENANCE AND INSPECTION
CAUTION
-
Never use spare parts that are not Anest Iwata originals.
-
Never damage fluid nozzle, tip of fluid needle or air cap holes.
-
Never immerse the spray gun completely in liquids such as thinner.
6.1 MANUAL CLEANING PROCEDURE
- Never soak air cap set (1) in cleaning liquid for an extended period,
even when cleaning.
- Never use metal brush to clean the gun.
1. Drain remaining paint from spray gun, into a suitable container. Spray
a small amount of cleaning liquid to clean fluid passages and air cap
set.
Incomplete cleaning can cause failure of pattern shape and uniform
particles.
2. Clean each section with brush soaked with cleaning liquid and wipe out
with waste cloth. Do not immerse the whole gun in cleaning liquid.
Otherwise, it can damage the gun. When cleaning, never scratch any holes
of air cap set, fluid nozzle or piston set.
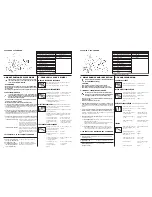
3.
Before disassembly, fully clean fluid passages.
During disassembly, do
not scratch seat section.
(1)
Disassemble piston set.
First remove fluid adjustment knob and
pull it by holding end of piston.
Ensure that piston spring does not suddenly fly out because fluid
adjustment knob is strongly pushed by piston spring.
(2)
Disassemble fluid nozzle
(Use ring spanner and box wrench).
Remove fluid nozzle while piston set is kept pulled backwards, in
order to protect seated section of fluid nozzle and piston set.
6.2 INSPECTION & REPLACEMENT STANDARD
WHERE TO INSPECT
REPLACEMENT PART
a. Each hole passage of air cap (1)
Replace if it is crushed or deformed
and fluid nozzle (2-1).
b. Packing and O ring
Replace if it is deformed or worn out.
c. Leakage from seat section
Replace them if there is any leakage
between fluid nozzle (2-1)
even after cleaning.
and piston set (2-2).
Before carrying out maintenance and inspection ALWAYS
observe WARNING indications.
The fluid passages of the gun, must be cleaned thoroughly
after each use, especially after use with bi-component paints.
Incomplete cleaning can cause defective pattern shape.
7. TROUBLESHOOTING
GUN DOES NOT SPRAY
- Fluid adj. knob (13) closed.
Check and adjust.
- Tip hole of nozzle obstructed.
Check and clean.
INTERMITTENT SPRAY PATTERN
- Air escapes from fluid nozzle
Check , clean & replace if
and tapered seat of gun body.
necessary.
- Air escapes from fluid passa-
Replace O’ring.
ges because O’ring is worn out.
- Air escapes from fluid hose
Tighten.
joint.
DEFECTIVE SPRAY PATTERN
(Round Pattern specifications are excluded)
- Dirty nozzle (2-1)or air cap (1). Clean carefully.
- Nozzle (2-1) or air cap (1)
Replace If damaged.
has been damaged.
- Fluid nozzle (2-1) is loose or
Tighten or remove and
not properly fitted.
clean its seated section.
- Paint viscosity too high or
Dilute paint or increase
too low.
viscosity.
- Fluid output too high or
Adjust fluid adj. knob (13)
too low.
to reduce or increase.
LEAKING
- Fluid nozzle (2-1), piston set
Clean or replace if neces-
(2-2), dirty, damaged, worn
sary.
on seat.
- Piston spring (5) is worn.
Replace.
- Fluid nozzle (2-1) and gun
Tighten.
body are loose .
- Fluid nozzle (2-1) and gun
Clean or replace
dirty or damaged on seat.
if necessary.
- Piston set is dirty.
Clean or replace O’ring if
necessary.
- Piston O’ring is worn.
Replace.
TOF-5B/6B & TOF-5RB/6RB
No.
Description
Qty.
No.
Description
Qty.
1
AIR CAP SET
1
11
O’RING
1
1-2
AIR CAP SET
(TOF-5RB/6RB) 1
12
JAM NUT
1
2
NOZZLE PISTON SET
1
13
FLUID ADJ. KNOB
1
2-1
NOZZLE SET
1
14
SPRING
1
2-2
PISTON SET
1
3
BODY
1
4
O’RING SEAT
1
5
PISTON SPRING
1
6-1
PATTERN ADJ. KNOB
1
6-2
PLUG
(TOF-5RB/6RB)
1
7
HOLDER
1
8
HEX. NUT
1
9
BOLT
1
10
NIPPLE
2 (3 R)
Marked parts are wearable parts.
6. MANUTENZIONE ED ISPEZIONE
ATTENZIONE
-
Mai utilizzare parti di ricambio che non siano originali ANEST IWATA.
-
Mai danneggiare i fori dell’ugello aria, dell’ugello materiale e l’estre-
mità dell’astina.
-
Mai immergere completamente la pistola nei liquidi come solvente.
6.1 PULIZIA MANUALE
-
Mai lasciare immerso l’ugello aria (1) nel detergente per un periodo
prolungato, anche durante la pulizia.
-
Mai utilizzare oggetti metallici per la pulizia della pistola.
1. Scaricare la vernice residua dalla pistola, sistemandola in un conteni-
tore adeguato. Spruzzare una piccola quantità di detergente per pulire i
passaggi del materiale e l’ugello aria.
Una pulizia incompleta può provo-
care difetti alla forma del ventaglio.
2. Pulire ogni sezione con uno spazzolino imbevuto di solvente, ed un panno
assorbente. MAI immergere completamente la pistola nel detergente per
evitare che si danneggi.
Durante la pulizia evitate di graffiare le superfici dei
fori dell’ugello aria, dell’ugello materiale o del pistone.
3.
Prima dello smontaggio della pistola detergere tutti i passaggi vernice
Durante lo smontaggio fate attenzione a non graffiare le sezioni delle sedi.
(1)
Rimuovere il set pistone.
Rimuovere il dado regolazione materiale
e tirare il pistone tenendolo dal retro.
Assicurarsi che la molla del pistone non
venga spinta fuori bruscamente, poiché il
dado di regolazione materiale subisce una
forte pressione dalla molla del pistone.
(2)
Rimuovere ug. materiale
Usare l’apposita chiave per lo smontaggio
Rimuovere l’ugello materiale mentre il pis-
tone rimane tirato per proteggere la sezio-
ne della sede dell’ugello materiale e della
astina.
6.2 ISPEZIONI & SOSTITUZIONI STANDARD
PARTI DA CONTROLLARE
PARTI DA SOSTITUIRE
a. Ogni foro di passaggio ugello
Sostituire se schiacciati o deformati.
aria (1) e ug. materiale (2-1)
b. Guarnizioni ed O’ring.
Sostituire se deformate od usurate.
c. Perdite dalle sezioni delle
Sostituire se le perdite non si arrestano
sedi tra l’ugello materiale
anche dopo un’accurata pulizia.
(2-1) e il pistone (2-2).
Prima di procedere a qualsiasi operazione d’ispezione e manuten-
zione, leggere sempre ed osservare scrupolosamente tutte le indi-
cazioni sulle AVVERTENZE di SICUREZZA.
I passaggi del materiale devono essere accuratamente puliti
dopo ogni utilizzo della pistola ed in particolar modo dopo, l’uso
di vernici bi-componenti. Una pulizia incompleta potrebbe cau-
sare difetti alla forma del ventaglio.
7. PROBLEMI, CAUSE E RIMEDI
MANCATA FUORIUSCITA DI VERNICE
- Regolazione del materiale (13)
Verificare e regolare.
non sufficentemente aperta.
- Foro ugello materiale ostruito.
Verificare e pulire.
ATOMIZZAZIONE AD INTERMITTENZA
- Trafilamento d’aria dall’ugello
Verificare, pulire e sosti-
materiale e dalle sede corpo.
tuire se necessario.
- Trafilamento d’aria dai passag- Sostituire l’O’ring (11).
gi del materiale a causa della
usura dell’O’ring.
- Trafilamento d’aria dal raccor-
Stringere.
do della tubazione materiale.
DIFETTI DEL VENTAGLIO
(Eccetto per le versioni con ventaglio conico)
- Ugello materiale (2-1) o ugello Pulire accuratamente.
aria (1) incrostati di vernice.
- Ugello materiale (2-1) o ugello Sostituire se necessario.
aria (1) danneggiati.
- Ugello materiale (2-1) allentato. Stringere o rimuovere e
o non non inserito correttamen- pulire la sezione della
te inserito.
sede.
- Viscosità vernice troppo
Diluire la vernice o au-
elevata o troppo bassa.
mentare la viscosità.
- La portata della vernice é
Registrare la reg. del ma-
troppo elevata o troppo
teriale (12), per ridurre
bassa.
o aumentare la portata.
TRAFILAMENTO DELLA VERNICE
- Ugello materiale (2-1) e pisto-
Pulire o sostituire se ne-
ne (2-2), incrostati, danneg-
cessario.
giati o usurati nella sede.
- Molla pistone (5) usurata.
Sostituire.
- Ugello materiale (2-1) e cor-
Stringere.
po allentati.
- Ugello materiale (2-1) e cor-
Pulire o sostituire se ne-
po incrostati, danneggiati
cessario.
o usurati nella sedi.
- Il set pistone e l’O’ring
Pulire o sostituire l’O’ring
sono incrostati.
se necessario.
- L’O’ring del pistone é
Sostituire.
usurato.