Andonstar 246S Скачать руководство пользователя страница 15

14

Output to external devices

◆HDMI output

•firstly, make sure the external device is actual real FHD 1080P HDMI monitor, otherwise the display
resolution can not reach to 1080P.
•Power on the microscope, and connect it to the HDMI monitor. The microscope has no built-in battery,
so please make sure the microscope stays powered on the whole time.
• Switch on the microscope, place the specimen on the base or the slide holder, adjust the object
distance and focus distance.
•When the microscope is connect to external devices, image data would transfer to the external device,
so the microscope monitor display no image.
•HDMI output supports photo capture, but not video recording.

◆USB Output

Software installation

Where to download the software:
https://bit.ly/3xCRDPL

Currently software“Microscope Measure”only supports Windows system.

System requires: Windows XP SP3、 Windows 7、Windows8、Windows10
Runtime:Microsoft.Net Framework 4.0

Microsoft Visual C++ 2010

If there isn’t complete either of the runtime mentions above in your computer system, it would report
wrong during the installation process.
If you couldn’t open the download link above, contact our customer service.

After done downloading, open the zip file and run it.
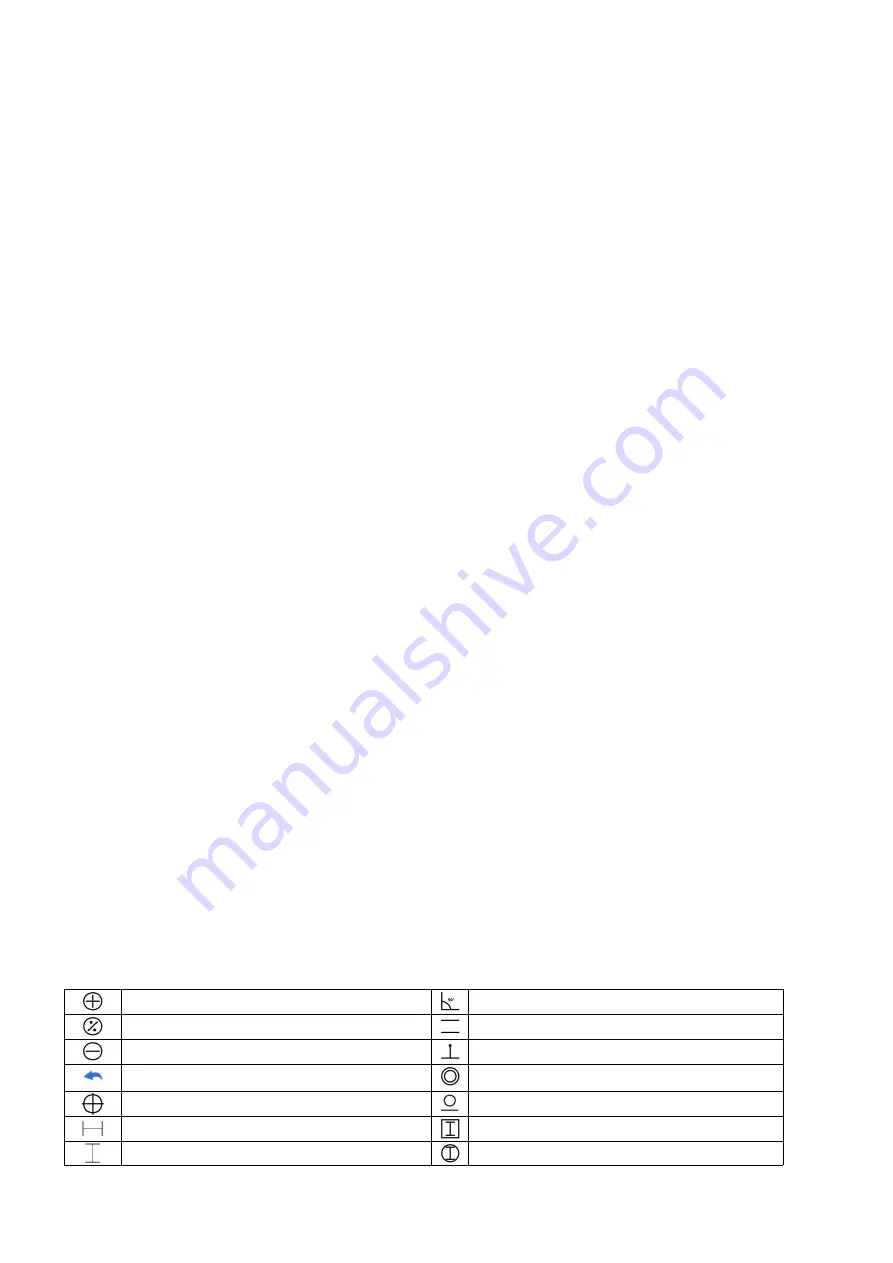
*Icons definitions

Zoom In

Measuring a 3-points-angle (degree)

Back to original size

Distance between parallel lines(Length)

Zoom out

Distance from a point to a line (Length)

Undoes the last action

Distance between 2 circles (Radius, length)

Cross hairs (crosier,4 grid, 8 grid)

Distance from a line to a circle(Radius, length)

Horizontal distance of 2 points

Add a square mark

Vertical distance of 2 points

Add a circle mark

Содержание 246S

Страница 1: ...Digital Microscope 246S 249S Users Manual metal stand...

Страница 2: ...e 3 Video demonstration 3 Button Connection 4 Bracket installation 5 Bracket instructions 5 Quick Start 6 How to choose lens 7 Digital zoom 10 Save files to micro SD card 10 Remote 11 Settings 12 Outp...

Страница 3: ...low these steps for daily cleaning as well remember to ONLY wipe the INSULATED part of the monitor 5 The screen of the monitor is very fragile please use it with care Do not drop hard press or leave i...

Страница 4: ...le HDMI cable USB cable Slide holder Slides kit Tweezers Bug box P1 Package include Video demonstration Please find the video demo from the link Please type all letters properly capitalized QR code be...

Страница 5: ...ower on off Mode Menu Up Digital zoom in Down Digital zoom out OK Start recording Take pictures while the device is recording Remote signal receiver where you aim remote to Focusing tube Lens fixing s...

Страница 6: ...ram Bracket instructions P3 Bracket instructions Secondary Bracket Lift Boom Arm Lower Limit Stop Monitor Fixing Screws Spot Lights Clips Boom Arm V locker lock the arm in vertical direction Boom Arm...

Страница 7: ...and its totally normal Trouble shooting When the monitor image stops or freezes please pin the Reset hole pic 2 to reset the device first then power on the device again Reset hole is very tiny located...

Страница 8: ...tom of the focusing tube Bend the two goose neck spot lights make the field of view enough illuminated Loose the Arm V locker locate the whole monitor part to a desire height distance from the lens to...

Страница 9: ...on the coin Loose the Arm V locker locate the whole monitor part to a desire height distance from the lens to the specimen should be around 12mm to 320mm then fix the V locker In order to adjust objec...

Страница 10: ...lides holder Loose the Arm V locker locate the whole monitor part to a desire height distance from the lens to the specimen should be around 4mm to 5mm then fix the V locker Since the focus range is v...

Страница 11: ...tton to select choose Format and confirm 5 Do not insert a card while microscope is working If you do the microscope would switch off automatically And you will have to turn it on again In order to ta...

Страница 12: ...eeze Stop the image on the display works in video mode photo mode and while recording Illumination exposure compensation from 2 0 to 2 0 Sharpness up down three levels of sharpness Soft Normal Strong...

Страница 13: ...ow And then press M again to get into settings menu as right below pic 9 video menu pic 10 setting menu Gridline Settings remote needed Use Up and Down to choose among Cross Line Line Direction Locati...

Страница 14: ...see the following pic Pic 13 Delete line 1 before after Date Time Setting Select Date Time in setting menu press OK button to get in time setting Use up and down button to select correct number OK to...

Страница 15: ...ownload the software https bit ly 3xCRDPL Currently software Microscope Measure only supports Windows system System requires Windows XP SP3 Windows 7 Windows8 Windows10 Runtime Microsoft Net Framework...

Страница 16: ...Measure an ellipse Long axis radius short axis radius circumference area 3 points circle radius circumference area Measure a radius circle radius circumference area Edge detection Measure a diameter c...

Страница 17: ...p of this window the result of measuring can be much more precisely Main operating window This windows shows the full view from the microscope And it is also the place where users do measuring and ima...

Страница 18: ...istance for the rest steps 2 In the Calibration management set the name and unit length of the new calibration refer the picture on the right Then click Calibration meanwhile the in the toolbar should...

Страница 19: ...roper place around the target 3 Special Effect Includes Edge detection Inverse color Flip horizontal Relief Sharpen and Smooth Steps 1 Choose the special effect you need in the toolbar 2 Move your cur...

Страница 20: ...software can not recognize the microscope Firstly please make sure that you have connected the microscope to the PC properly and have chosen USB camera on the microscope monitor Secondly if there is...

Страница 21: ...hows card error or card is full after inserting memory card to the device Please format the card after insert it into the device Format steps refer to chapter Save files to micro SD card PS If there a...

Отзывы: