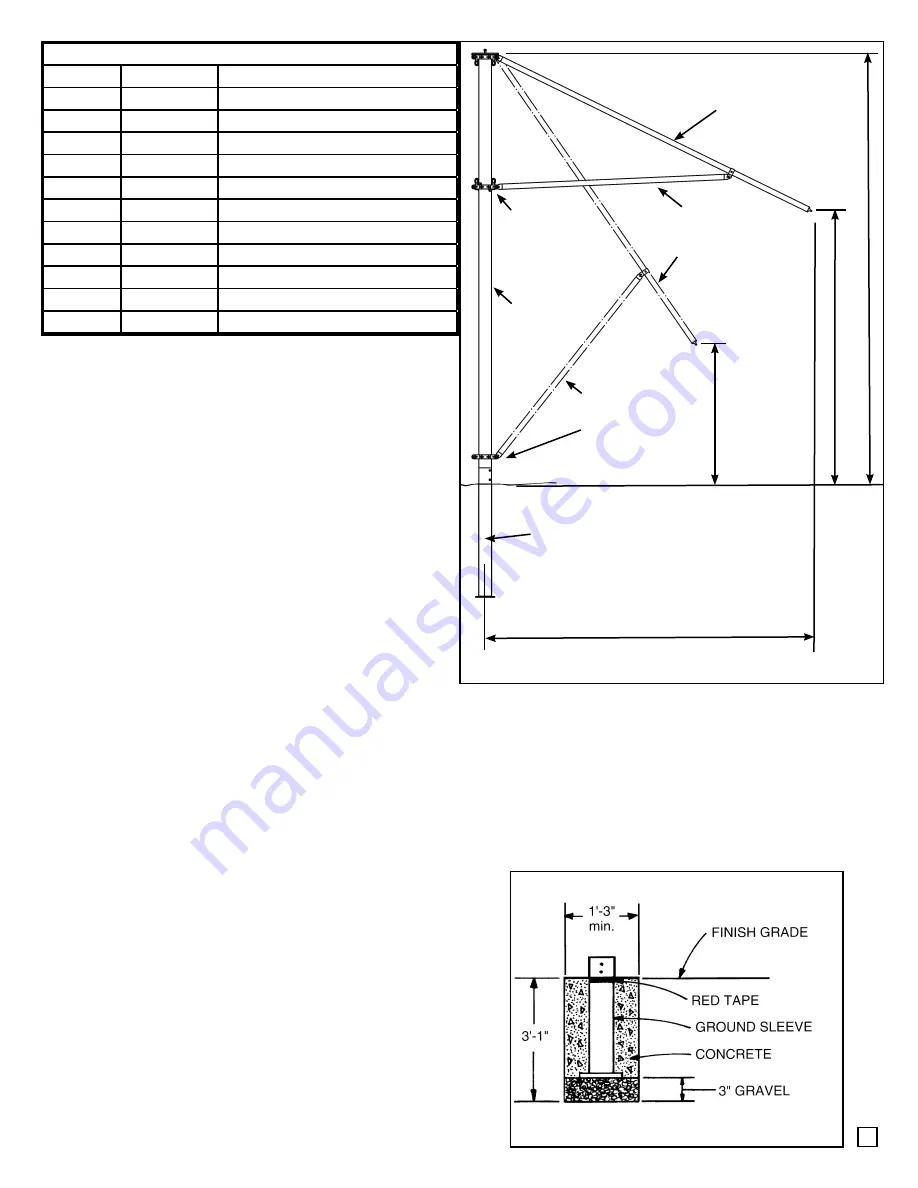
FUNBRELLA PALM PARTS LIST
ITEM NO. QUANTITY
DESCRIPTION
1
1
Pole Assembly
2
10
Rafters
3
10
Braces
4
1
Pressure Plate
5
20
3/8” x 1 3/4” Hex Head Bolt
6
10
3/8” x 1 1/4” Hex Head Bolt
7
30
3/8” Lock Nut
8
2
3/8” x 5 1/2” Hex Head Bolt
9
2
3/8” ID Flat Washer
10
2
3/8” Hex Nut
11
2
3/8” Cap Nut
MANPOWER REQUIRED
Two experienced installers should be able to assemble
a Funbrella Palm top & frame in two hours.
TOOLS REQUIRED
9/16” Wrench • 5/8” Wrench • 3/4” Wrench
(2) 10’ Stepladders
(1) 16’ Extension Ladder
Post Hole Digger (optional...required only to dig
hole for ground sleeve)
(2) Cable Come-A-Longs (minimum 800 lb. rating,
minimum 10’-0” pull) - sold separately
INSPECT SITE - CAUTION
Consult local Utility Company prior to installation.
Prior to assembly be sure to look around for obsta-
cles, pipes, wires and etc.
LAYOUT & CHECK
Use parts list for a quick identification and check list
for proper quantities.
SET GROUND SLEEVE (SOLD SEPARATELY)
Dig a 1’-3” minimum diameter hole 3’-1” deep or as
required by soil conditions or local code. Add 3” of
gravel. Insert ground sleeve with 6” square plate on
bottom. Ground sleeve is marked with red tape indicat-
ing finished grade level.
(
Figure B
)
Plumb sleeve and brace into position during concrete
pour.
Fill concrete to cover red tape. Allow to dry for 72
hours before mounting Funbrella Palm center pole.
2
Finish Grade
10’-0”
4’-4”
8’-6”
13’-6”
Ground Sleeve
Rafter in Open
Position.
Rafter in Closed
Position.
Brace in Open
Position
Brace in Closed
Position.
Bottom Hub in
Closed Position.
Bottom Hub in
Open Position.
CenterPole
Figure A
Figure B
Warning: Do not install groundsleeve
or center pole where they may be in
contact with water from swimming
pool or any other body of water.
Содержание Funbrella Palm
Страница 2: ...1 ...


