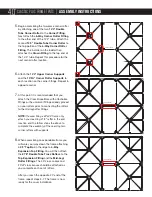
Anchor Economy Tent 40 CLASSIC PLUS Скачать руководство пользователя страница 5

5.

 Begin assembling the two-piece corner rafter 

by attaching one of the two 

14’4” Double 

Tube Corner Rafter to the Corner Fitting
Next attach the 

6-Way Corner Rafter Fitting 

to the other end of the 14’4” tube. Attach the 
second 

14’4” Double Tube Corner Rafter to 

the top portion of the 

6-Way Corner Rafter 

Fitting. The installer on the ladder then 
attaches the 

Crown Fitting to the top end of 

the 14’4” tube. Repeat this procedure for the 
next corner rafter location.  

6.

 Attach the 

14’4” Upper Corner Supports 

and the 

10’5½” Corner Rafter Supports to 

each location on the corner fittings. Repeat in 
opposite corner.

7.

 At this point it is recommended that you 

attach the Cross Brace Bars with attachable 
fittings or the universal fittings already placed 
on your rafters prior to connecting the rafters 
to the mid leg/rafter fittings. 

 NOTE: 

If assembling a 40’x40’ frame only 

attach your reaming 21’8” rafter in the end 
location and the follow steps the above to 
complete the assembly of the reaming two 
corner rafters with supports.

8.

 When assembling an expandable frame you 

will work your way down the frame attaching 

9’4” Top Bar in the ridge to 4-Way 

Expansion Top Fitting. You will then attach 
the 

21’8” Double Tube Truss Rafters to the 

Top Expansion Fitting and the Mid-Leg/
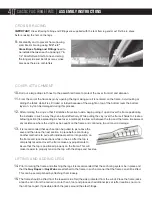
Rafter Fittings
. The 40’ cross cables and 
20’x2”cross braces should be attached as 
you complete each set of rafters. 

  After you reach the opposite 20’ end of the 

frame, repeat steps 3-7. The frame is now 
ready for the cover installation.
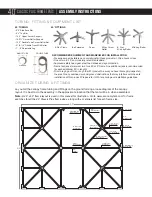
40’

 CLASSIC PLUS FRAME TENTS  

|


ASSEMBLY INSTRUCTIONS

10’ Step Ladder

10’ Step Ladder

10’ Step Ladder

Содержание Economy Tent 40 CLASSIC PLUS

Страница 1: ...40 CLASSIC PLUS FRAME TENTS ASSEMBLY INSTRUCTIONS 2995 NW 75th Street Miami FL 33147 5943 305 691 0191 TOLL FREE 800 438 3226 EMAIL sales economytent com WEB economytent com...

Страница 2: ...YL The vinyl fabric developed for this tent system requires specific attention during installation cleaning and storage to maintain its maximum life span Please follow the following care and maintenan...

Страница 3: ...ave Bar 9 4 Top Bar 50 40 TUBING FITTING EQUIPMENT LIST 40 TUBING 9 4 Side Eave Bar 9 4 Top Bar 14 4 Upper Corner Support 10 5 Corner Rafter Support 14 4 Double Tube Corner Rafter Bar 21 8 1 4 Double...

Страница 4: ...the installer on the ladder and then attach the opposite end to the 6 Way Mid Leg Rafter Fitting on the ground The ladder can help support the rafter at the top A tent jack may also be used to elevate...

Страница 5: ...tings or the universal fittings already placed on your rafters prior to connecting the rafters to the mid leg rafter fittings NOTE If assembling a 40 x40 frame only attach your reaming 21 8 rafter in...

Страница 6: ...frame it helps to create a billowing action like spreading a sheet over a mattress to allow air between the top and the frame Be aware of any resistance where the vinyl may be caught on the frame and...

Страница 7: ...eel bars slot of the ratchet ratchet buckle needs to have the handle facing upward Pull the loop strap back towards the tent approximately 18 Hold the strap with one hand and begin to crank the ratche...

Страница 8: ...raps from the Corner Fittings and Legs on the same side Remove the two corner Legs and carefully lower this side of the frame to the ground Note Corner legs should be removed at the same time and the...

Отзывы: