


HEADSET OPERATION
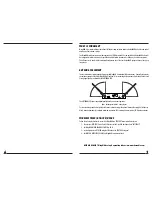
AnchorMAN wireless intercom systems use both single and dual-earpiece, noise
cancelling headsets featuring 4-pin XLR connectors and dynamic microphones.
1. Put on headset and adjust for a firm, comfortable fit
2. Connect headset cable to belt pack jack using the
XLR connector
3. Position boom microphone close to mouth
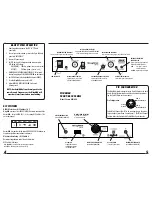
4. Headset Volume Control buttons are on belt pack
adjust volume by pushing “+” or “–“ repeatedly
For videos on how to setup & use your AnchorMAN wireless intercom system go to:
www.anchoraudio.com/anchorman.php
MICROPHONE SENSITIVITY SETTING
Use the Micr/– buttons to adjust voice detection sensitivity
levels. Press + for more voice detection sensitivity and – for less. The
h setting will pick up your voice even at a whisper.
The most sensitive settings should be used in very quiet environments
with little or no back ground noise. Experiment with the Microphone
Sensitivity level to ensure voice detection picks up the beginning and
end of each sentence.
Remember, what you hear in your headset is what other members of the
network will hear.
CAUTION: Setting voice detection to an overly sensitive level can cause ambient background
noise to trigger transmission, disturbing all members of the network.
5
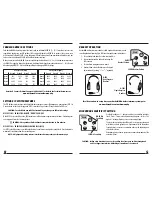
H-200S
Single-Earpiece
Headset
H-200
Dual-Earpiece
Headset
LOWER Headset Volume
RAISE
Headset Volume
LESS Mic Sensitivity
MORE Mic
Sensitivity
CHANGING USER ID SETTINGS
Each AnchorMAN belt pack is preset at the factory with an individual USER ID (1 – 4). If more than four users are
required in a single group, use DIP switches 1 & 2 to assign belt packs to a USER ID. In groups of five or more, users
will be required to share USER ID’s. Each belt pack will be able to monitor all communications within the group, but
only one user with a shared USER ID will be able to transmit at a time.
When you receive your AnchorMAN 4-user set each belt pack is labeled with 1, 2, 3 or 4 , this number corresponds to
the USER ID assigned to that unit at the factory. Additional labels have been included (numbers 1 – 4) to be used
when changing USER ID’s. Use the following tables when changing USER ID settings.
Questions? Contact Technical Support at 888-444-6077 or Refer to the Technical Documents at
www.anchoraudio.com/anchorman.php
.
SETTING DIP SWITCH FEATURES
The DIP Switches are located one the belt pack behind the antenna, to access flip antenna up. A description of DIP 1 &
2 can be found at the top of this page and DIP 3 is covered on Page 3 under “Group Selection For EU Users”.
CAUTION: Turn Belt Pack power OFF before making any changes to DIP switch settings.
DIP SWITCH 4 – ENABLE FIVE-MINUTE “TIMED” VOX MODE
When DIP 4 is set to the ON position, VOX transmissions will be limited to approximately 5 minutes. Each subsequent
voice trigger will reset the five-minute timer.
EU USERS: EU regulations limit continuous transmission time to five minutes.
DIP SWITCH 5 – ENABLE ADJUSTABLE SQUELCH LEVEL (RSSI)
Set DIP 5 to the ON position to use the Headset Volume Control buttons to adjust the squelch level. Use this feature to
minimize RF interference from the surrounding area.
NOTE: A high squelch setting reduces interference but may reduce performance range.
US Frequencies (MHz)
Group A Group B Group C Group D
User 1
945 945.4 945.8 946.2
User 2
946.6 947 947.4 947.8
User 3
948.2 948.6 949 949.4
User 4
949.8 950.2 950.6 951
EU Frequencies (MHz)
Group A Group B Group C Group D
User 1
863.2 863.3 863.4 863.5
User 2
863.6 863.7 863.8 863.9
User 3
864 864.1 864.2 864.3
User 4
864.4 864.5 864.6 864.7
8


