background image

UG-1055 

EVAL-ADAU1777Z User Guide


Rev. 0 | Page 6 of 25 

3.


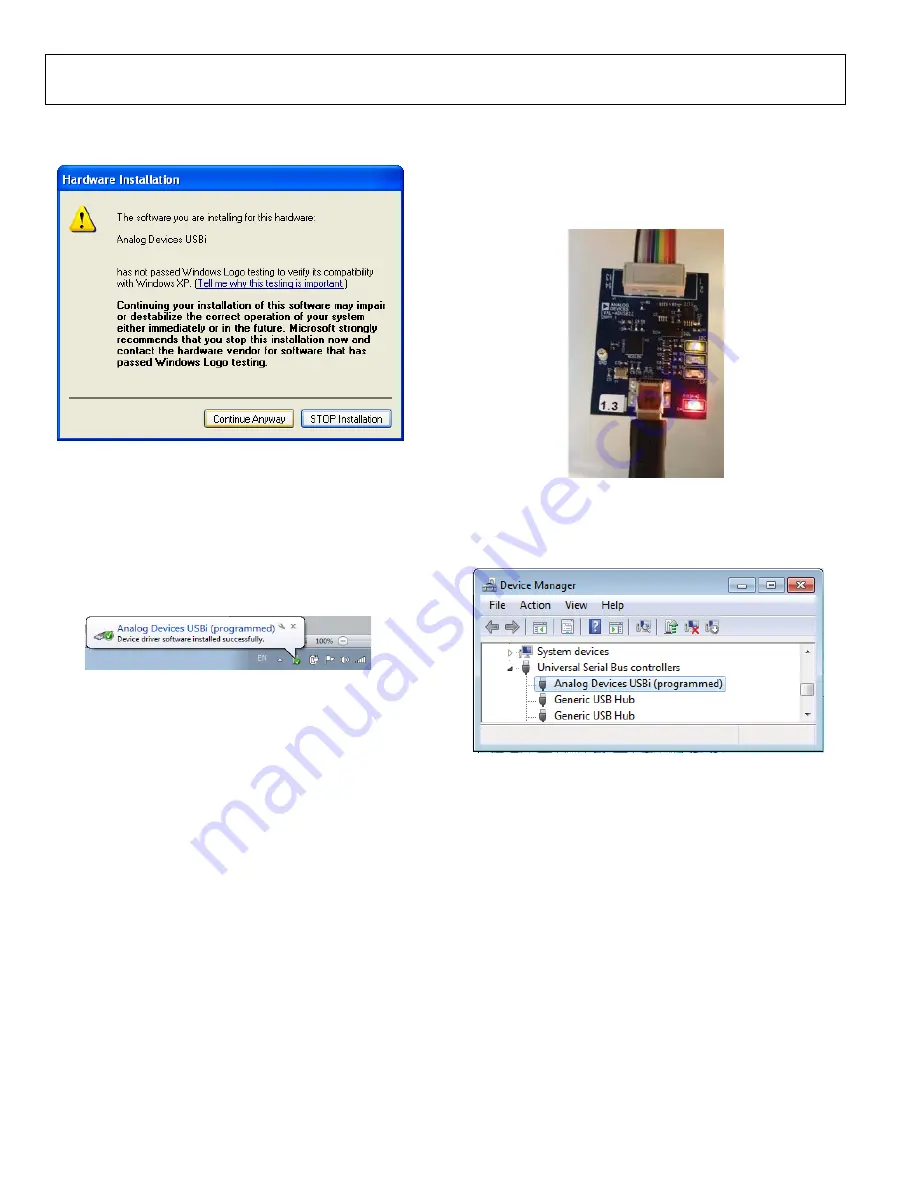
When the 

Hardware Installation

 warning appears, click 

Continue Anyway

 (see Figure 8). 

15

05

4-

00

8


Figure 8. Hardware Installation Warning 

The USBi drivers are now installed. Leave the USBi connected 
to the PC. 

Using Windows 7 or Windows Vista 

After connecting the USBi to the USB 2.0 port, Windows 7 or 
Windows Vista recognizes the device and installs the drivers 
automatically (see Figure 9). After the installation is complete, 
leave the USBi connected to the PC. 

150

54

-009


Figure 9. USBi Drivers Installed Correctly 

Confirming Proper Installation of the USBi Drivers 

To confirm that the USBi drivers have been installed properly,  

1.


With the USBi still connected to the USB 2.0 port of the 
PC, check that both the yellow I

2

C LED and the red power 

indicator LED are illuminated (see Figure 10). 

1

5054-

010


Figure 10. State of USBi Status LEDs After Driver Installation 

2.


In Windows 

Device Manager

, under the 

Universal Serial 

Bus controllers

 section, check that 

Analog Devices USBi 

(programmed)

 appears as shown in Figure 11. 

15

054-

01

1


Figure 11. Confirming Driver Installation Using the 

Device Manager


Содержание EVAL-ADAU1777Z

Страница 1: ...g on the information therein All referenced brands product names service names and trademarks are the property of their respective owners 00000005981LF 000 EOS Power Buy Now We have 45 000 LP502030 PCM NTC LD A02554 EEMB Lithium Battery Rectangular 3 7V 250mAh Rechargeable in stock now Starting at 0 034 This EEMB part is fully warrantied and traceable 1 855 837 4225 Give us a call International 1 ...

Страница 2: ... setup of the EVAL ADAU1777Z evaluation board This evaluation board provides full access to all analog and digital inputs outputs on the ADAU1777 The ADAU1777 core is controlled by Analog Devices Inc SigmaStudio software which interfaces to the board via a USB connection The EVAL ADAU1777Z can be powered by a single AAA battery by the USB bus or by a single 3 8 V to 5 5 V supply any of these suppl...

Страница 3: ...h and Jumper Settings 7 Powering Up the Board 7 Connecting the Audio Cables 7 Setting Up Communications in SigmaStudio 7 Creating a Basic Signal Flow 8 Downloading the Program to the DSP 10 Using the Evaluation Board 11 Power 11 Inputs and Outputs 11 MP Pins 13 Serial Audio Interface 13 Communications Header J1 14 Self Boot 14 Power Down 15 Hardware Description 16 Jumpers 16 Integrated Circuits IC...

Страница 4: ...MIC INPUTS SERIAL AUDIO CONNECTOR MP PINS DIFFERENTIAL STEREO OUTPUT SINGLE ENDED STEREO OUTPUT XTAL OSCILLATOR MASTER CLOCK ADAU1777 15054 002 Figure 2 Functional Block Diagram 15054 003 POWER BYPASS SWITCH POWER SUPPLY DIFFERENTIAL STEREO OUTPUTS EEPROM OSC SERIAL AUDIO CONNECTOR MULTIPURPOSE PINS PDM DMIC HEADERS I2C SPI HEADER SELF BOOT SWITCH ANALOG INPUTS ADAU1777 STEREO ANALOG IN Figure 3 B...

Страница 5: ...UG 1055 EVAL ADAU1777Z User Guide Rev 0 Page 4 of 25 15054 004 Figure 4 Default Jumper and Switch Settings Solid Black Rectangle Indicates a Switch or Jumper Position ...

Страница 6: ...SBi EVAL ADUSB2EBZ DRIVERS SigmaStudio must be installed to use the USB interface USBi After the SigmaStudio installation is complete 1 Connect the USBi to an available USB 2 0 port using the USB cable included in the evaluation board kit The USBi does not function properly with a USB 3 0 port 2 Install the driver software see the Using Windows XP section or the Using Windows 7 or Windows Vista se...

Страница 7: ...mplete leave the USBi connected to the PC 15054 009 Figure 9 USBi Drivers Installed Correctly Confirming Proper Installation of the USBi Drivers To confirm that the USBi drivers have been installed properly 1 With the USBi still connected to the USB 2 0 port of the PC check that both the yellow I2 C LED and the red power indicator LED are illuminated see Figure 10 15054 010 Figure 10 State of USBi...

Страница 8: ... to J1 control port of the EVAL ADAU1777Z CONNECTING THE AUDIO CABLES Connect a stereo audio source to J22 AIN2 3 Connect headphones or powered speakers to J23 stereo output 15054 012 Figure 12 Stereo Out J23 and Stereo In J22 SETTING UP COMMUNICATIONS IN SigmaStudio Start SigmaStudio by double clicking the shortcut on the desktop Click File New Project or press Ctrl N to create a new project The ...

Страница 9: ...ch contains all of the algorithms that can run in the SigmaDSP From within the IO Audio Input Pair 2 folder select the Input cell see Figure 19 15054 019 Figure 19 Input Cell Selection Click and drag the Input cell into the blank schematic space to the right of the Toolbox see Figure 20 15054 020 Figure 20 Input Cell Go to the IO Audio Output folder and select the Output cell see Figure 21 15054 0...

Страница 10: ...Serial Port tab in the top right corner In the bottom left corner of the Output Serial Port tab the Push Button Vol section is located Locate the drop down box for Converters Controlled by PushButton Volume and change its value to All ADCs see Figure 26 15054 026 Figure 26 Output Serial Port Tab Go to the Pin Pad Control tab In the Pin Modes section change the value of DAC_SDATA MP0 to Push button...

Страница 11: ...F7 key 15054 028 Figure 28 Link Compile Download If the project does not compile correctly an error displays see Figure 29 If an error displays return to SigmaStudio and check the configuration for mistakes When the project compiles the signal flow runs on the evaluation board and the audio passes from the input to the output The volume can be changed in real time by using the buttons on the board...

Страница 12: ...1777Z has multiple audio input and output options including digital and analog There are four single ended analog inputs that are configurable as microphone or line inputs dual stereo digital microphone inputs and two differential outputs that can also be used in a single ended configuration Analog Microphone Inputs For microphone signals the ADAU1777 analog inputs can be configured as single ende...

Страница 13: ... microphones instead of the ADCs by toggling the appropriate Decimator Source settings Go to the PGA ADC tab to find and set the following switches see Figure 36 The digital microphones can now be routed via the appropriate inputs on the Audio Input cell 15054 036 Figure 36 Decimator Source Headphone Output The headphone output J23 connects to any standard 3 5 mm mini plug stereo headphones By set...

Страница 14: ...re 53 for the pinout of the header These jumpers enable the use of the volume control mute and other capabilities of the ADAU1777 To use the full functionality of the MP pins on the ADAU1777 change the selections in the drop down boxes under the Pin Pad Control tab which is located in the Hardware Configuration ADAU1777 Register Control tab of SigmaStudio see Figure 40 15054 040 Figure 40 MP Pins ...

Страница 15: ...hannel Data IO on LSB MSB Unused TDM Outputs LRCLK Mode as pulse or 50 duty cycle and LRCLK Polarity see Figure 43 15054 043 Figure 43 Serial Port Control If using TDM mode ensure that the appropriate TDM output channels have been enabled in the TDM Output Channel section see Figure 44 15054 044 Figure 44 TDM Output Channel Use the Signal Routing tab to route the core outputs ADCs or serial inputs...

Страница 16: ...t Compilation to E2PROM see Figure 48 15054 048 Figure 48 Write to E2PROM When the project has been written to the E2PROM move the self boot switch S2 to the on position see Figure 49 to ensure that the ADAU1777 boots from the E2PROM when it powers up 15054 049 Figure 49 Self Boot Switch On POWER DOWN The power down header J15 PD on the silkscreen of the board provides access to the power down pin...

Страница 17: ...e ADAU1777 J10 IOVDD_VDD Jumper connects IOVDD on the ADAU1777 to VDD 3 3 V board supply on the evaluation board J11 J14 Microphone bias Jumpers used to add a microphone bias to the analog microphone inputs AIN0 and AIN1 J12 DVDD regulator REG Jumper connects DVDD on the ADAU1777 to its internal regulator J13 Out R Jumper provides access to the mono differential output right J15 Power down Jumper ...

Страница 18: ... C17 10µF C19 10µF R5 33R2 R6 33R2 R7 33R2 R8 33R2 C41 10µF A B 1 2 3 J14 A7 IOVDD B7 SCL SCLK C7 MICBIAS0 D7 MICBIAS1 E7 AVDD F7 AGND A6 XTALI MCLKI B6 SDA MISO C6 ADDR0 SS D6 ADDR1 MOSI E6 SELFBOOT F6 CM A5 XTALO B5 DMIC0_1 MP4 E5 AIN0 F5 AIN1 A4 ADC_SDATA1 CLK_OUT MP6 B4 DMIC2_3 MP5 E4 AIN3 F4 AIN2 A3 ADC_SDATA0 PDMOUT MP1 B3 DAC_SDATA MP0 E3 PD F3 AGND A2 BCLK MP2 B2 LRCLK MP3 C2 REG_OUT D2 HP...

Страница 19: ...tion Board Schematic PDM Digital Microphone Interface R29 49 9kΩ 1 3 5 7 9 2 4 6 8 10 12 11 J4 HEADER_12WAY_UNSHROUD LRCLK MP3 BCLK MP2 DAC_SDATA MP0 ADC_SDATA0 PDMOUT MP1 ADC_SDATA1 CLKOUT MP6 EXT_MCLK 15054 052 Figure 52 EVAL ADAU1777Z Evaluation Board Schematic Serial Audio Interface VOL MP0 VOL MP1 DSP BYPASS MP6 A MUTE MP2 B BANK SWITCH MP3 MP PIN JUMPERS R37 10kΩ R38 10kΩ R39 10kΩ R40 10kΩ 1...

Страница 20: ... 10kΩ D1 GREEN DIFFUSED R26 137kΩ 1 2 3 4 5 6 S1 SPDT D2 D3 J10 TP4 TP3 TP1 1 VIN 2 EN 6 VOUT 5 SW 3 FB 7 EP 4 GND U4 ADP1607ACPZN001 R7 C26 10µF C23 10nF A B 1 2 3 J3 C24 1 0µF L2 2 2µH 3 EN 2 GND 1 IN 5 OUT 4 SS U3 ADP1712AUJZ 1 5 R7 C21 0 10µF C20 0 10µF C48 0 10µF C47 0 10µF C29 0 10µF C28 0 10µF C30 0 10µF VDD BRD_RESET USB_5V IOVDD EXT_5V 15054 054 Figure 54 EVAL ADAU1777Z Evaluation Board S...

Страница 21: ...7kΩ R14 2 67kΩ R19 OPEN R16 OPEN R17 OPEN R22 OPEN R21 OPEN R20 OPEN R23 10kΩ R18 10kΩ C22 0 10µF IOVDD BRD_RESET ADDR0 SS SCL SCLK SDA MISO ADDR1 MOSI IOVDD IOVDD USB_5V 15054 053 Figure 55 EVAL ADAU1777Z Evaluation Board Schematic Control Port Interface 15054 056 Figure 56 EVAL ADAU1777Z Evaluation Board Layout Top Assembly ...

Страница 22: ...EVAL ADAU1777Z User Guide UG 1055 Rev 0 Page 21 of 25 15054 057 Figure 57 EVAL ADAU1777Z Evaluation Board Layout Top Copper ...

Страница 23: ...UG 1055 EVAL ADAU1777Z User Guide Rev 0 Page 22 of 25 15054 058 Figure 58 EVAL ADAU1777Z Evaluation Board Layout Ground Plane 15054 059 Figure 59 EVAL ADAU1777Z Evaluation Board Layout Power Plane ...

Страница 24: ...EVAL ADAU1777Z User Guide UG 1055 Rev 0 Page 23 of 25 15054 060 Figure 60 EVAL ADAU1777Z Evaluation Board Layout Bottom Copper ...

Страница 25: ...ded PBC06DAAN or cut PBC36DAAN 3M 1 J5 2 pin header unshrouded jumper 0 10 PBC02SAAN or cut PBC36SAAN Sullins Electronics Corp 2 J6 to J7 12 way socket unshrouded PPPC062LFBN RC 3M 6 J8 J10 to J12 J15 J17 2 pin header unshrouded jumper 0 10 use shunt Tyco 881545 2 PBC02SAAN or cut PBC36SAAN Sullins Electronics Corp 1 J9 10 way unshrouded PBC05DAAN or cut PBC36DAAN 3M 1 L2 2 2 µH inductor LQH32PN2R...

Страница 26: ...udes any entity other than ADI Customer their employees affiliates and in house consultants The Evaluation Board is NOT sold to Customer all rights not expressly granted herein including ownership of the Evaluation Board are reserved by ADI CONFIDENTIALITY This Agreement and the Evaluation Board shall all be considered the confidential and proprietary information of ADI Customer may not disclose o...

Отзывы: