background image

EVAL-ADAQ7980SDZ User Guide 

UG-1060 


Rev. 0 | Page 13 of 30 

EVALUATION BOARD SOFTWARE SETUP PROCEDURES 

EVALUATION BOARD CONNECTION SEQUENCE 

With the evaluation software installed, use the following 
evaluation board operation/connection sequence: 
1.


Connect the SDP controller board to the evaluation board via 
the P8 connector (secure the connection using nylon screws). 
The software is configured to find the evaluation board on the 
J2 connector of the SDP board.  

2.


Power the 

EVAL-ADAQ7980SDZ

 with the appropriate 

supply, as described in the Power Supplies section.  

3.


Connect the 

EVAL-SDP-CB1Z

 board to a PC using the 

USB cable. 

4.


Start the evaluation software. Click 

Start

 > 

All Programs

 > 

Analog Devices > ADAQ798x 

ADAQ798x Evaluation 

Software

.  

When the software starts running, it searches for Analog Devices 
hardware connected to the PC, first attempting to detect and 
connect to any SDP boards connected to the PC via the USB 
ports. If SDP boards are connected, the software attempts to 
detect the 

EVAL-ADAQ7980SDZ

 evaluation board connected 

to the SDP board. If the 

EVAL-ADAQ7980SDZ

 connects, the 

software runs in the standard operation mode. If it does not 
connect, a dialog box appears and prompts the user to either repeat 
the connection attempt or run the software in standalone mode.  

With Hardware Connected 

To run the program with hardware connected, 
1.


Follow Step 1 to Step 4 in the Evaluation Board 
Connection Sequence section. 

2.


The software then attempts to connect to the SDP board and 
the 

EVAL-ADAQ7980SDZ

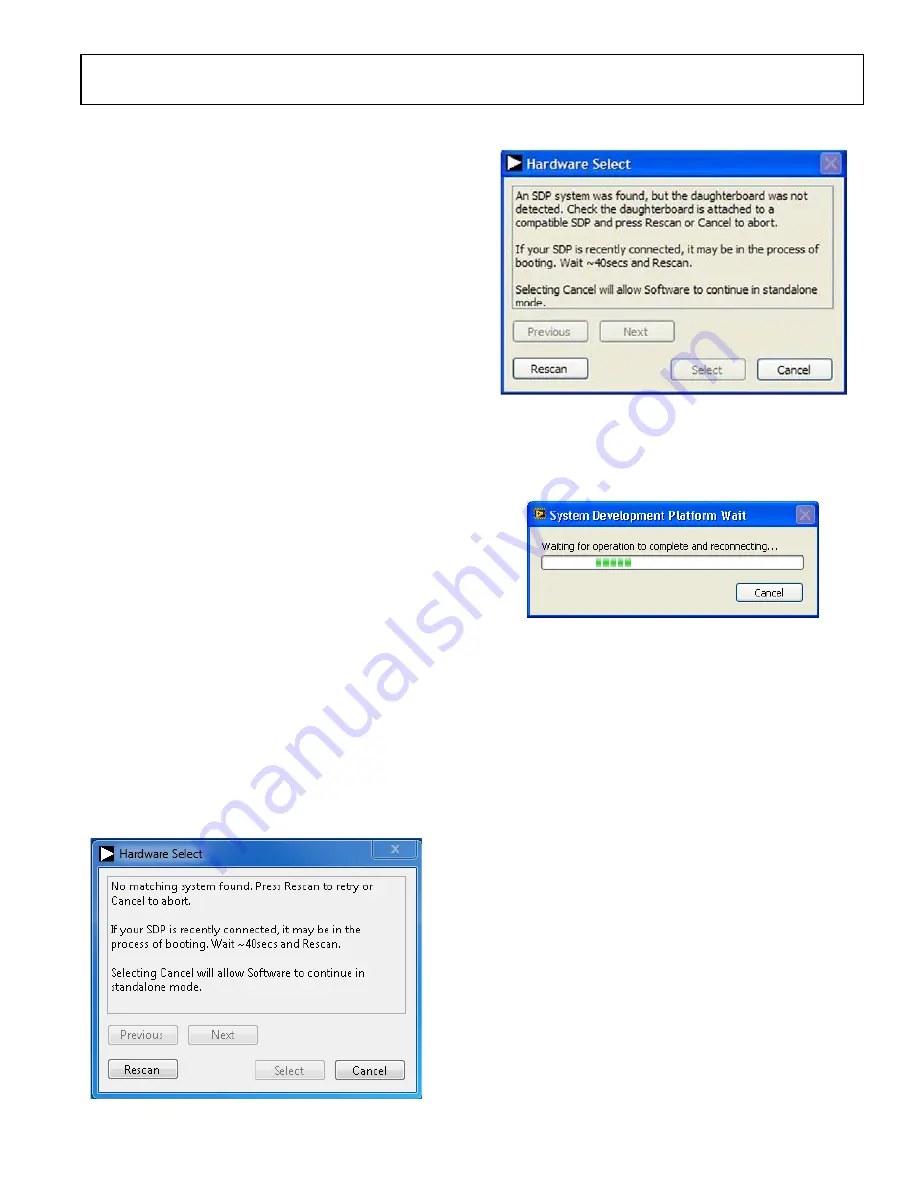
. If the SDP board is not found, an 

error window displays (see Figure 18). If the SDP board is 
found but the 

EVAL-ADAQ7980SDZ

 is not detected, a 

different error window displays (see Figure 19). If either 
connectivity error displays, ensure the hardware is properly 
connected to the USB port of the PC, wait a few seconds, 
click 

Rescan

, and follow the instructions. 


Figure 18. SDP Board Not Connected to the USB Port Pop-Up Window Error  


Figure 19. 

EVAL-ADAQ7980SDZ

 Not Connected to the USB Port Pop-Up 

Window Error  

3.


After finding the evaluation board, the software connects 
to the 

EVAL-ADAQ7980SDZ

 and displays the pop-up 

window shown in Figure 20. 


Figure 20. Software Connects to SDP Board 

4.


After the 

EVAL-ADAQ7980SDZ

 is detected, the main 

window of the software appears (see Figure 22), showing 
that the 

EVAL-ADAQ7980SDZ

 is connected. 

Without Hardware Connected 

The software can run in standalone mode when no evaluation 
board hardware is connected to the USB port. Use this mode to 
load previously saved states of the 

ADAQ798x Evaluation 

Software

 and view previously captured sets of data in the 

various windows of the software.  
1.


Click 

Start

 > 

All Programs

 > 

Analog Devices > 

ADAQ798x 

ADAQ798x Evaluation Software

.  

2.


The software attempts to connect to the evaluation hardware. 
If the hardware is not found, either of the error messages in 
Figure 18 or Figure 19 display. To continue without hardware 
in standalone mode, click 

Cancel

15065-

1

18

15065-

016

15065-

017

Содержание EVAL-ADAQ7980SDZ

Страница 1: ...d designed to demonstrate the low power ADAQ7980 performance and provide an easy to understand interface for a variety of system applications The ADAQ7980 is a 16 bit analog to digital converter ADC subsystem that integrates four common signal processing and conditioning blocks into a system in package SiP design that supports a variety of applications The EVAL ADAQ7980SDZ can also evaluate the AD...

Страница 2: ... Control Mode 12 Evaluation Board Software Setup Procedures 13 Evaluation Board Connection Sequence 13 Evaluation Board Software 15 Overview of the Main Window 15 Configure Tab 16 Waveform Tab 17 Histogram Tab 18 FFT Tab 19 Summary Tab 20 Evaluation Hardware and Software Operation 21 Capturing Conversion Results 21 Generating a Waveform Analysis Report 21 Generating a Histogram of the ADC Code Dis...

Страница 3: ...EVAL ADAQ7980SDZ User Guide UG 1060 Rev 0 Page 3 of 30 EVAL ADAQ7980SDZ EVALUATION BOARD Figure 1 15065 001 ...

Страница 4: ...cognized when it connects to the PC Installing the ADAQ7980 Evaluation Board Software To install the ADAQ798x Evaluation Software 1 Start the Windows operating system and download the software from the EVAL ADAQ7980SDZ product page on the Analog Devices website 2 Unzip the downloaded file 3 Double click the setup exe file to begin the evaluation board software installation see Figure 2 Figure2 ADA...

Страница 5: ... the installation of the EVAL SDP CB1Z SDP board drivers automatically loads Figure 8 Loading the Setup for SDP Drivers Installation Installing the EVAL SDP CB1Z SDP Board Drivers After the installation of the evaluation board software completes a welcome window displays for the installation of the EVAL SDP CB1Z system demonstration platform board drivers 1 Ensure all other applications are closed...

Страница 6: ...tion is complete See the Software Installation Procedures section for more information 1 Before connecting power connect the 120 pin connector P8 of the EVAL ADAQ7980SDZ board to Connector J4 on the EVAL SDP CB1Z board Nylon fastening screws are included in the EVAL ADAQ7980SDZ evaluation kit to ensure the EVAL ADAQ7980SDZ and EVAL SDP CB1Z boards are connected firmly together 2 Verify the link se...

Страница 7: ...ck Device Manager b Under ADI Development Tools Analog Devices System Development Platform SDP B appears see Figure 15 indicating the EVAL SDP CB1Z driver software is installed and the EVAL ADAQ7980SDZ is connected to the PC correctly Figure 15 Device Manager Checking the EVAL ADAQ7980SDZ Is Connected to the PC Correctly 15065 015 ...

Страница 8: ... of the integrated ADC driver the range of the AMP_OUT pin For example if using a 5 V reference then the ADAQ7980 can convert signals on the AMP_OUT pin between 0 V and 5 V before the signal overranges The REF pin of the ADAQ7980 is the input to the integrated reference buffer The REF_OUT pin is the output of the reference buffer and the reference node utilized by the integrated ADC When utilizing...

Страница 9: ...o the noninverting input of the ADC driver through the R22 resistor VCM is set to REF 2 by default Use R22 and R24 resistors to set VCM to another desired dc voltage See the Reference section for more information on VCM Table 2 outlines the link settings and passive components that implement common ADC driver configurations Table 2 ADC Driver Configuration Settings Configuration Link Settings Comp...

Страница 10: ...supply 2 5 and 0 To evaluate the ADAQ7980 in a single supply configuration connect the V pin to ground and connect the V and VDD pins to either 7 5 V or 5 V If V is set to 5 V the device is not able to use a 5 V reference voltage Alternatively power the EVAL ADAQ7980SDZ from a bench top power supply by using the P6 terminal block Individual supplies can also be supplied externally through P6 but a...

Страница 11: ...SDP Change to B for LDO always on ties it to VDD J7 A Reference source input voltage 7 5 V or 5 0 V Set A to 7 5 V and B at 5 0 V J8 A ADR3433 enable signal Do not alter J9 1 On board reference voltage selection 5 0 V or 3 3 V Set 1 to 5 0 V and 3 to 3 3 V J10 1 Reference source on board or externally supplied Change to 3 if using bench reference J11 1 VDD supply voltage 5 0 V or 7 5 V Set 1 to 5 ...

Страница 12: ... interface to transfer data to the EVAL SDP CB1Z The EVAL ADAQ7980SDZ communicates with the EVAL SDP CB1Z board using a 3 3 V logic level Logic voltages that exceed 3 3 V can damage the SDP interface USER DEFINED CONTROL MODE The EVAL ADAQ7980SDZ can also be used without the EVAL SDP CB1Z controller board In this case the EVAL ADAQ7980SDZ connects to the serial interface using the P8 connector or ...

Страница 13: ... the Evaluation Board Connection Sequence section 2 The software then attempts to connect to the SDP board and the EVAL ADAQ7980SDZ If the SDP board is not found an error window displays see Figure 18 If the SDP board is found but the EVAL ADAQ7980SDZ is not detected a different error window displays see Figure 19 If either connectivity error displays ensure the hardware is properly connected to t...

Страница 14: ... Standalone Mode 4 Load example files or previously saved files via File Load data The contents of the loaded file update the various plots in the software 5 To connect the EVAL ADAQ7980SDZ and run the software in standard operation close and relaunch the software This allows it to repeat the search for the SDP board and EVAL ADAQ7980SDZ evaluation board 15065 018 ...

Страница 15: ...elp option opens a window containing information about the controls of the software Help text displays in the window when the mouse hovers over a control The About option opens a window displaying the software version information Tabs There are five tabs available in the tabs area of the main window Configure Waveform Histogram FFT and Summary These tabs display the data in different formats Navig...

Страница 16: ... produce one sample This effectively reduces the ADC Nyquist rate by a factor of the over sampling ratio but at the benefit of increased resolution Dynamic Power Scaling The Dynamic Power Scaling pane provides dynamic power scaling DPS configuration options for both the ADC driver and the reference buffer DPS is a power saving functionality of the ADAQ7980 See the ADAQ7980 ADAQ7988 data sheet for ...

Страница 17: ...n the data in the waveform plot The indicators except Frequency are displayed in both volts V and codes LSB The analysis items reference the signal at the AMP_OUT pin of the ADAQ7980 The indicators include the following Pk pk Amplitude displays the difference between the maximum and minimum values in the data Max Amplitude displays the maximum value in the data Min Amplitude displays the minimum v...

Страница 18: ...rence the signal at the AMP_OUT pin of the ADAQ7980 The parameters include the following Max Amplitude displays the maximum value in the data Min Amplitude displays the minimum value in the data DC Offset Mean displays the average value of the data Transition Noise Pk Pk displays the peak to peak value of the noise of the signal displayed in μV and LSB RMS Pk pk Amplitude displays the difference b...

Страница 19: ...ise displays the rms voltage of the noise floor in the FFT plot Specifically this calculation includes all frequency bins in the FFT plot that are not displayed in the Show Harmonic Content window This value is used in calculations for Dynamic Range SNR SINAD and SFDR values SNR displays the ratio of the Fund Amplitude value to the RMS Noise value displayed in dB THD displays the ratio of the ener...

Страница 20: ...ed in V and LSB DC Offset Mean displays the average value of the data displayed in V and LSB Transition Noise PP displays the peak to peak value of the noise of the signal displayed in μV and LSB RMS Fund Freq displays the frequency with the largest amplitude in the FFT plot displayed in kHz Fund Amplitude displays the amplitude of the Fund Freq value displayed in dBFS RMS Noise displays the rms v...

Страница 21: ...apture button Raw data is then captured and passed to the PC for statistical computations and various measured values are displayed in the Histogram Analysis pane DC Input To perform a histogram test of dc input 1 If using an external source apply a signal to the evaluation board at the P1 P2 input SMA connector pair It can be required to filter the signal to ensure that the dc source is noise com...

Страница 22: ...eters such as SNR and THD OPERATING THE EVALUATION SOFTWARE IN STANDALONE MODE The software can run in standalone mode when no evaluation board hardware is connected to the USB port Conversions cannot be performed in this mode but previously acquired results can be loaded and viewed in the evaluation software environment Selecting File Load Data loads a dialogue box prompting the file to load The ...

Страница 23: ...OOUT C32 C31 C30 C29 C28 C26 R23 R20 P4 P1 R19 R18 P3 P2 C25 R22 R24 C27 R21 LDO_OUT VCM INVERT SELECTION INVERTING VIN NONINVERTING VCM INVERT EXCITATION INVERT SELECTION VIN IN IN VCM VIN RBUF_PD V VDRIVE SDI SCLK SDO AMP_OUT INVERT EXCITATION IN V PD_REF CNV INVERTING SCLK VDD IN LDO_OUT PD_AMP PD_REF VDRIVE VIN REF SDO V VIN VDRIVE V EXT_REF VDD_BENCH VSDP_BENCH V _BENCH V _BENCH NONINVERTING ...

Страница 24: ... 68 67 66 55 54 53 51 50 2 74 47 76 45 77 44 78 43 118 117 115 109 104 98 93 86 81 75 69 63 58 52 46 40 36 28 23 17 11 6 4 3 56 71 61 7 4 8 5 6 PAD 3 2 1 SPI_SEL_A CLKOUT NC NC GND GND VIO 3 3V GND PAR_D22 PAR_D20 PAR_D18 PAR_D16 PAR_D15 GND PAR_D12 PAR_D10 PAR_D8 PAR_D6 GND PAR_D4 PAR_D2 PAR_D0 PAR_WR_N PAR_INT GND PAR_A2 PAR_A0 PAR_FS2 PAR_CLK GND SPORT_RSCLK SPORT_DR0 SPORT_RFS SPORT_TFS SPORT_...

Страница 25: ...90345 10µF 0 1µF 10µF 10µF SMB1251B1 3GT30G 50 ADA4805 1ARJZ 3PIN_JUMPER_SM J20 J8 J7 P5 R17 C24 R16 C22 U4 R15 C23 R14 C20 J10 C21 C18 R13 C17 R11 J9 R12 C19 U2 C16 C15 R10 U3 C14 C13 R9 EXT_REF ON_BOARD_REF REF REF_PD 3P3V_REF 5V_REF REF V ONBOARD_7P5V ONBOARD_5V V ON_BOARD_REF VCM 2 3 1 2 3 1 2 3 1 5 4 3 2 1 1 5 2 4 6 3 3 2 1 3 2 1 6 2 8 7 5 3 1 4 AGND VOUT_FORCE VOUT_SENSE VIN ENABLE GND_SENSE...

Страница 26: ...R AMPLIFIERS ON BOARD BENCH UNIPOLAR BIPOLAR ON BOARD ON BOARD BENCH KLDX SMT2 0202 ATR 2 4kΩ 0kΩ ADP7118AUJZ 5 0 10µF 10µF ADP2370ACPZ 5 0 0Ω 10µF 10µF 0Ω ADM660ARZ 10µH 10µF DNI SML 310MTT86 ADP7182AUJZ 2 2µF 100kΩ 2 2µF 1µF M20 9990345 M20 9990345 1kΩ AT 100MHz 10µF 3PIN_JUMPER_SM 1kΩ M20 9990345 0Ω M20 9990345 50kΩ 10µF DNI DNI C12 C11 R8 U9 C8 C10 C9 U8 C3 C7 R6 R3 R5 J15 U6 L2 J17 J19 C5 R4 ...

Страница 27: ...EVAL ADAQ7980SDZ User Guide UG 1060 Rev 0 Page 27 of 30 Figure 33 EVAL ADAQ7980SDZ Evaluation Board Silkscreen Top Assembly Figure 34 EVAL ADAQ7980SDZ Evaluation Board Top Layer 15065 031 15065 032 ...

Страница 28: ...UG 1060 EVAL ADAQ7980SDZ User Guide Rev 0 Page 28 of 30 Figure 35 EVAL ADAQ7980SDZ Evaluation Board Layer 2 Ground Figure 36 EVAL ADAQ7980SDZ Evaluation Board Layer 3 Power 15065 033 15065 034 ...

Страница 29: ...EVAL ADAQ7980SDZ User Guide UG 1060 Rev 0 Page 29 of 30 Figure 37 EVAL ADAQ7980SDZ Evaluation Board Bottom Layer 15065 035 ...

Страница 30: ...Agreement and the Evaluation Board shall all be considered the confidential and proprietary information of ADI Customer may not disclose or transfer any portion of the Evaluation Board to any other partyfor any reason Upon discontinuation of use of the EvaluationBoard or termination of this Agreement Customer agrees to promptly return the Evaluation Board to ADI ADDITIONAL RESTRICTIONS Customer ma...

Отзывы: