UG-901
EVAL-AD7175-8SDZ User Guide
Rev. 0 | Page 8 of 10
SOFTWARE OPERATION
1
4
3
2
13
767
-0
07
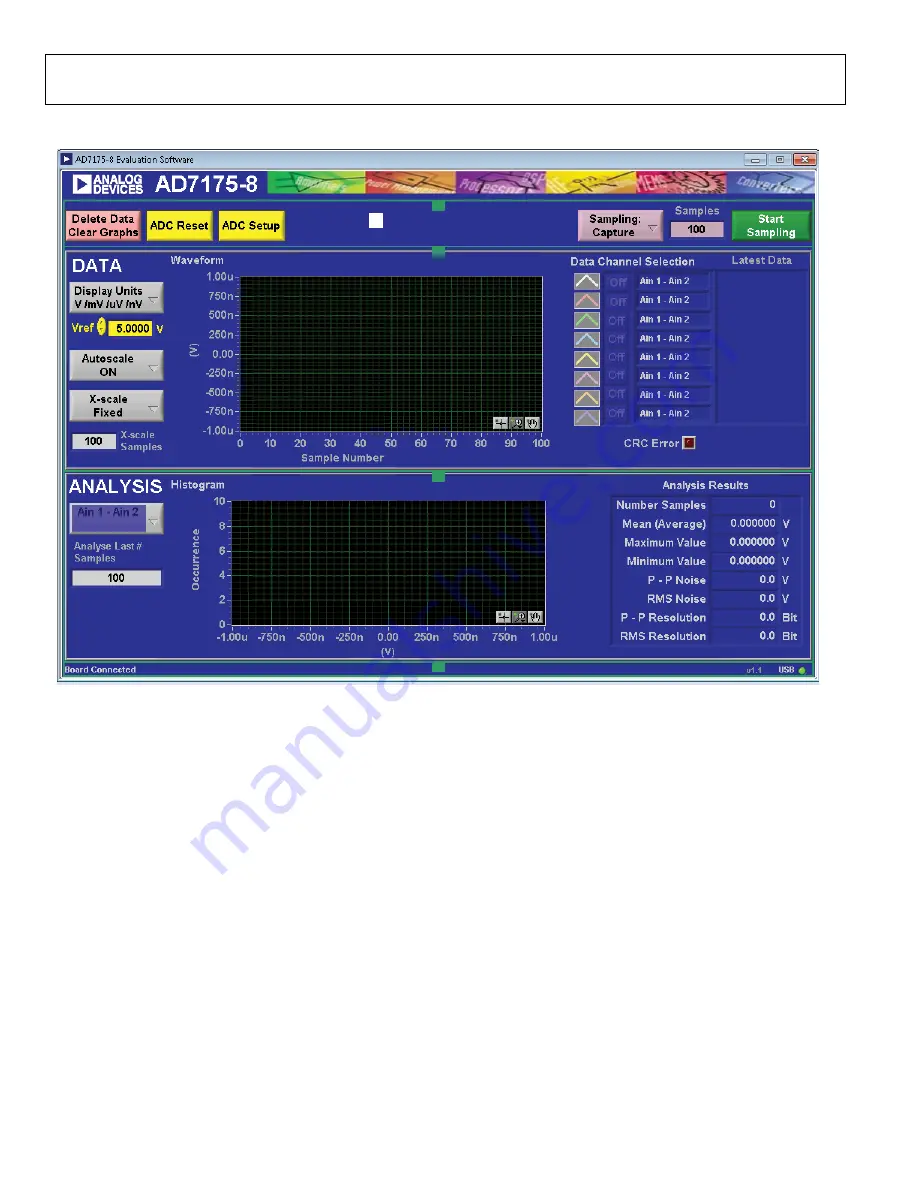
Figure 7. Main Window of the
Evaluation Software
OVERVIEW OF THE MAIN WINDOW
The main window of the software displays the significant
control buttons and analysis indicators of the
evaluation software (see Figure 7). This window is divided into
four sections. The green numbers shown in Figure 7 (Label 1
through Label 4) correspond to the following components of
the main window:
Control toolbar (Label 1)—control buttons
Data section (Label 2)—waveform graph and controls
Analysis section (Label 3)—histogram graph and controls
Status bar (Label 4)—information
CONTROL TOOLBAR
Start Sampling and Samples
Start Sampling
, located on the right of the control toolbar,
gathers ADC results. Results appear in the graphs of the
DATA
and
ANALYSIS
sections of the main window. The
Samples
numeric control is the number of samples gathered per batch.
Sampling
Sampling
(set to
Capture
in Figure 7) enacts the sampling mode
used by the software. This is unrelated to the ADC mode. The
user can capture a defined sample set or continuously gather
batches of samples. In both cases, the number of samples set in
the
Samples
numeric input dictates the number of samples.
ADC Setup
Click
ADC Setup
to open the ADC register map window. Use
the new window to change register settings. This window allows
the user to save existing register settings or load previously
saved register settings.
ADC Reset
Click
ADC Reset
to perform a software reset of the
There is no hardware reset pin. Perform a hard reset by removing
power to the board. The software reset has the same effect as a
hard reset.
Delete Data Clear Graphs
Click
Delete Data Clear Graphs
to clear any existing content
from the waveform and histogram graphs.


