System Installation
21
TPI-PRO (Total Presentation Interface)
5.
Apply power to the TPI-PRO.
Mouse Pass-Thru Control
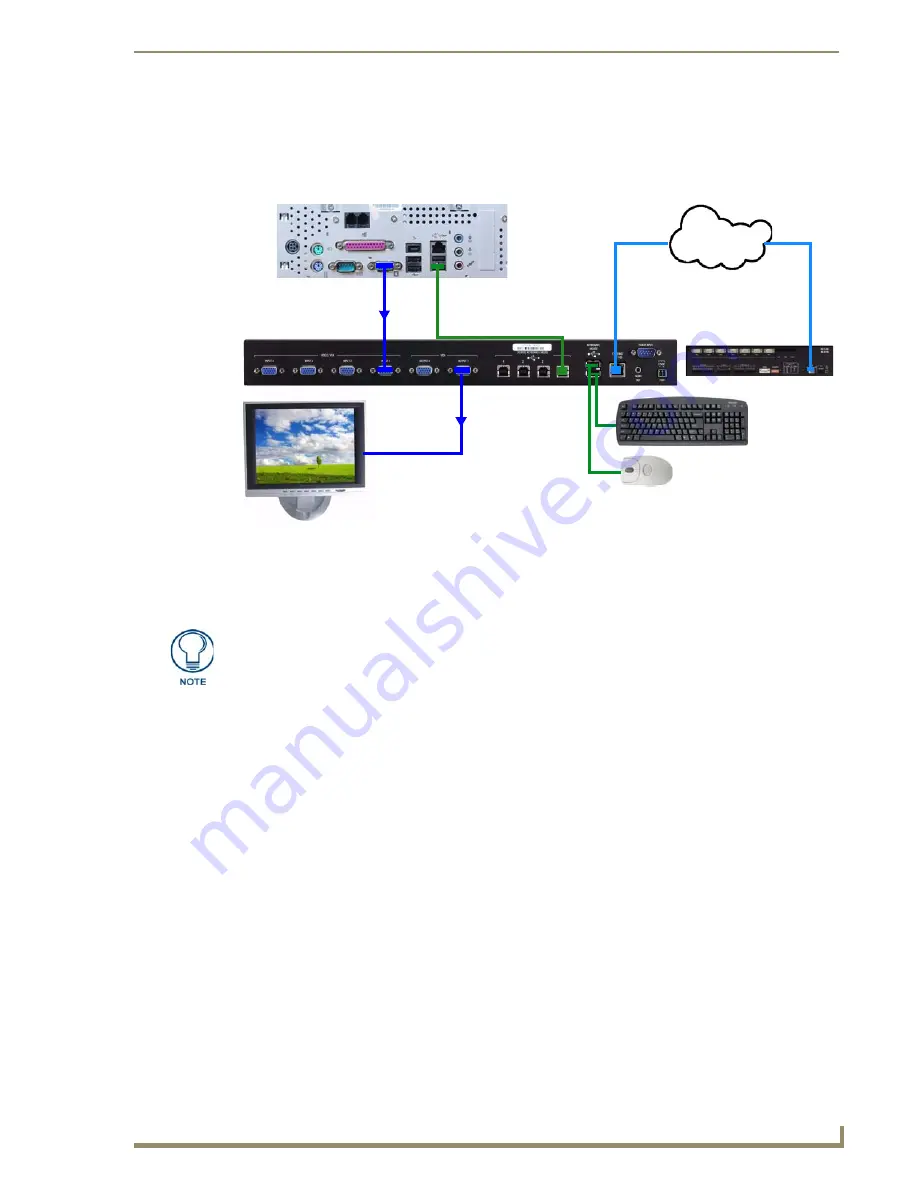
FIG. 26 illustrates a typical installation for using mouse pass-thru control.
To enable a touch response on a panel page routed through a computer, you must enable pass-thru control.
Pass-thru control enables the TPI-PRO to act as a control bridge between a computer and a monitor (typically
with no touch features).
Configuring the TPI-PRO for Pass-Through Control
You can control a PC by routing the mouse control through the TPI-PRO and displaying the results on a
non-touch enabled monitor. In this scenario, the TPI-PRO is virtually non-existent as it is akin to connecting
the monitor and mouse directly to the rear of the computer, thus the term "pass-through control".
In essence, the PC views the TPI-PRO as an adapter connected to a USB touch input device (as shown in
FIG. 26 on page 21).
1.
Discharge any acquired static electricity by touching a grounded metal object; disconnect the incoming
power connector from the rear of the TPI-PRO.
2.
Connect a USB mouse to one of the Type-A USB ports on the front or rear of the TPI-PRO.
3.
Connect a USB cable from a USB port on the PC to one of the Type-B USB ports on the rear of the
TPI-PRO (labelled SOURCE KEYBOARD/MOUSE)
.
4.
Connect a video output on the PC to the VIDEO/VGA Input connector on the rear of the TPI-PRO that
corresponds to the Type-B USB port to which the PC is connected. For example:
If the PC is connected to Type-B USB port #1, then the video output on the PC must be connected
to INPUT 1.
If the PC is connected to Type-B USB port #2, then the video output on the PC must be connected
to INPUT 2.
If the PC is connected to Type-B USB port #3, then the video output on the PC must be connected
to INPUT 3 (inputs 3 & 4 available only on the TPI-PRO-4).
FIG. 26
Example 2: Mouse Pass-Thru Control
PC
PC Monitor
Type-B USB cable connects the
LAN
NetLinx Master
USB Mouse
USB Keyboard
PC and TPI (control is on panel
pages on the PC and displayed
on the monitor)
TPI OUTPUT 1 connects to
USB Touch input devices connect to
KEYBOARD/MOUSE USB Ports on TPI
non touch-enabled monitor
VGA output from PC
connects to TPI INPUT 1
If you experience problems introducing new devices, install the drivers on the remote
PC according to manufacturer suggestions with the device connected directly to the
remote PC.
Содержание TPI-PRO-4
Страница 14: ...xii TPI PRO Total Presentation Interface Table of Contents ...
Страница 76: ...TPI PRO DVI Configuration Pages 70 TPI PRO DVI Total Presentation Interface ...
Страница 172: ...Terminal Telnet Commands 166 TPI PRO DVI Total Presentation Interface ...
Страница 180: ...Upgrading Firmware 174 TPI PRO DVI Total Presentation Interface ...
Страница 208: ...Supported Input and Output Modes 202 TPI PRO DVI Total Presentation Interface ...
Страница 214: ...Appendix 208 TPI PRO DVI Total Presentation Interface ...
Страница 217: ...Troubleshooting 203 TPI PRO Total Presentation Interface ...


