background image


EMC and Safety Notice 

Federal Communications Commission Statement 


This equipment has been tested and found to comply with the limits for a class B 
digital device, pursuant to part 15 of the FCC Rules. These limits are designed to 
provide  reasonable  protection  against  harmful  interference  in  a  residential 
installation. 
This equipment generates uses and can radiate radio frequency energy and, if not 
installed  and  used  in  accordance  with  the  instructions,  may  cause  harmful 
interference  to  radio  communications.  However,  there  is  no  guarantee  that 
interference will not occur in a particular installation. If this equipment does cause 
harmful interference to radio or television reception, which can be determined by 
turning  the  equipment  off  and  on,  the  user  is  encouraged  to  try  to  correct  the 
interference by one or more of the following measures: 
-


Reorient or relocate the receiving antenna. 

-


Increase the separation between the equipment and receiver. 

-


Connect the equipment into an outlet on a circuit different from that to which 
the receiver is connected. 

-


Consult the dealer or an experienced radio/TV technician for help. 


Regulatory Information/Disclaimers 

Installation  and  use  of  this  computer  must  be  in  strict  accordance  with  the 
instructions  included  in  the  user  documentation  provided  with  the  product.  Any 
changes or modifications (including the antennas) made to this device that are not 
expressly approved by the manufacturer may void the user’s authority to operate 
the equipment. 
The manufacturer is not responsible for any radio or television interference caused 
by unauthorized modification of this device, or the substitution of the connecting 
cables and equipment other than manufacturer specified. It is the responsibility of 
the  user  to  correct  any  interference  caused  by  such  unauthorized  modification, 
substitution  or  attachment.  Manufacturer  and  its  authorized  resellers  or 
distributors  will  assume  no  liability  for  any  damage  or  violation  of  government 
regulations arising from failing to comply with these guidelines. 


Содержание DK886EX

Страница 1: ...American Reliance Inc 12 1 TABLET COMPUTER DK886EX USER S GUIDE...

Страница 2: ...kes no representations or warranties either expressed or implied about the contents and specifically disclaims any warranties as to merchantability or fitness for any particular purpose Any of the sof...

Страница 3: ...ween the equipment and receiver Connect the equipment into an outlet on a circuit different from that to which the receiver is connected Consult the dealer or an experienced radio TV technician for he...

Страница 4: ...erence EN55024 EN61000 4 2 EN61000 4 3 EN61000 4 4 EN61000 4 5 EN61000 4 6 EN61000 4 8 EN61000 4 11 EN61000 3 2 EN61000 3 3 Generic Immunity Standard EN60950 IEC950 Product Safety R TTE CE Manual Regu...

Страница 5: ...rocedures described in this manual for setting your computer Environmental Information Material Safety and Recycling Caution Risk of explosion if battery is replaced by an incorrect type Dispose of us...

Страница 6: ...roper disposal is required For more information on collection reuse and recycling please consult local or regional waste administration You can also contact the dealer for more information on the envi...

Страница 7: ...E GUARD THE COMPUTER 11 REPLACING MODULES 12 HARD DISK DRIVE 13 TOUCH SCREEN 13 PCMCIA CARD 13 EXPRESS CARD 13 EXTERNAL BACKLIGHT KEYBOARD OPTIONAL 14 DOCKLIGHT OPTIONAL 14 STAND UNIT OPTIONAL 16 HEAT...

Страница 8: ...ER SUB MENU 28 IDE CHANNEL 1 SLAVE SUB MENU 29 ADVANCED MENU 31 SIO SMC227 CONFIGURATION SUB MENU 34 SECURITY MENU 36 RF SECURITY CONTROL SUB MENU 38 TPM STATE MENU 39 BOOT MENU 40 EXIT MENU 41 UTILIT...

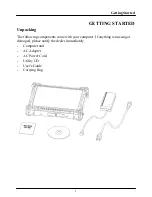
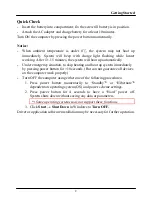
Страница 9: ...TTING STARTED Unpacking The following components come with your computer If anything is missing or damaged please notify the dealer immediately Computer unit AC Adapter AC Power Cord Utility CD User s...

Страница 10: ...gency situation to skip heating and boot up system immediately by pressing power button for 10 seconds But can not guarantee all devices on the computer work properly Turn OFF the computer using eithe...

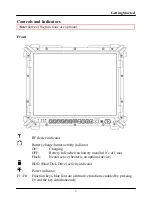
Страница 11: ...ry charge heater activity indicator ON Charging OFF Battery full when no battery installed it s off too Flash Heater active heater is an optional device HDD Hard Disk Drive activity indicator Power in...

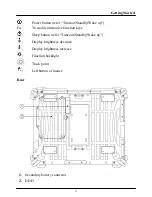
Страница 12: ...tandby Wake up Fn To enable alternative function keys Sleep button refer Timeout Standby Wake up Display brightness decrease Display brightness increase Function backlight Track point Left button of m...

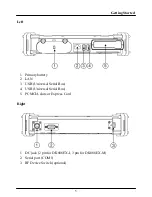
Страница 13: ...Left 1 Primary battery 2 LAN 3 USB Universal Serial Bus 4 USB Universal Serial Bus 5 PCMCIA slots or Express Card Right 1 DC jack 2 pin for DK886EX I 3 pin for DK886EX M 2 Serial port COM1 3 RF Devic...

Страница 14: ...Getting Started 6 Top 1 ANT Cover 2 Stylus holder 3 ANT Cover Bottom 1 Docking connector 2 External antenna jack optional...

Страница 15: ...or permanent damages The D sub connector cap is for dust and shock protection only The connector itself is sealed internally Other I O ports and devices must have caps tightly closed or cable inlets s...

Страница 16: ...of the AC cord into the wall outlet Make sure the green LED on the adapter turns on Attach the DC plug into the power jack of the computer turn the lock ring clockwise to secure it AC Adapter Indicat...

Страница 17: ...currently working on then shut down the computer Plug in AC or vehicle adapter to recharge the battery Battery Gauge You may check battery status from battery gauge in Windows Click the power battery...

Страница 18: ...n charge Primary and Secondary batteries externally Boot Up and POST The computer turns ON and loads the operating system such as Windows into the system memory This start up procedure is called boot...

Страница 19: ...tem Failure to shut down the computer properly may result in loss of data or hardware damages Automatic shut down is activated at battery exhaust Be sure to finish your work and save all your data whe...

Страница 20: ...the modules 1 Turn OFF the computer Hibernate or suspend to disk are not recommended as the parameters may change when modules are changed 2 Disconnect all cables from the computer 3 Use a coin to tur...

Страница 21: ...Touch screen facilitates direct finger touch or pen input on the screen instead of mouse or touch pad PCMCIA Card The computer supports 1x type II PCMCIA card To remove the card push the eject button...

Страница 22: ...USB port Track point The track point is functionally equivalent to a mouse Pushing the track point may move the cursor on the screen The 2 buttons act same as mouse buttons Backlight Press I O key for...

Страница 23: ...on the docking connector 2 Align the docking connector 3 Attach Docklight 4 Fix the screws Docklight ports Top 1 Docking connector Bottom and Left 1 Audio jacks Microphone Speaker 2 RGB port 3 Modem j...

Страница 24: ...rol circuit activates heating when computer is turned ON at temperature 0 C 20 C 32 F 4 F The heating is automatically just turn ON power the heater controller will detect temperature and take over Th...

Страница 25: ...Components and Operations 17 Please refer the illustration as below...

Страница 26: ...verting power from car lighters 12 14V or truck batteries 24 28V It can power the system and charge the batteries simultaneously Caution Remove or disconnect the vehicle adapter when leaving the vehic...

Страница 27: ...onal Devices 19 Stand Unit This acts as computer holder for office or vehicle operation and can work with or without Docklight RF Device The RF device are available as following GPS Bluetooth HSDPA Wi...

Страница 28: ...busy state Memory System memory Standard 1GB Expandable 2GB Cache memory Internal level II 2MB Video memory 224MB shared RAM Display The display is a XGA 1024 x 786 dots LCD LCD Type 12 1 Active TFT C...

Страница 29: ...5 Kg 5 5 lb Note Weight varies depending on system configurations AC Adapter Input Voltage AC 100 240 V Frequency 50 60 Hz Output Voltage DC 19V Maximum Power 90 Watts Dimension 133 mm W x 58mm D x 3...

Страница 30: ...A max 12V 24V respectively Output Voltage 19V 5 Output Current 2 8A Wiring Cigarette lighter Truck battery Application Car or Truck installation Docklight DL 8I DL 8M optional Ports Serial x 2 USB x 4...

Страница 31: ...Specifications 23...

Страница 32: ...CB FR 4 UL 94V0 Battery Rechargeable Lithium Ion cells Packing Carton Unbleached paper Cushion Recyclable PE Carrying bag Recyclable PE Fiber User s Guide Paper Please recycle the parts according to l...

Страница 33: ...m Specific Help Tab Shift Tab or Enter selects field F1 Help Select Item Change Values F9 Setup Defaults Esc Exit Menu Enter Select Sub Menu F10 Save and Exit Note The contents may vary depending on c...

Страница 34: ...disk drive is installed here F1 Help Select Item Change Values F9 Setup Defaults Esc Exit Menu Enter Select Sub Menu F10 Save and Exit IDE Channel 0 Master Sub Menu Selections You can make the follow...

Страница 35: ...ble removable disk drive is installed here F1 Help Select Item Change Values F9 Setup Defaults Esc Exit Menu Enter Select Sub Menu F10 Save and Exit IDE Channel 0 Slave Sub Menu Selections You can mak...

Страница 36: ...disk drive is installed here F1 Help Select Item Change Values F9 Setup Defaults Esc Exit Menu Enter Select Sub Menu F10 Save and Exit IDE Channel 1 Master Sub Menu Selections You can make the follow...

Страница 37: ...ble removable disk drive is installed here F1 Help Select Item Change Values F9 Setup Defaults Esc Exit Menu Enter Select Sub Menu F10 Save and Exit IDE Channel 1 Slave Sub Menu Selections You can mak...

Страница 38: ...and functions for setup The scroll bar on the right of any window indicates that there is more than one page of information in the window Use PgUp and PgDn to display all the pages Pressing Home and...

Страница 39: ...ct Sub Menu F10 Save and Exit Warning Incorrect settings may cause system malfunction To correct it restore the Setup Defaults with F9 Advanced Menu Selections You can make the following selections on...

Страница 40: ...enabled Auto Only enable if card found Note that if Root Port 1 is disabled Root Ports 2 4 will be disabled as well USB Device 29 Function 7 Disabled Enabled Control USB 2 0 functionality through thi...

Страница 41: ...BIOS Setup 33 Feature Options Description SIO SMC227 CONFGURATION These items control the configuration of various National 393 SIO devices...

Страница 42: ...er1 Disabled Printer2 Disabled Configure COM1 using device options Disabled No configuration 3F8 IRQ 4 Set the base I O address for COM1 F1 Help Select Item Change Values F9 Setup Defaults Esc Exit Me...

Страница 43: ...3 Configure UART mode options RS232 External Device TTL3 Internal Device COM4 port Disabled 2E8 IRQ 5 Configure COM4 using device options Disabled No configuration 2E8 IRQ 5 Set the base I O address f...

Страница 44: ...tem must be reset or restarted from power on for settings to take effect F1 Help Select Item Change Values F9 Setup Defaults Esc Exit Menu Enter Select Sub Menu F10 Save and Exit Security Menu Selecti...

Страница 45: ...f presence AC97 Modem Interface Disabled Auto Control Detection of the AC97 Modem Device Auto AC97 Modem will be enabled if present disabled otherwise Disabled AC97 Modem will be unconditionally disab...

Страница 46: ...Select Item Change Values F9 Setup Defaults Esc Exit Menu Enter Select Sub Menu F10 Save and Exit RF Security Control Sub Menu Selections You can make the following selections on the RF Security Cont...

Страница 47: ...PM State No Change Item Specific Help Change TPM State F1 Help Select Item Change Values F9 Setup Defaults Esc Exit Menu Enter Select Sub Menu F10 Save and Exit TPM State Menu Selections You can make...

Страница 48: ...view or configure devices Up and Down arrows select a device and moves the device up or down f and r specifies the device fixed or removable x excludes or includes the device to boot Shift 1 enables...

Страница 49: ...e Values F9 Setup Defaults Esc Exit Menu Enter Select Sub Menu F10 Save and Exit Exit Menu Selections You can make the following selections on the Exit Menu Feature Options Description Exit Saving Cha...

Страница 50: ...ewest information before starting to install drivers Chipset Windows Driver Installation Insert the Driver CD into the CD ROM Click infinst_autol exe in the directory of DK8EX Driver Chipset 2kXpVista...

Страница 51: ...complete driver installation Windows may recommend using their driver but you should confirm to change the factory bundled driver After restart and back to Settings window choose proper Colors and Sc...

Страница 52: ...ROM Click setup exe in the directory of DK8EX Driver PCIe_1G Lan 2kXp3264 RTL8168_8101E_664 then follow the prompt to complete installation Mini PCI E Intel 3945ABG WLAN For the driver and software to...

Страница 53: ...s 2 Function Key Manager is better for tablet Install 1 Run setup exe from the directory of Input Management Services and then follows the prompt to complete Uninstall 1 Left click the icon and then l...

Страница 54: ...orrectly and enter the Windows desktop and launch again Launch Launch Function Key Manager and this window will be shown As Function Key Manager is titled there are two function key sets 1 and 2 And e...

Страница 55: ...he proper file type if necessary batch file bat is the default 2 Open a URL in default browser Input the address of the website e g www amrel com 3 Replace with another Key The single key or combinati...

Страница 56: ...s 6 Change display output Switch display output among LCD CRT and DVI Just only one single mode can exist Enable External Monitor Enable Notebook Display and Enable External DVI are the candidates Ple...

Страница 57: ...Please make sure Intel Extreme Graphics 2 driver Control Panel application is installed and this icon will be on the task menu Activate the Graphics Properties from Graphics Options In the Hot Keys a...

Страница 58: ...ey to work as Rotate Screen with parameter of Normal when you have set other keys to act as Rotate Screen with parameter of 90 180 or 270 So you could change display between Normal and rotation of 90...

Страница 59: ...ivers 51 It results from Hide modes that monitor cannot display is enabled So in such a situation uncheck this box to enable all rotation views under Control Panel Display Display Properties Setting A...

Страница 60: ...lays a virtual keyboard on the computer screen Especially it is useful for tablet PC users users could type data by using a pointing device or joystick You can toggle this function key to enable disab...

Страница 61: ...vehicle adapter battery and the power source Minimize the configuration i e remove extra peripherals and devices Remove the modules one by one HDD CD ROM Battery etc Remove the software suspected Set...

Страница 62: ...any the application software the failure phenomenon etc A list of the hardware software configuration if applicable 5 Clearly mark the outside of the shipping box with the RMA If RMA is not present on...

Страница 63: ...Recycled Recycleable Printed in USA P N G630804000B...

Отзывы: