


SECTION 1 – INSTALLATION 1-1
Section 1 - Installation
Unpacking the Instrument
After the instrument is removed from the shipping crate, the operating equipment and spare
parts on the packing list should be checked to affirm that all have been received and none are
damaged. Due to the size and weight of the instrument, ensure that the Curing Chamber is
always level during unpacking, transportation, and installation to prevent tipping taking into
consideration that the instrument is heavier on the side with the hoist. A lifting device (i.e.
forklift) must be used to load, lift, package, or transport the instrument and ensure that the
personal operating the lifting device is properly trained. Casters are installed on the unit to
allow it to be moved over short, level distances. Set the brake on the casters to ensure the
instrument will stay in place.
Note: File an insurance claim with your freight carrier if damage has occurred
during shipment. Verify all parts received appear on the enclosed packing
list. If items are missing, please notify Chandler Engineering, immediately.
Utilities Required
The utilities required to operate the instrument are:
dry compressed air at 100 psi/700 KPa,
200-240 volt, single-phase, 50 Hz/60 Hz, 40-ampere capacity.
Tools and Equipment Required
A standard maintenance or mechanics tool set is adequate for the installation, operation, and
maintenance of the instrument. An accessory torque wrench is provided.
Preparing for Operation
Prior to operating this instrument, the technician should study the drawings accompanying
the operating and maintenance instructions to become thoroughly familiar with the curing
chamber operation and its parts.
1.
Ensure the instrument is on a level surface and position the instrument in such a way that
it isn’t difficult to plug in or remove the power cord.
Note: Lock the wheels to keep it stationary as you make the necessary connections.
2.
Connect the air hose from the “Air Inlet” port located on the back of the instrument to the
air supply.
3.
Fill the reservoir with white oil by opening the right-hand cabinet door and ensure that
the drain valve on the bottom of the reservoir is closed. Remove the brass fill plug from
the top of the reservoir and fill the reservoir with the white oil and replace the fill plug.
4.
Close and lock the cabinet door before operating the instrument.
5.
Connect the power cord to the receptacle located on the back of the instrument.
Содержание Chandler Engineering 1910
Страница 4: ...T 2 TABLE OF CONTENTS This page is intentionally left blank ...
Страница 10: ...P 6 PREFACE This page is intentionally left blank ...
Страница 12: ...1 2 SECTION 1 INSTALLATION This page is intentionally left blank ...
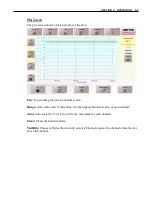
Страница 21: ...SECTION 2 OPERATION 2 9 Help Screen The Help Screen displays this manual ...
Страница 24: ...2 12 SECTION 2 OPERATION This page is intentionally left blank ...
Страница 27: ......
Страница 29: ...4 2 SECTION 4 TROUBLESHOOTING GUIDE This page is intentionally left blank ...
Страница 31: ...5 2 SECTION 5 REPLACEMENT PARTS This page is intentionally left blank ...
Страница 33: ......
Страница 38: ...CHANDLER ENGINEERING ...
Страница 40: ...P1 P7 P11 PLC1 P3 P18 P12 P5 P6 CHANDLER ENGINEERING ...
Страница 41: ...CHANDLER ENGINEERING ...
Страница 45: ...cut out postcards on dotted lines ...


