ameriwoodhome.com
STEP
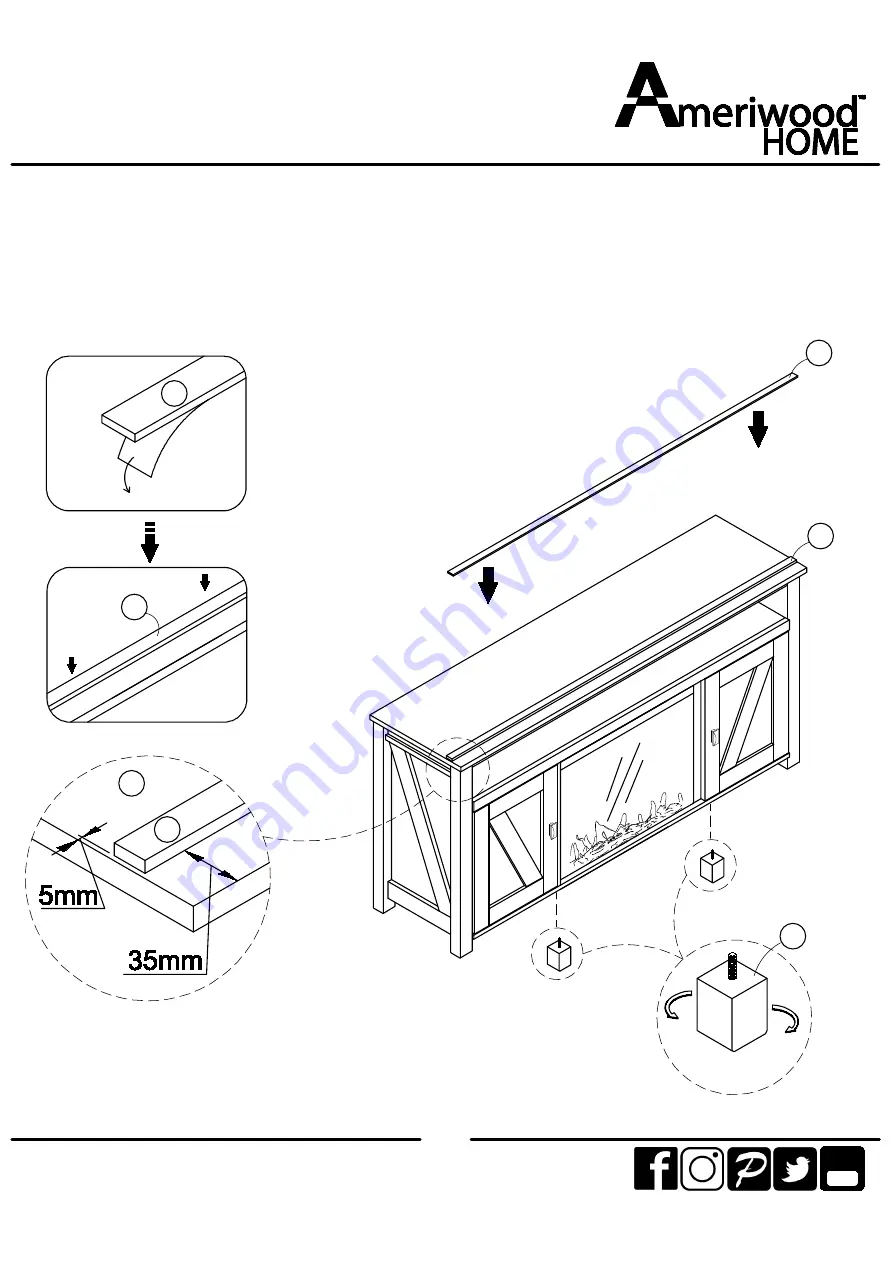
22
15
Tube
You
S
A
leveler
R
15.1 Attach (S) into (A) as illustrated.15.2 Adjust the foot (R) before use.
Страница 1: ...on lower shelves or drawers WARNING THIS INSTRUCTION BOOKLET CONTAINS IMPORTANT SAFETY INFORMATION PLEASE READ AND KEEP FOR FUTURE REFERENCE Do Not Return This Product Contact our customer service te...
Страница 2: ...rea you plan to keep it to avoid excessive heavy lifting Identify sort and count the parts before attempting assembly Compression dowels are lightly tapped in with a hammer Do NOT use harsh chemicals...
Страница 3: ...ess Have the following tools Flat Head Screwdriver 2 Phillips Head Screwdriver and Hammer Caution If using a power drill or power screwdriver for screwing please be aware to slow down and stop when sc...
Страница 4: ...PC FIXED SHELF T1795884030GO QTY 1 PC B D TOP T1795884010GO QTY 1 PC LEFT SIDE PANEL T1795884040GO QTY 1 PC Tube You E RIGHT SIDE PANEL T1795884050GO QTY 1 PC PARTITION T1795884060GO QTY 2 PCS F G RA...
Страница 5: ...0GO QTY 1 PC K O RAIL T1795884100GO QTY 1 PC BACK PANEL T1795884150GO QTY 2 PCS Tube You P UPPER BACK PANEL T1795884160GO QTY 1PC STOPPER T1795884170GO QTY 1PC Q R FOOT T1795884180GO QTY 2PCS S RAIL T...
Страница 6: ...Board Identification Not actual size ameriwoodhome com 6 Tube You T S R Q P O N M L K K J I H H G F F E D C B A...
Страница 7: ...AM LOCK TGO2101 CAM BOLT TGO2001 WOOD DOWEL TGO2900 BOLT TGO1608 SCREW TGO1001 3 5 x 14mm 6 30 SCREW TGO1005 7 42 3 x 12mm SCREW TGO1301 8 2 4 x 14mm No Actual Size 9 2 KNOB TGO5510 10 4 DOOR HINGE TG...
Страница 8: ...2 3 A B I J Q ameriwoodhome com STEP 8 1 1 1 Cam bolt 2 into A B and I as illustrated 1 2 Insert 3 into B J and P as illustrated Tube You 3 8 15 2...
Страница 9: ...ameriwoodhome com STEP 9 2 2 1 Cam bolt 2 into C and H x 2 as illustrated 2 2 Insert 3 into C and L as illustrated Tube You 3 12 2 13 H X 2 C C L H 3 2...
Страница 10: ...ameriwoodhome com STEP 10 3 Tube You 3 18 2 8 3 1 Cam bolt 2 into D and E as illustrated 3 2 Insert 3 into D E G and F x 2 as illustrated D E G F F X 2 3 2...
Страница 11: ...TEP 11 4 4 1 Attach J into A with 5 as illustrated 4 2 Attach I into C with 1 as illustrated Tube You Proper orientation of CAM LOCK Tip Quick Assembly UNLOCK LOCK 1 5 5 5 J 5 1 A C C I J UNFINISHED E...
Страница 12: ...home com STEP 12 5 5 1 Attach G into C with 1 as illustrated 5 2 Attach H into F with 1 as illustrated Tube You Proper orientation of CAM LOCK Tip Quick Assembly UNLOCK LOCK 1 H F F H x 2 C G 6 UNFINI...
Страница 13: ...ameriwoodhome com STEP 13 6 Tube You Proper orientation of CAM LOCK Tip Quick Assembly UNLOCK LOCK 6 1 Attach F into C with 1 as illustrated C F F 1 4...
Страница 14: ...ameriwoodhome com STEP 14 7 7 1 Attach B into F with 1 as illustrated 7 2 Attach Q into B as illustrated Tube You F F C B R Proper orientation of CAM LOCK Tip Quick Assembly UNLOCK LOCK 1 4...
Страница 15: ...ameriwoodhome com STEP 15 8 8 1 Attach D and E into C B with 1 as illustrated Tube You Proper orientation of CAM LOCK Tip Quick Assembly UNLOCK LOCK 1 B D E C 8...
Страница 16: ...com STEP 16 9 Tube You A Proper orientation of CAM LOCK Tip Quick Assembly UNLOCK LOCK 1 9 1 Attach L into C with 1 as illustrated 9 2 Attach A into D E L with 1 as illustrated L E D C FINISHED EDGE F...
Страница 17: ...ameriwoodhome com STEP 17 10 Tube You 10 1 Attach P O into C with 1 as illustrated 7 42 O O P 7...
Страница 18: ...s illustrated 11 2 Attach 10 into M N with 6 as illustrated 11 3 Attach 10 M N into D E with 6 as illustrated 11 4 Attach 9 into M N with 4 as illustrated 11 5 Attach 12 into M N as illustrated 4 6 9...
Страница 19: ...ont habituellement dans des fentes afin de vous permettre de les vis apr s l ajustement To adjust side ways Turning the screw C on BOTH hinges on each door Para ajustar los lados marcados Gire los tor...
Страница 20: ...ameriwoodhome com STEP 20 13 Tube You 6 6 13 1 Attach T from backside with 6 as illustrated T...
Страница 21: ...m STEP 21 14 Tube You 1 1 8 2 4 x 14mm 13 2 Proper orientation of CAM LOCK Tip Quick Assembly UNLOCK LOCK Q 1 8 8 13 13 14 1 Attach Q into C with 1 as illustrated 14 2 Attach 13 into B with 8 as illus...
Страница 22: ...ameriwoodhome com STEP 22 15 Tube You S S A S leveler R 15 1 Attach S into A as illustrated 15 2 Adjust the foot R before use S S...
Страница 23: ...745 3351 4 Site of Manufacture Binh Duong Viet Nam 5 See front page of instruction manual for date of manufacture This unit has been designed to support the maximum loads shown Exceeding these load li...
Страница 24: ...unt codes Quick and easy replacement part service To register your product visit ameriwoodhome com Visit your local retailer s website rate your purchased product and leave us some feedback We would l...
Страница 25: ...Les glissi res sont marqu es d un R droit et d un L gauche pour un bon placement Assurez vous toujours de faire face la pointe situ sur le haut de la Serrure de Came vers le bord ext rieur Utiliser to...
Страница 26: ...ez 3 dans D E G et F x 2 comme illustr Page 11 4 1 Fixez J dans A avec 5 comme illustr 4 2 Fixez I dans C avec 1 comme illustr Page 12 5 1 Fixez G dans C avec 1 comme illustr 5 2 Fixez H dans F avec 1...
Страница 27: ...endances un aper u sur les nouveaut s Sondages avoir une voix au sein de notre communaut Offres exclusives et codes promo Service de pi ces de rechange rapide et facile Pour enregistrer votre produit...
Страница 28: ...derecha y L izquierda para la colocaci n correcta Aseg rese de que siempre este el punto locaizado en la parte superior de bloqueador de leva este volteadohacia borde exterior Utilizar todos los clavo...
Страница 29: ...N M PUERTA IZQUIERDA N PUERTA DERECHA O PANEL TRASERO P PANEL SUPERIOR TRASERO Q TAP N R PIE S FERROCARRIL T CHIMENEA P gina 8 1 1 Perno de leva 2 en A B e I como se ilustra 1 2 Inserte 3 en B J y P c...
Страница 30: ...ites puede causar inestabilidad colapsarse y o causar serias lesiones ADVERTENCIA Riesgo de lesiones a las personas no coloque un televisor sobre muebles Este mueble no est aprobado para su uso con un...