

Assigning an EverAlert Dynamic Display to
the inCloud Portal
There are two simple ways to provision the displays to connect to
the management portal.
Option 1
uses a wired LAN ethernet cable
on a DHCP enabled network with internet access.
Option 2
uses a
USB key that is created from the management portal and contains
the encrypted Wi-Fi credentials for connecting the device to your
network and Site.
NOTE:
If you will be using a Wi-Fi connection for your display and
have not already created a security key on the inCloud Management
Portal, please reference your welcome e-mail for instructions on
generating a security key.
1.
Option 1
– Configuration using wired LAN on a DHCP Network All
displays have been preconfigured to a specific Site using their MAC
address.
a. Make sure the Ethernet cable is plugged into the display
(if using the Dynamic Display PoE Kit, use the Ethernet patch
cable from the PoE Splitter).
b. Go to Step 3.
Position the display in the desired orientation (landscape or
portrait) before beginning the provisioning process. Once the
display is provisioned, it will be locked
into this orientation.
DYNAMIC DISPLAY QUICK START INSTALLATION GUIDE
Assigning an EverAlert Dynamic Display to
the inCloud Portal
(continued)
2.
Option 2
– Configuration using USB Key
a. Login to
https://incloud.american-time.com
b. If you have more than one site established, select the
Site
on
which the new display(s) will be installed. Note that displays
are assigned to a specific site by American Time and cannot be
installed to a different site.
c. In the side menu, click
Admin.
In the dropdown, click on
EverAlert
Configs
, followed by
Default Config.
d. Make sure the desired wireless credentials have been entered.
If they are blank and the intention is to use a Wi-Fi network to
connect, enter them now and click
Save Only
.
e. Click
Create Key
. The encrypted file will download to your
computer.
f. Go to the default download location on your computer and copy
the
SecurityKey.txt
file to a USB flash drive.
Note:
If this process has been done before on your computer,
there might be more than one security file in this directory with
a number suffix like SecurityKey(1).txt. Be sure to identify the
correct file and rename it to SecurityKey.txt if it is numbered.
3. Power up the display by plugging into an AC wall receptacle.
(If using the Dynamic Display PoE Kit, connect the DC power cable to
the power jack on the back of the Display; if using Battery Backup,
see kit instructions.)
4. If using wired Ethernet, skip to Step 8.
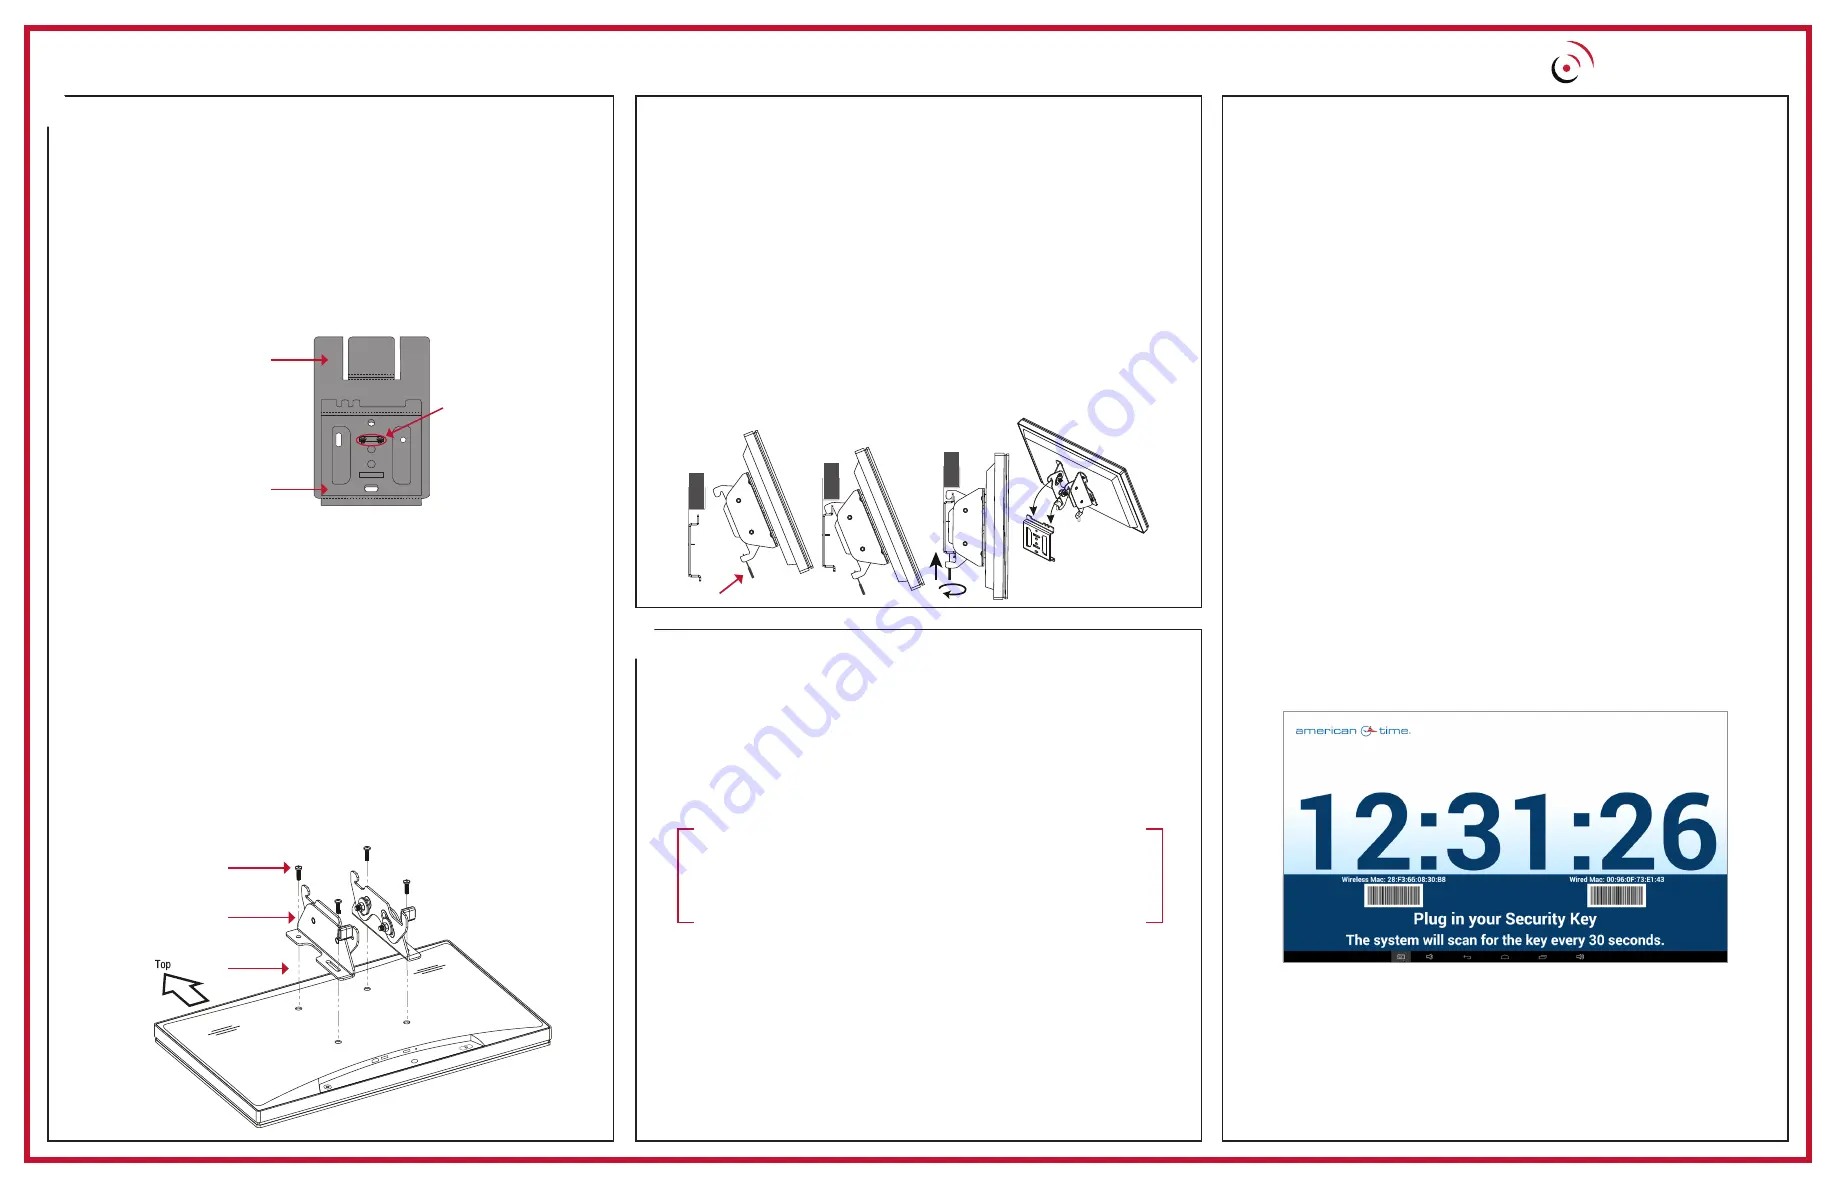
5. Once the Display has fully loaded, the screen will display the
provisioning screen that says
Plug in your Security Key
.
6. Insert the USB flash drive with security key into one of the two USB
ports on the bottom of the EverAlert Display. Once the key is read,
the screen will show
Security Key Found
and update the Wi-Fi
credentials on the display and connect to the Portal.
7. After the device has established an internet connection, it will
connect to inCloud and download any necessary updates.
8. Once updates are complete, the display will load its predefined
default clock layout and the display is ready for use.
Ever
Alert
®
emergency communication platform
5
4
Wall Mounting (if applicable)
(Note: If installing Battery Backup Kit, see kit instructions for wall
mount process)
1. Preassemble the wall mount base to the power supply bracket.
a. Lay the power supply bracket (F) on a flat surface.
b. Position the bracket base (E) over the studs as illustrated
in figure 1.
c. Using the two nuts (G) supplied, tighten the wall mount base
to the power supply bracket.
2. Attach the adjustable brackets to the EverAlert Display
a. Remove the Display from the styrofoam wrap and lay it face
down on the styrofoam wrap it came in.
b. Determine whether the display will hang in Portrait or
Landscape orientation
Note:
Illustration shown below is in Landscape orientation.
If mounting the display in Portrait orientation, the brackets will
need to rotate 90 degrees in either direction from the position
shown in the picture. Orientation will be fixed after provisioning.
c. Line up the two adjustable brackets (D) with the four holes on
the back of the display as shown in figure 2. Secure with 4
M4X6mm (A) screws.
d. Adjust the brackets to the desired position and tighten the
bolts down. Brackets can adjust to a maximum of 10 degrees
up or 10 degrees down.
+ –
B
D
A
Figure 2
F
E
G
Figure 1
Mounting
(continued)
3. Mounting EverAlert Display to the wall
a. Using the wall mount assembly from Section 4-1,
install two M6 screws (B) directly into a stud or into
provided cement anchors (H). Make sure that the power
supply mount is facing upwards.
b. Insert the power supply into the top slot of the
power supply bracket.
NOTE:
If using the Dynamic Display PoE Kit (EAPOEKIT), reference the
included instructions for installation.
c. Take the display and insert the top of the adjustable brackets
onto the top of the wall mount base and pivot display down.
d. Insert and tighten the bracket screws (C) on the bottom of the
bracket until the display is secure.
C