background image

2

7302307-100

5

1-7/8"

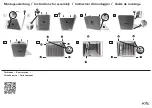
ANCHOR SCREW INSTALLATION

Anchor

Screw

Washer

Lavatory

Nut


IMPORTANT:  Final assembly of nut and washer or lag bolt method shown for reference only.

6

A

9

Rear

View

7

B

C

Note: Space constraints 

may dictate method of 

fastening pedestal to floor.

4

Remove lavatory and 

pedestal from installed 

position. Drill pilot holes for 

lavatory and pedestal 

anchor screws or lag bolts.

Note: Some models are supplied with lag bolts, anchor screws, or 

steel hangers for lavatory installations only. Other models and all 

pedestals are not provided with mounting hardware. Various 

pedestal screw sizes and types are available to the installer at 

local hardware outlets. 

1

Provide suitable reinforcement 

behind finished wall for lavatory 

mounting screws. 

* Determine horizontal center line 

location of support from fixture. 

NOTE: If replacing an existing sink 

be certain to shut off water supply 

before removing old sink.

C/L of 2X6

Support

Finished

Floor

*

3

Mark lavatory and pedestal screw locations through 

the mounting holes.

2

Top of Pedestal      

For example only

Place lavatory and pedestal into installed position. 

Level and square the lavatory and pedestal assembly. 

8

Secure lavatory to wall as 

shown in 

Step 5. Install 

washers and hand tighten nuts 

or lag bolts. Level and square 

the unit. Connect hot and cold 

supply lines to the shut-off 

valves. Tighten trap joints for 

watertight assembly.

Following manufacturer's 

instructions, install faucet and 

drain assembly (not included). 

Be certain to apply a bead of 

sealing putty on the underside 

of the drain (area "A") in order 

to ensure a watertight seal 

between the lavatory and drain. 

Remove excess putty after 

installing drain on lavatory.

Return the fitted lavatory to the 

installed position. Connect trap to 

drain assembly hand tight to check 

alignment.  It may be necessary to 

cut off part of the tailpiece (area 

"B") or part of the horizontal leg of 

the trap (area "C").

Lavatory slab

Install lavatory anchor screws leaving 1-7/8" 

threaded end exposed as illustrated.

Shut-Off

Valves

Use lag bolts to secure lavatory as illustrated.

LAG BOLT INSTALLATION

Lag

Bolt

Washer

Lavatory

Lavatory

Steel

Hanger

ALTERNATE METHOD: COMPONENTS NOT INCLUDED 

Содержание TOWNSEND 0328

Страница 1: ...ps Screwdriver Pipe Wrench Putty Knife Drill Saber Saw Basin Wrench Plumbers Putty or Caulking Tubing Cutter Tape Measure Hacksaw Level In the United States American Standard Brands 1 Centennial Ave Piscataway New Jersey 08855 Attention Director of Customer Care For residents of the United States warranty information may also be obtained by calling the following toll free number 800 442 1902 www a...

Страница 2: ...locations through the mounting holes 2 Top of Pedestal For example only Place lavatory and pedestal into installed position Level and square the lavatory and pedestal assembly 8 Secure lavatory to wall as shown in Step 5 Install washers and hand tighten nuts or lag bolts Level and square the unit Connect hot and cold supply lines to the shut off valves Tighten trap joints for watertight assembly F...

Страница 3: ...American Standard Brands 1 Centennial Ave Piscataway New Jersey 08854 Atención Director de Servicio al Cliente Para los residentes en los Estados Unidos la información de la garantía puede obtenerse también llamando al siguiente número sin cargo 800 442 1902 www americanstandard com En Canadá AS Canada ULC 5900 Avebury Rd Mississauga Ontario Canadá L5R 3M3 Número sin cargo 800 387 0369 www america...

Страница 4: ...a nivelar y amortiguar la loza del lavatorio en el pedestal 8 Asegure el lavatorio a la pared como se muestra en paso 5 Instale las arandelas y apriete manualmente las tuercas o tornillos de rosca para madera Nivele y haga que cuadre la unidad Conecte las líneas de suministro de agua caliente y fría a las válvulas de cierre Ajuste las uniones de la trampa para tener un ensamble hermético Instale e...

Страница 5: ...uga Ontario Canada L5R 3M3 Sans frais 800 387 0369 www americanstandard ca Aux États Unis American Standard Brands 1 Centennial Ave Piscataway New Jersey 08854 Attention Directeur du Service à la clientèle Les résidents des États Unis peuvent aussi obtenir des informations à propos de la garantie en composant le numéro sans frais 800 442 1902 www americanstandard com C O N S E R V E R P O U R U S ...

Страница 6: ...es piédestals ne sont pas fournis avec la quincaillerie de montage Plusieurs grandeurs et types de vis pour piédestal sont offerts par les quincailleries locales Fixer le lavabo au mur comme illustré à la figure l étape 5 Poser les rondelles et les écrous en serrant à la main Mettre le lavabo de niveau et d équerre Raccorder les conduites d alimentation d eau chaude et d eau froide aux robinets d ...

Отзывы: