background image

page 18 

UX360 User Guide

Changing the Schedule (cont.)

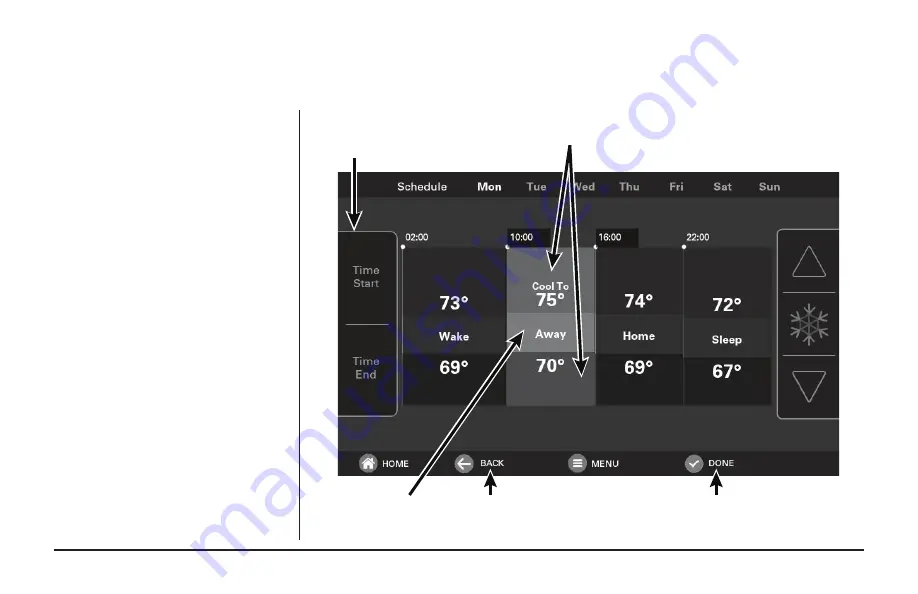
Changing Period Start or End Times


1.  Press anywhere in a Period to make it 

active. Other Periods will dim and the 

Start and End times for this Period will be 

in black boxes at the top of the screen. 

2.  Press

 TIME START 

or 

TIME END


and adjust the time on the screen. 


NOTE: 

The UX360 uses intelligent 

technology and will not allow setting an 

illogical start or end time. Periods must be 

at least 30 minutes in duration. 

Changing Period Set Points


1.  Press the active Period’s Cooling or 

Heating Temperature Set Point. 

2.  Adjust the Set Point using the 

UP

 or 

DOWN 

arrows. 

Changing the Period Name


1.  Press the 

PERIOD NAME

 (Wake, Away, etc.). 

2.  Select a predefined name or press 

NEW


and select 

NEXT

3.  If selecting a new name, enter the name 

using the on-screen keyboard. 

4.  Press 

NEXT

Adjust start and 

end times

To change temperature settings press in the red or blue 

area, then adjust the setting up or down with the arrows 

on the right

Press in the gray area to 

rename a period

Select 

Back 

to discard 

changes and exit

Select 

Done 

to save 

changes and exit

Содержание AHUI2360A200U

Страница 1: ...Model AHUI2360A200U 012 5063 01B EN AmericanStandard LinkUX360ThermostatUserGuide One System Limitless Potential Complete Control TM...

Страница 2: ...efits of your system it should be connected to a American Standard Home account For online support go to www asairhome com Scroll to the bottom of the page and select Help SC360 System Controller TSYS...

Страница 3: ...ce fee Additional smart controls and home automation devices may require a monthly subscription for remote access via most web enabled smartphones tablets and computers Internet service and American S...

Страница 4: ...appear across banner System Mode Fan Mode Schedule Mode Air Effects Mode Cooling Mode Set Point Network Status Desired Set Point Heating Mode Set Point Menu Back Ventilation Dehumidifying Current Ind...

Страница 5: ...ystem Alerts Notifications and About Info Press to access all user settings Temp Scale Deadband and Calibration One Touch Presets Service Tech Access Menu Bridge for Z Wave Devices Scheduling Humidity...

Страница 6: ...a Wi Fi network Enable Disable wireless connection access Advanced Setup Network Properties and Diagnostics Enable Disable wireless access to equipment for technician Manually set the Date Time No nee...

Страница 7: ...ly for 24 hours After 24 hours access will be disabled Wireless access is disabled Wireless access is always enabled Wireless technician access allows the technician to wirelessly connect to the commu...

Страница 8: ...ndoor Sensor Calibration NOTE Indoor sensor calibration settings are disabled when the thermostat is not enabled as an indoor sensor Please contact your dealer for help Thermostat Settings Navigate to...

Страница 9: ...to Display Settings by selecting Home Screen Menu Screen Settings Display Select your preferred display brightness backlight screen saver and color theme settings and press Done Brightness Backlight S...

Страница 10: ...nctionality Select the desired level of access restriction and select Done Applying an access restriction will cause the screen to lock when inactive for one minute Restriction Description None No res...

Страница 11: ...cast to view the 5 day forecast Postal Code To set or change the weather location select Postal Code enter your zip code or postal code and then select Done Weather Navigate to Weather by selecting Ho...

Страница 12: ...Guide Navigate to Indoor Humidity by selecting Home Screen Menu Humidity Select the indoor humidity target Frost settings only apply when heating is running and may override the target humidity setti...

Страница 13: ...all the communicating equipment on the system Specific details include but are not limited to model number serial number software version installation date and network information Details and equipme...

Страница 14: ...adjust the Set Point to the desired temperature 2 To change the Heating Set Point press the HEATING SET POINT area to activate the setting The current System Mode indicator will display this symbol U...

Страница 15: ...eep to set Cooling Heating setpoints for each preset System Mode Indicator Press here to lower the temperature Press here to raise the temperature Press here to change the cooling set point System Mod...

Страница 16: ...rature is adjusted Each day can have from one to four periods and each day can have a different number of periods The Scheduling Screen shows the start time for each Period highlighted across the top...

Страница 17: ...nd stop time press the red or blue area The up down Day arrows will change to Temperature and Add Delete period buttons will change to Time Start Time Stop Add a period Press the period name wake away...

Страница 18: ...inutes in duration Changing Period Set Points 1 Press the active Period s Cooling or Heating Temperature Set Point 2 Adjust the Set Point using the UP or DOWN arrows Changing the Period Name 1 Press t...

Страница 19: ...the Add Period Screen is displayed 2 Press the green circle where you would like to insert a Period 3 Choose a name for the new Period or select New to define a Custom Name and select NEXT 4 If selec...

Страница 20: ...n select DELETE PERIOD the Delete Periods Screen is displayed 2 Press the TRASH CAN icon in the Period s you wish to delete 3 Select DONE to save your changes and return to the Schedule Screen The cha...

Страница 21: ...Connect toWiFi Network Please connect your American StandardLink system to your home internet connection for remote and diagnostic access Select your network Enter the password and select CONNECT 1 2...

Страница 22: ...b enabled smartphone tablet or computer go to www asairhome com or use your mobile app to setup an American Standard Home account Download the American Standard Home mobile app from the Google Play St...

Страница 23: ...63 01B EN page 23 Mobile App Registration cont Read the License Agreement then ACCEPT or DECLINE EnterthePinCodeandselect NEXT Registration successful Select DONE Return to the UX360 control and selec...

Страница 24: ...s instruction manual Removing Z Wave Devices 1 From the HOME Screen press MENU then select American Standard Home 2 Select REMOVE DEVICE and follow the manufacturer s instructions for setting the Z Wa...

Страница 25: ...device Adding Z Wave Devices 1 Start the American Standard Home app 2 Select the menu button in the top left corner 3 At the bottom of this slide out menu select Connect New Device 4 Select Z Wave De...

Страница 26: ...if a list of security keys is displayed 7 If prompted enter the 5 digit DSK PIN Code for the device being added and select Accept DSK This PIN Code can usually be found on the back of the device on t...

Страница 27: ...he devices back to your network Bridge Information If this bridge is being used as a secondary or inclusion controller in the network please reset this bridge only in the event that the primary contro...

Страница 28: ...turer has a policy of continuous data improvement and it reserves the right to change design and specifications without notice We are committed to using environmentally conscious print practices Repre...

Отзывы: