


(10) 12-Gallon, 500 PSI Carpet Extractor
12-Gallon, 500 PSI Carpet Extractor (7)
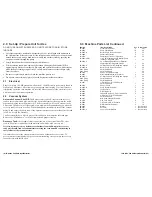
5.0 Maintenance
Regular maintenance is required to keep your Carpet Extractor in proper working
condition. Failure to properly maintain your machine could void warranty. Thoroughly
clean all equipment and accessories after each use:
•
Rinse the solution and recover tanks with clean water.
•
Flush the pump system with clean water, including all hoses and wand(s).
•
Do not allow water to remain in the tanks after use.
• Lubricate all quick disconnects with WD-40 or similar lubricant.
• Clean vacuum float assembly screen.
WARNING: Disconnect electrical power cord before performing any service or
maintenance inside the machine base or before testing or repairing switches or power
cords. Failure to do so may result in severe personal injury or death.
Operation
Interval
Clean Vacuum Assembly Screen
Daily- After Each Job
Rinse Out Recovery Tank
Daily
Flush Solution Tank and Pump
Daily
Clean Pump-Inlet Filter
Weekly - As Needed
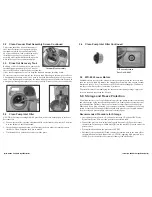
5.1 Clean Fresh Water Tank Filter
The fresh water tank filter is located at the bottom of the solution tank. Unscrew the filter
counterclockwise and rinse with fresh water. If necessary, use a tooth brush to remove
detergent build-up. Note, a heavy build-up is a warning sign that the solution system
should be flushed. See the “Flush Chemical System” section.
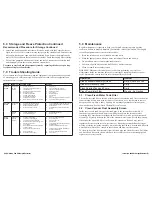
5.2 Clean Vacuum Float Assembly Screen
Inside the recovery tank, on top of the stand pipe, is the vacuum float assembly. It
functions to prevent debris and water from being sucked into the vacuum motors.
Operating the Carpet Extractor without the float assembly or with a poorly maintained
assembly, will greatly decrease the life of the vacuum motors and will void the warranty.
If debris builds up on this filter, it will reduce the vacuum air flow and may cause a
significant decrease in the rate of water recovery. If debris prevents the float ball from
moving or seating inside the assembly, it may not stop the airflow when the tank fills with
water and the water will be sucked in the vacuums and blow out the exhaust.
To clean, twist off the float assembly from the stand pipe and clean the screen. Pull fibers
and lint off and rinse with clean water. Push the assembly back onto the stand pipe and
replace the recovery tank lid.
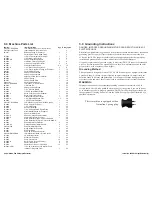
6.0 Storage and Freeze Protection Continued
Recommended Procedure for Storage Continued
•
Attach and wands and hand tools that will also be stored with the Carpet Extractor.
Open the valve for 30 seconds, directing the spray to the solution tank. Disconnect the
hose and with the valve open and the jets pointing down, depress the dimple on the
male QD. This will drain the solution out of the tool. Drain thoroughly before storing.
•
Turn off the pump and disconnect all hoses and tools. Vacuum out the solution tank
and thoroughly drain the recovery tank and vacuum hose.
To return to service, flush the pressure system by repeating the above steps, using
fresh water in place of antifreeze.
7.0 Trouble Shooting Guide
Never operate this Carpet Extractor when the equipment is not performing as expected
or when any part is visibly damaged. When repair is needed, take the equipment to an
authorized service center.
System Problem Possible Cause
Remedy
Vacuum
System
No Vacuum
/ Weak
Vacuum
1.
Vacuum Tank Full
2.
Float Assembly Tank Screen Dirty
3.
Float Ball Stuck
4.
Damaged or Loose Vacuum Hose
5.
Dump Valve Open
6.
Access Lid not Sealed
7.
Vacuum Hose Clogged
8.
Air Intake Grid Clogged
9.
Leak in Recovery Tank
10.
Water Coming out of Vacuum Exhaust
1.
Empty Tank
2.
Clean the Screen with Water
3.
Tap Float to Unstick then Clean
4.
Attach or Replace
5.
Close Valve
6.
Replace Gasket
7.
Clear Debris
8.
Clean
9.
Clean and Dry Area, Patch with Silicone
10.
Use a Low Foaming Detergent
Electrical
System
Unit will not
Turn On
1.
Extension Cord not Plugged In
2.
Switch not in the “On” Position
3.
Building Circuit Overloaded
4.
Wiring Connections Loose
1.
Check if Machine and Cord are Plugged In
2.
Check Switches, Replace if Necessary
3.
Reset Circuit
4.
Unplug Machine and Check for Loose
Wires
Burning
Smell
1.
Vacuum Motor Hung Up
2.
Pump Motor Hung Up
1.
Replace Vacuum Motor
2.
Replace Pump
Pump
System
Pump is not
Running
Properly
1.
No Power to the Pump
2.
Jets on Wand are Clogged
3.
In-Line Water Filter is Clogged
4.
Debris in Solution Tank Covering Inlet
5.
Kinked or Loose Hose
6.
Pump Failed
7.
Quick Disconnects are not Completely
Locked Together
8.
Heater is Clogged with Deposits
9.
Pump is Pulsating
10.
Auto Prime Valve is Open
1.
Check the Electrical System
2.
Clean Jet Filters
3.
Clean In-Line Filter
4.
Clear Debris
5.
Check and Replace Hoses if Necessary
6.
Replace Pump
7.
Snap Quick Disconnects Together\
8.
Flush Heater with System Maintainer or
Replace if Necessary
9.
Check for Clogged Jets and Clean
10.
Close Valve