

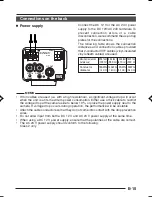


E-19
Camera-
mounting bracket
Fixing screws
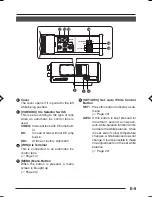
Installation of camera
• Mounting from the bottom
This camera is originally designed to be
mounted from the bottom, as shown
q
.
The hole is standard photographic pan-
head screw size (1/4-20 UNC). Example
the Fixing unit or Pan/Tilt unit.
• Mounting from the top
Remove the CAMERA MOUNTING
BRACKET from the bottom of the camera
by removing two fixing screws as shown
w
. Attach the CAMERA MOUNTING
BRACKET to the top, then mount the
camera on the Fixing Unit as shown
e
.
Make sure that two original screws are
used when mounting the CAMERA
MOUNTING BRACKET. Be sure to use a
6 mm long locking screw for the camera-
mounting bracket.
(This camera is used indoor and under
similar conditions.)
q
w
e
VIDEO
IRIS
DC
VIDEO
IRIS
DC
e02_adc770(06_22)e.p65
5/24/04, 11:47 am
19


