American DJ PRO-DJ1 Скачать руководство пользователя страница 13

Index

• Safety Instructions..................................................................................p.3
• Operating Determinations.......................................................................p.4
• Connections.............................................................................................p.4
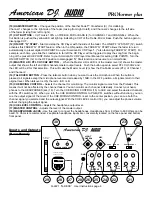
• Functions (Front Panel)........................................................................p.5-6
• Inputs & Outputs (Rear Panel)...........................................................p.6-7
• Replacing the Crossfader.......................................................................p.7
• Changing the Transformer Switch...........................................................p.7
• Technical Specifications.........................................................................p.7
• Warranty & Service..................................................................................p.8

Thank you for purchasing this American DJ® product. The Q-2221 Is ready to be

used, there Is no assembly required. Please read the following Instructions before

installing or using your new unit. The Q-2221 has a 2 year limited warranty!

CAUTION!

- Keep this device away from rain and moisture!

Safety Instructions

Always plug in the power last. Make sure that the Power switch is set to the OFF position before connecting other
devices to the mixer.

Keep away from heaters and other heating sources!

If the device has been exposed to drastic temperature fluctuation (e.g. after transportation), do not switch on the mixer
immediately. The arising condensation of water might damage your device. Leave the device switched off until it has
reached room temperature.

Never put any liquids on the mixer or close to it. Should any liquid enter the device, disconnect from main power 
immediately. Have the device checked by a qualified service technician before operating again. Any damage caused 
by liquid entering the device is not subject to warranty!

Never let the AC cord come in contact with other cables! Handle the AC cord and all AC connections with particular care.

Make sure that the available voltage is not higher than stated on the AC voltage selector (29).

Before the device is switched on, all fader and volume controls should be set to 0 or minimum position.

Damages caused by manual modifications to the device or unauthorized operation by unqualified persons are not 
subject to warranty.

There are no user serviceable parts inside the mixer. For maintenance and/or service, contact an authorized American
DJ® dealer.

Q-2221  “Q-DECK”  User Instructions page 3

Содержание PRO-DJ1

Страница 1: ...PRO DJ1 American DJ AUDIO Los Angeles CA 90058 USA Front load professional single CD player Featuring Fader Q Start Flip Flop and Digital Output PRO DJ1 10...

Страница 2: ...e metal objects or spill liquid inside the CD player Electric shock or malfunction may occur Please record and retain the model name and serial number from your rating label for future reference Model...

Страница 3: ...ppliance 9 Grounding or Polarization Precautions should be taken so that the grounding or polarization means of an appliance is not defeated 10 Power Cord Protection Power supply cords should be route...

Страница 4: ...og wheel serves two functions depending on the mode you are working in a The jog wheel will act as a slow frame search control when the CD is not playing but either paused or set to a cue point To set...

Страница 5: ...mode Note the word PROGRAM is indicated on the display Select each track to be programmed with the forward and back SKIP BUTTONS 2 3 and press the PROGRAM BUTTON between selections You can program up...

Страница 6: ...ndle the power cord carefully Hold the plug from the ends when unplugging the cord Never pull the plug out from the cable Keep the set free from moisture water and dust Unplug main power when not usin...

Страница 7: ...n the power is on Press the OPEN CLOSE BUTTON 1 to open or close the disc tray or Press PLAY BUTTON 9 to close the tray automatically when it is open If the tray is not closed after 60 seconds it will...

Страница 8: ...d OUT BUTTON 2 LEDs will light and flash LOOP INDICATOR 29 in LCD DISPLAY 13 will also flash see figure 14 4 To exit the LOOP press the OUT BUTTON 2 LEDs will stay on but not flash Music will resume n...

Страница 9: ...f the surface of the disc If the disc is dirty wipe it off with a soft dry cloth Do not use benzene thinner water record spray electrostatic proof chemicals or silicone treated cloths to clean discs A...

Страница 10: ...ng rate 8 times 1 BIT D A converter D A conversion 16 bit Frequency response 1 dB 20 Hz to 20 000 KHz T H D 0 05 Signal to noise ratio 78 dB Channel separation 78 dB Output level 2 0V 1dB Load impedan...

Страница 11: ...Q 2221 Q DECK USER INSTRUCTIONS djs wanted...

Страница 12: ...gh quality Alps Feather Fader FF 4 Crossfader replaceable made in Japan Fader Curve Switch changes from a normal curve to a quick curve for crabbing Separate gain control for each channel Bass mid tre...

Страница 13: ...h on the mixer immediately The arising condensation of water might damage your device Leave the device switched off until it has reached room temperature Never put any liquids on the mixer or close to...

Страница 14: ...et properly For recording connect your tape recorder or cassette deck to the OUTPUT REC jacks 24 The REC OUT level will not be influenced by the Master Control 17 Connect your microphone to the Microp...

Страница 15: ...agram on page 7 5b CHANNEL 2 TRANSFORMER SWITCH CHANGEABLE Used to select the input to be sent to channel 2 TRANSFORMER SWITCH may be used up down or left right To change the switch see diagram on pag...

Страница 16: ...s PFL of Channel 1 and Channel 2 14 TALKOVER BUTTON Press the talkover button when you want to use the microphone When the button is pressed all signals except the microphone level are decreased by 15...

Страница 17: ...ONO AUX SELECTOR SWITCH gives the DJ the possibilities of 4 inputs lines ie 4 lines CD tape etc or 2 lines CD tape etc and 2 phono lines 24 REC OUT Connect to your record unit The REC OUT level is not...

Страница 18: ...03 Signal To Noise Ratios Line Better than 85dB Microphone Better than 78dB Phono Better than 80dB Frequency Response Line 20Hz 15KHz 0 5dB Microphone 20Hz 20KHz 0 5dB ChanneI EQ Bass Mid Treble 30dB...

Отзывы: