background image

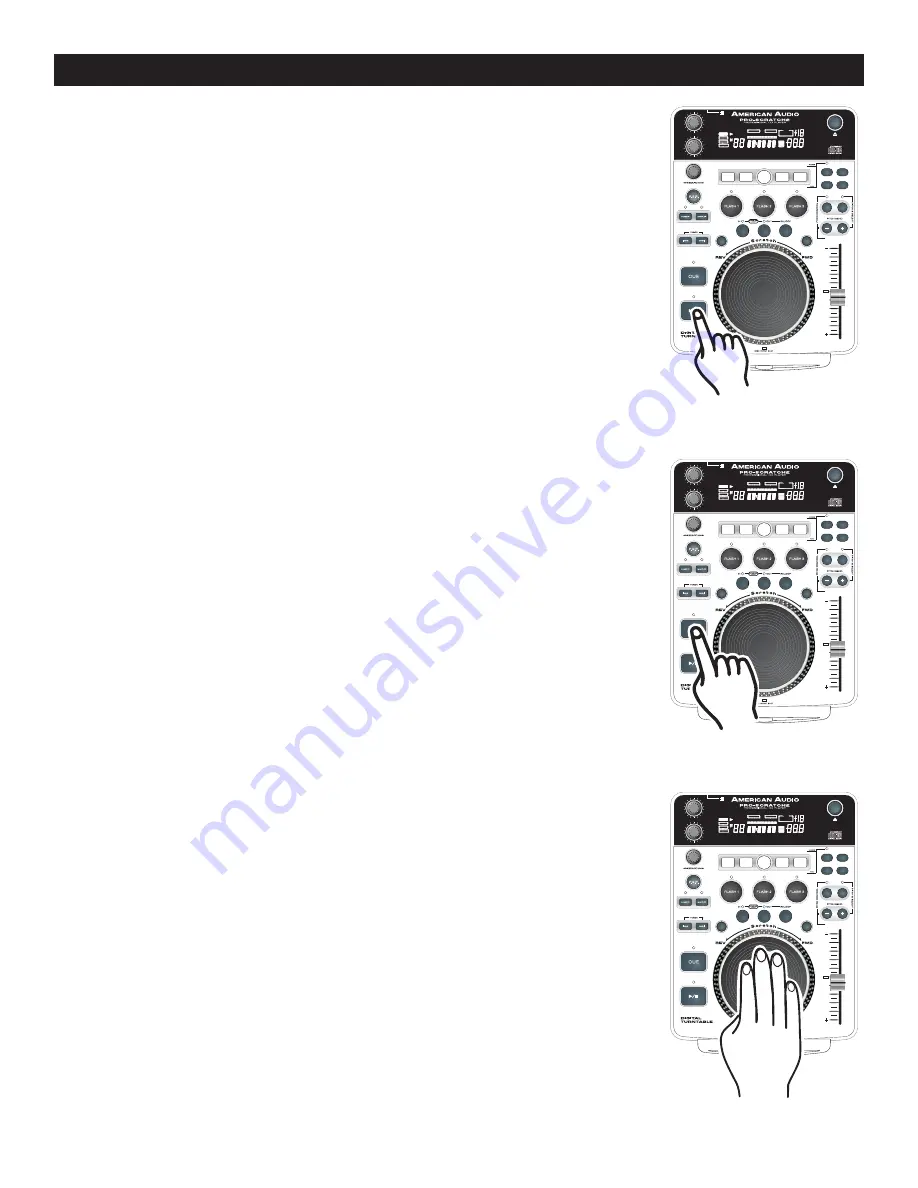
3. STARTING PLAYBACK - 

Figure 11

Insert an audio CD as describe on page 14


(

LOADING/EJECTING DISCS

).  

Pressing the 

PLAY/PAUSE BUTTON (17)

  with an audio CD inserted will imme-

diately start playback. The 

PLAY (44) 

indicator will glow as soon as playback 

begins. The point at which playback starts (cue point) will automatically be stored 
in the memory as the cue point. The unit will return to this cue point (the point at 
which playback started) when the

 CUE BUTTON (15)


or the


BOP BUTTON (30) 

is pressed.

4. AUTO CUE

This function will automatically set a cue point to the first audio source when a CD 
is inserted. The first set cue point will always be the beginning of track 1. If a new 
track is selected before the

  PLAY BUTTON (17) 

is pressed, a new CUE POINT 

will be set to reflect the new starting point.

5. STOPPING PLAYBACK - 

Figures 11 & 12

Stopping playback will not stop the drive mechanism, but merely pause or cue the 
track, this functions allows the unit to begin play instantly. The drive mechanism 
will only stop if a disc is ejected or the unit has gone in to sleep mode. There are 
two ways to stop (pause) playback:
1) Press the 

PLAY/PAUSE BUTTON (17)

 during playback. This will pause play-

    back at the exact same point the

 PLAY/PAUSE BUTTON (17) 

was pressed.


2) Press the

 CUE BUTTON (15) 

during playback. This will pause playback and    

    return the track to the last set cue point.  

6.


PAUSING - 

Figure 11

This function pauses playback at the exact same point the

 PLAY/PAUSE BUTTON 

(17) 

was pressed.


Pressing the 

PLAY/PAUSE BUTTON (17) 

will switch between 

play and pause modes. When the unit is in pause mode the 

PAUSE INDICATOR 

(49) 

in the 

LCD DISPLAY (19) 

will glow. The green 

PLAY/PAUSE BUTTON (17) 

LED will also begin to flash repeatedly.

7.


FRAME SEARCH


This feature allows you to scroll through a track frame by frame, allowing you to 
find and set a starting cue, sample, or loop point. To use the scroll function you 
must first be in Pause Mode (see section 5) or Cue Mode (see section 7). Once 
you are in Pause or Cue mode, turn the

 JOG WHEEL (16) 

to scroll through the 

track (Figure 13). Turning the wheel in a clockwise direction will advance the 
frame search and turning the wheel in a counter-clockwise direction rewinds the 
frame search. When you use the 

JOG WHEEL (16) 

the monitor (headphone level) 

function allows you to here what you are scrolling through. Once you reach your 
desired starting point you can set a cue (starting) point by pressing the


PLAY/

PAUSE BUTTON (17)

  as in Figure 11. Pressing the

  CUE BUTTON (15) 

as in 

Figure 12 will now return you to the point you just set.

 BASIC OPERATIONS (CONT.)

Figure 11

Figure 12

PARAMETER TIME

PARAMETER RATIO

EJECT

POWER

CUE

1   2   3   4   5   6   7   8   9   0

RELOOP

SINGLE

LOOP

REMAIN

NONSTOP

TOTAL

ELAPSED

M

T

S

PROGRAM

LOCK

KEY

SYNC.

BEAT

F

PITCH

BPM

CUE

AUTO

BPM

OFF
ON

FX

MIX

BOP

ENTER

PAN

FLANGER

SKID

PHASE

FX SELECT

SGL/CTN

TIME

REV.PLAY

TEMPO 
LOCK

4%/8%/16%

TRANS

ECHO

SCRATCH

FILTER

HOLD

ON/OFF

SAMPLE PITCH

Figure 13

©

American Audio

®

   -   www.americandj.com   -   Pro-Scratch 2™ Instruction Manual Page 15

Содержание Pro-Scratch 2

Страница 1: ...Featuring Sampling Sampling FLIPFLOP Pro Scratch 2 User Guide and Reference Manual 4295 Charter Street Los Angeles Ca 90058 www americandj com Rev 02 02...

Страница 2: ...KING 14 STARTING PLAYBACK 15 PAUSING PLAYBACK 15 FRAME SEARCH 15 TRACK SCANNING FAST FWD FAST REV 16 SETTING AND STORING CUE POINTS 16 CREATING A SEAMLESS LOOP 17 USING THE BUILT IN SAMPLER 19 CREATIN...

Страница 3: ...USER SERVICEABLE PARTS INSIDE REFER SERVICE TO YOUR AUTHORIZED American Audio DEALER The lightning flash with an arrow triangular symbol is intended to alert the user to the presence of non insulated...

Страница 4: ...pinched by items placed upon or against them paying particular attention to cords at plugs conveniencereceptacles andthepointwhere they exit from the product OUTDOOR ANTENNA GROUNDING If an outside an...

Страница 5: ...have fallen or liquid has been spilled into the CD Player C The CD Player has been exposed to rain or water D The CD Player does not appear to operate normally or exhibits a marked change in performa...

Страница 6: ...ed in perfect operating condi tion Carefully check the shipping carton for damage that may have occurred during shipping If the carton appears to be damaged carefully inspect your CD player for any da...

Страница 7: ...the set up section of this manual This feature will start the next player once one 1 player has ended For example if player one 1 is playing a disc and it ends player two 2 will instantly begin to pl...

Страница 8: ...merican DJ Fader Q Start mixer This will enable the Fader Q Start function See Fader Q start control page 8 CAUTION Be sure to use the supplied mono 1 8 control cables Using other types of cable may r...

Страница 9: ...effect See built in effects on page 21 7 P S P Pre Set Parameters BUTTON This button is used to activate the effect preset Each effect comes with four preset this button access the presets 8 FLASH BU...

Страница 10: ...l decrease the pitch percentage down to 100 The pitch bend will be deter mined on how long you turn the jog wheel continuously C The jog wheel will act as a frame search control when the CD is in paus...

Страница 11: ...slow to another playing music source Be sure to notice that this function is a momen GENERAL FUNCTIONS AND CONTROLS Cont tary pitch adjustment for a more precise adjust ment use the PITCH SLIDER 33 to...

Страница 12: ...ual Page 12 Figure 5 43 POWER ON ON OFF OFF 115V 230V DIGITAL OUT DIGITAL OUT SERIAL NO CUE HEADPHONE L R HEADPHONE VOLUME HEADPHONE VOLUME AUDIO OUT Com plies with DHHs radia tion Per fom ance standa...

Страница 13: ...splay time will depend on the selected time func tion The selected time function will be displayed above the TIME METER as TOTAL REMAIN 58 REMAIN 58 OR ELAPSE 59 55 MEMORY BUCKET INDICATOR This indi c...

Страница 14: ...press the EJECT BUTTON 18 see Figure 8 CAUTION NEVER attempt to insert any other objects beside 5 CD in the disc slot NEVER attempt to insert more than one disc at a time Doing so may result in sever...

Страница 15: ...his feature allows you to scroll through a track frame by frame allowing you to find and set a starting cue sample or loop point To use the scroll function you must first be in Pause Mode see section...

Страница 16: ...2 You may also use the JOG WHEEL 16 to set a cue point While a disc is in PAUSE or CUE mode use the JOG WHEEL 16 to scroll through a track to find your desired starting point Once you have found your...

Страница 17: ...thout sound interruption You can use this loop to create dramatic effect in your mixing This loop has no time limit and you could actually loop the entire length of disc You create a seamless loop bet...

Страница 18: ...c playback will resume nor mal play Figure 13 The IN BUTTON 14 and OUT BUTTON 32 LEDs will remain on to remind you that a loop is stored in memory REPLAY LOOP The RELOOP 31 function allows you to retu...

Страница 19: ...ce turn the sample function off immediately after initiating your sample With the sample function on the sample will continue to play until the sample function is turned off 7 Important Notice If you...

Страница 20: ...gain or power is shut off unless they are stored in to the unit s memory Changing the Sample Parameters Volume While a sample is playing push the PARAMETERS RATIO BUTTON 3 One tap will display SV 10 0...

Страница 21: ...BOP ENTER PAN FLANGER SKID PHASE FX SELECT SGL CTN TIME REV PLAY TEMPO LOCK 4 8 16 TRANS ECHO SCRATCH FILTER HOLD ON OFF SAMPLE PITCH PARAMETER TIME PARAMETER RATIO EJECT POWER CUE 1 2 3 4 5 6 7 8 9...

Страница 22: ...running time 2 REMAIN 59 This describes the time in the LCD 52 53 54 as the current TRACKS remaining running time 3 TOTAL REMAIN 59 This describes the time in the LCD 52 53 54 as the disc total remai...

Страница 23: ...the LCD 19 where XX XX will be replaced with firmware version 18 CLEAR ALL MEMORY You may clear the system memory at any time This will erase all your programmed memory and restore the unit to it s de...

Страница 24: ...der is in the center position a green LED just left of the slider will glow When this slider is glowing there is zero pitch being applied to the track regardless if the pitch function is on or off Act...

Страница 25: ...ND BUTTON 29 will provide a slow down in the playback pitch PITCH BEND BUTTONS 28 29 The PITCH BEND BUTTON 28 will increase track playback speed and the PITCH BEND BUTTON 29 will decrease track playba...

Страница 26: ...wheel in a clockwise direction will increase your track pitch and rotating the wheel in a counter clockwise direction will slow your track pitch The speed you rotate the JOG WHEEL will determine pitch...

Страница 27: ...he Skid and Scratch time parameters can be adjusted from 0010 to 9990 9990 will give you the longest Skid times The SKID value ranges from a 10ms to ten seconds Figure 51 PARAMETER TIME PARAMETER RATI...

Страница 28: ...After PT value has been set use the PARAMETER RATIO KNOB 3 to create the effect by turning it back and forth FLANGER EFFECT The flanger effect distorts the output signal and creates an effect similar...

Страница 29: ...M CUE AUTO BPM OFF ON FX MIX BOP ENTER PAN FLANGER SKID PHASE FX SELECT SGL CTN TIME REV PLAY TEMPO LOCK 4 8 16 TRANS ECHO SCRATCH FILTER HOLD ON OFF SAMPLE PITCH PARAMETERS All the effects have adjus...

Страница 30: ...f you follow steps one and four you will initiate the FX mix on the current track For example If you used the brake effect for your effects mix following steps one and four will initiate a brake effec...

Страница 31: ...and three You must be in continuos play mode for this effect to operate properly if the unit is in single play mode the track will cue when the effect has played out PARAMETER TIME PARAMETER RATIO EJ...

Страница 32: ...ETER RATIO EJECT POWER CUE 1 2 3 4 5 6 7 8 9 0 RELOOP SINGLE LOOP REMAIN NONSTOP TOTAL ELAPSED M T S PROGRAM LOCK KEY SYNC BEAT F PITCH BPM CUE AUTO BPM OFF ON FX MIX BOP ENTER PAN FLANGER SKID PHASE...

Страница 33: ...Flip Flop control Be sure to connect 1 8 mono mini plugs from the control connection on the rear your Pro Scratch 2 to the 1 8 control jack on the rear of American Audio Q series mixer That s it you...

Страница 34: ...aired or serviced by anyone other than the American Audio factory unless prior written authorization was issued to purchaser by American Audio if the product is damaged because not properly maintained...

Страница 35: ...L LIMIT CONDITION Output level 1 0Vrms 1dB 1 0V 1dB 1KHz 0dB Channel balance 0 5dB 1 0dB 1KHz 0dB Frequency response 0 5dB 1 0dB 20Hz 20KHz 0dB De emphasis response 2 5dB 3dB 16KHz 20dB Channel separa...

Страница 36: ...American Audio World Headquarters 4295 Charter Street Los Angeles CA 90058 USA Tel 323 582 3322 Fax 323 582 3311 Web www americandj com E mail info americandj com...

Отзывы: