


PN 05605
04/2020
WARNING: IF THE PRESSURE READING EXCEEDS THE GIVEN PARAMETERS, QUICKLY CLOSE THE
NITROGEN CYLINDER
“
T
”
HANDLE OR HANDWHEEL VALVE AND VENT THE PRESSURE
BY OPENING THE FLOW CHAMBER BALL VALVE. REGULATORS CANNOT BE FIELD
ADJUSTED –
THEY MUST BE REPLACED IF FOUND TO BE OUT OF TOLERANCE.
R
-
c. Observe the proper regulator static dead
-
set pressure for a minimum of one minute –
then fully open the
flow chamber valve for 1 to 2 seconds, and observe the pressure reading to ensure that the flow
pressure is between 225 and 245 psi (1551 and 1689 kPa). Close the nitrogen cylinder valve after the
test and vent the flow chamber pressure by opening the flow chamber valve.
R
-
d. Disconnect the service kit quick connect adapter from the low
-
pressure regulator, and reinstall the
regulator securely to the agent cylinder. (THIS STEP IS FOR REGULATED EXTINGUISHERS ONLY)
7.
Disconnect the discharge hose from the agent cylinder. Check the couplings, hose, and hose gaskets for
damage or deterioration –
replace as necessary.
8.
To perform an operational integrity check on the discharge hose and valve/nozzle combination:
a.
Connect the test kit hose adapter to the female end of the discharge hose.
b.
Connect the discharge valve/nozzle to the hose and properly secure it.
c.
Connect a properly regulated and verified nitrogen pressure source (set to the extinguisher operating
pressure 235
-
245 psi) to the test kit hose adapter.
d.
Slowly pressurize the discharge hose/valve/nozzle assembly to the extinguisher operating pressure
and check for leaks or distortion.
e.
Operate the discharge valve lever to ensure proper operation and to clear the hose of any obstructions
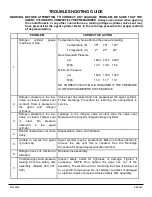
(if hose is obstructed –
refer to Troubleshooting section of this manual.
f.
Close the nitrogen pressure source and slowly relieve remaining pressure by fully opening the
discharge valve lever.
9.
Remove the agent cylinder fill cap and examine it closely for any signs of damage, cracks, or thread wear.
Clean the agent cylinder fill cap threads and thread vent port on the cap with a stiff bristle nylon brush.
Remove the fill cap gasket and check for wear, cracks, or tears –
replace if necessary. Lightly lubricate
the gasket with V
-
711 and reinstall.
10.
Examine the dry chemical agent for proper type and condition. Replace chemical that is contaminated,
caked, or other than the type indicated on the nameplate (label). Do not trust the height of the chemical in
the cylinder when determining agent fill. Dry chemical settles and the only true indication of agent fill is to
weigh the extinguisher and compare with the weight indicated on the nameplate (label).
11.
Place the service kit Vent Spacer on top of the agent cylinder fill opening collar. Check again to see that
the fill cap thread vent is clean and that the agent fill cap gasket is in place. Install the agent fill cap
securely over the vent spacer.
CAUTION: (STEP 12) The agent cylinder cap threads must be clear and the cap securely installed
onto the vent spacer and agent cylinder to allow pressure to slowly vent after performing the
siphon tube clearing and gas tube integrity checks.
12.
To perform a siphon tube clearing and gas tube integrity check:
a.
Remove the service kit Agent Hose Adapter from the discharge hose assembly, and install it securely onto
the agent cylinder siphon tube outlet.


