background image

Chapter 5: Monitoring and Managing

35

User Management

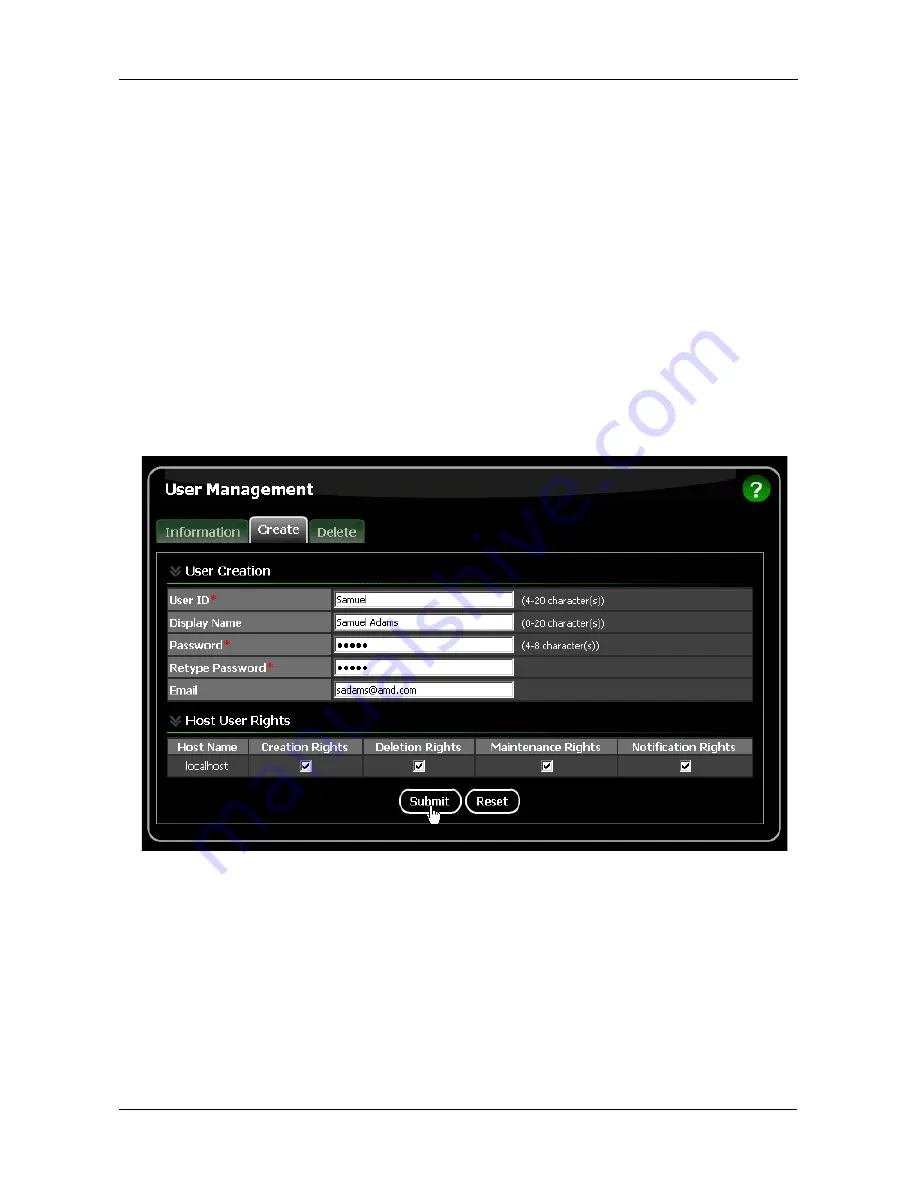
Adding a User (below)

Setting up Email Event Notification (page 36)

Deleting a User (page 39)

Changing a User’s Password (page 40)

Changing a User’s Email Address (page 41)

Changing a User’s Access Rights (page 42)

Adding a User

1.

Log into RAIDXpert as the Administrator.

2.

Click User Management in Tree View.

3.

Click the Create tab in Management View. 

4.

Type a User ID into the User ID field.

This ID will be the User’s login name.

5.

Type the user’s display name into the Display Name field. 

This name could be the User’s actual name.

6.

Type a password into the Password field.

Use up to 8 letters and numbers but no spaces or other characters.

7.

Type the same password into the Retype Password field.

Содержание RAIDXpert

Страница 1: ...RAIDXPERT USER MANUAL Version 2 1 ...

Страница 2: ...al inaccuracies typographical or other errors AMD assumes no liability for any error in this publication and for damages whether direct indirect incidental consequential or otherwise that may result from such error including but not limited to loss of data or profits AMD provides this publication as is without warranty of any kind either express or implied including but not limited to implied warr...

Страница 3: ...ging into RAIDXpert 11 Choosing a Language 14 Accessing the Host PC 14 Making the Recommended Initial Settings 15 Administrator s Settings 15 Creating a New Logical Drive 18 Logging out of RAIDXpert 22 Connecting to RAIDXpert from the Internet 23 Running RAIDXpert without Network Connection 23 Chapter 4 RAIDXpert User Interface 25 Banner 26 Tree View 26 Management Window 28 Event Frame 29 Current ...

Страница 4: ...ewing Physical Drives 53 Merging a Physical Drive 54 Scheduling Media Patrol All Physical Drives 54 Viewing Physical Drive Information 55 Making Physical Drive Settings 57 Running Media Patrol One Physical Drive 58 Viewing the Physical Drive Bad Sector Log 59 Deleting Physical Drive Backup Information 60 Logical Drives 62 Viewing Logical Drives 62 Creating a Logical Drive 62 Deleting a Logical Dri...

Страница 5: ... 5 Block Striping with Distributed Parity 97 RAID 10 Mirror Stripe 98 RAID Ready Single Drive 99 JBOD Concatenation 100 Choosing a RAID Level 101 RAID 0 101 RAID 1 101 RAID 5 102 RAID 10 102 RAID Ready 102 JBOD 103 Choosing Stripe Block Size 103 Gigabyte Boundary 103 Initialization 104 Hot Spare Drive s 104 Partition and Format the Logical Drive 105 Migration 105 Ranges of Logical Drive Migration ...

Страница 6: ...RAIDXpert User Manual vi ...

Страница 7: ... Chipset SATA Controller wherever they exist on the network Figure 1 RAIDXpert in a browser window Its browser based GUI provides email notification of all major events or alarms memory cache management drive event logging logical drive maintenance rebuild and access to all components in the RAID configuration server controller logical drives and physical drives RAIDXpert is designed to work with ...

Страница 8: ...t PC Figure 2 RAIDXpert on a network Java Runtime Environment The RAIDXpert installation program installs a private JRE in folder _jvm under the same directory where RAIDXpert is installed RAIDXpert uses this private JRE to avoid incompatibility issues with any other JREs that may be present on your system Desktop PC with Internet browser Laptop PC with Internet browser The Internet Networked PC w...

Страница 9: ...owsers install the browser first and make it the default browser Then install RAIDXpert You must use one of the browsers listed above on your networked PC in order to access RAIDXpert over the network About This Manual This User Manual describes how to set up and use the RAIDXpert software to maintain your RAID system This manual includes a full table of contents chapter task lists and numerous cr...

Страница 10: ...ed to complete a task Important items include things often missed Caution A Caution informs you of possible equipment damage or loss of data and how to avoid them Warning A Warning notifies you of probable equipment damage or loss of data or the possibility of physical injury and how to avoid them ...

Страница 11: ... Insert the software CD into your CD ROM drive 2 Double click the Install CD s icon to open it 3 Double click the Installer icon to launch it right The first RAIDXpert installation dialog box appears 4 Follow the prompts in the installation dialog boxes Windows with RAID Ready Backup Follow these steps to install RAIDXpert with the RAID Ready Backup feature on your Windows based PC or Server 1 Boo...

Страница 12: ...n as root 2 Insert the software CD into your CD ROM drive 3 In the CD window double click the RAIDXpert bin icon to begin installation right 4 When the Run or Display dialog box appears click Run in Terminal After several moments the first RAIDXpert installation dialog box appears 5 Follow the prompts in the installation dialog boxes Installation under Windows and Linux continued 1 When the first ...

Страница 13: ...he License Agreement screen appears click the I accept the terms of the license agreement option to proceed with installation Then click the Next button to continue Note If you leave the I do not accept the terms of the license option selected the installation will quit when you click Next ...

Страница 14: ...ge you can choose to apply security to external connections that is connections involving the Internet or outside your company firewall Security options are invisible to authorized users External Http Security Check the box to install Secure Socket Layer SSL support for external connections to RAIDXpert AMD provides a default certificate for the server as well as for internal data communication Ho...

Страница 15: ...Chapter 2 Installation 9 Click the Next button when you have made your choice 6 When the Ready to Install screen appears click the Install button to continue ...

Страница 16: ...RAIDXpert User Manual 10 7 When the Install Complete screen appears click the Finish button This completes the RAIDXpert installation Go to Chapter 3 Setup on page 11 ...

Страница 17: ...se Programs AMD RAIDXpert RAIDXpert Linux PCs Choose RAIDXpert in the Applications menu Or log on manually with your browser 1 Launch the Browser 2 In the Browser address field type the entry explained below If you did not choose the External Security option during RAIDXpert installation see page 8 use the Regular connection If you chose the External Security option during RAIDXpert installation s...

Страница 18: ...ks like this https 127 0 0 1 8443 amd or https localhost 8443 amd Note that the IP address shown above applies to a log in at the Host PC When you log in over a network enter the Host PC s actual IP address or hostname 3 Press the Enter key 4 When the login screen appears type admin in the Login ID field Type admin again in the Password field The RAIDXpert login and password are case sensitive 5 C...

Страница 19: ...hapter 3 Setup 13 After sign in the RAIDXpert opening screen appears Note Make a Bookmark Netscape Navigator or set a Favorite Internet Explorer of the Login Screen so you can access it easily next time ...

Страница 20: ... Administrative Tools User and Host Management and Utility Configuration AMD RAIDXpert Controller Physical Drives Logical Drives and Spare Drives If you do not see these details in the Tree View and you are connecting over a network it means your network connection to the Host PC is not working Restore your connection before proceeding If you do not see RAIDXpert at all lower your browser s securi...

Страница 21: ...ow is the best time to make them You can change them later as necessary Administrator s Settings To make the Administrator s password and notification settings 1 In Tree View under Administrative Tools click User Management 2 In the Management Window click the admin link 3 Click the Settings tab ...

Страница 22: ... field 7 Click the Submit button If the action was successful the Management Window will display the message Update Success 8 If you plan to set up Event Notification click the Settings tab The image above was shortened to fit on this page 9 Check the boxes of the notification events that you want to have reported to you via email and popup messages To select events by their severity check one of ...

Страница 23: ... Administrative Tools click Utility Configuration 2 Enter the Sender s address in the Email Sender field Be sure the sender has an account in your email system See your IT administrator 3 Enter your email server in the Email Server field 4 Optional Change the Email Subject line as needed 5 Click the Submit button when you are done ...

Страница 24: ...nagement View The Select RAID Level screen appears 3 Select the option beside the RAID level you want for your logical drive RAIDXpert displays the RAID levels you can use with the available physical drives See page 101 for information about the available RAID levels 4 In the Select Drive Group screen click the following option Single Disk s Selects single disks unassigned physical drives 5 Click ...

Страница 25: ... the Logical Drive Size field Or to use the maximum capacity of the physical drives check the Use Maximum Capacity box For RAID Ready and JBOD the system will check the Use Maximum Capacity Box automatically 7 Click the physical drives to select them Available drives have a white frame Selected drives have a red frame For RAID Ready select only one physical drive 8 Click the Next button ...

Страница 26: ... this setting 12 RAID 0 1 5 and 10 Choose a Gigabyte Boundary policy from the dropdown menu GigaByte Boundary Rounds the size of the logical drive down to the nearest whole gigabyte This is the default For more information see Gigabyte Boundary on page 103 None No Boundary function 13 Choose an Initialization policy from the dropdown menu Fast Initialization Erases the reserve and master boot sect...

Страница 27: ...ish button If there are physical drives available the Select RAID Level screen appears again where you can create an additional logical drive Click the Logical Drive in Tree View to see all of the information about your new logical drive ...

Страница 28: ...ing system See Appendix B Partition and Format on page 111 for more information Logging out of RAIDXpert There are two ways to log out of RAIDXpert Close your browser window Click Logout on the RAIDXpert Banner After logging out you must enter your username and password to log in again Clicking Logout brings you back to the Login Screen ...

Страница 29: ...rtually any location Running RAIDXpert without Network Connection RAIDXpert was designed to run over a network You can run RAIDXpert without a network connection directly on the Host PC To run RAIDXpert on the Host PC 1 Choose RAIDXpert in the Windows Programs menu Or choose RAIDXpert in the Linux Applications menu Your browser opens and displays a no connection to the Internet is currently availa...

Страница 30: ...RAIDXpert User Manual 24 ...

Страница 31: ...me page 29 This chapter describes RAIDXpert s Graphic User Interface GUI You should understand that RAIDXpert is software running on your Internet Browser RAIDXpert adds a graphic user interface to make RAID management functions easier to understand and perform Figure 1 The RAIDXpert Graphic User Interface ...

Страница 32: ...down menu Show or Hide the Event Frame See Event Frame below Display AMD contact information including links to the AMD website and address Log out of RAIDXpert Display the Main Online Help menu The banner always appears when your browser displays RAIDXpert Tree View Figure 3 The RAIDXpert Tree View The purpose of Tree View is Navigation Tree View appears in the left frame of the browser window Cl...

Страница 33: ...ves Logical Drives and Spare Drives Controller Priority settings Status settings Scheduled activities Lock Physical Drive View Information on attached physical drives Split Merge function Physical Drive Information on a specific physical drive Cache setting Media Patrol Bad Sector Log BSL and Drive Locator Logical Drive View Information on logical drives Create and Delete logical drives Logical Dr...

Страница 34: ... the information about a logical drive because you clicked a Logical Drive in Tree View Every Management View window has at least one tab typically the Information tab In most cases there are other tabs each with a particular function that applies to the RAID component you have chosen In the example above you can Click the Settings tab to change the name of the logical drive or its cache settings ...

Страница 35: ...how Event from the RAIDXpert banner Figure 5 Event Frame appears below the Management Window The Event Frame lists 20 per screen Events are listed by events by Number Source the AMD Chipset SATA Controller Severity Information Warning Critical Date and Time of occurrence and Description Click the Prev Page and Next Page buttons to move through the Event list Click the Close Management Window butto...

Страница 36: ...ve the Banner Click the Open Events icon to display the current events Figure 6 Viewing the current event The most recent event displays until another one happens The next event appears automatically There is no interruption of activity and there are no buttons to click Each event lists the date and time of occurrence level of severity and a description the same as the Event Log To hide the curren...

Страница 37: ... field type the entry explained below If you did not choose the External Security option during RAIDXpert installation see page 8 use the Regular connection If you chose the External Security option during RAIDXpert installation see page 8 use the Secure connection Regular Connection RAIDXpert uses an HTTP connection http Enter the Host PC s IP address 127 0 0 1 or localhost Enter the Port number ...

Страница 38: ...over a network enter the Host PC s actual IP address or hostname 3 Press the Enter key 4 When the login screen appears type admin in the Login ID field Type admin again in the Password field The RAIDXpert login and password are case sensitive 5 Click the Sign in button Note Make a Bookmark Netscape Navigator or set a Favorite Internet Explorer of the Login Screen so you can access it easily next t...

Страница 39: ...Chapter 5 Monitoring and Managing 33 After sign in the RAIDXpert opening screen appears ...

Страница 40: ...ays in the language selected Logging out of RAIDXpert There are two ways to log out of RAIDXpert Close your browser window Click Logout on the RAIDXpert banner After logging out you must enter your user name and password to log in again Clicking Logout brings you back to the Login Screen Notes You can also choose the language at the Login Screen To display some of the supported languages you might...

Страница 41: ...ser 1 Log into RAIDXpert as the Administrator 2 Click User Management in Tree View 3 Click the Create tab in Management View 4 Type a User ID into the User ID field This ID will be the User s login name 5 Type the user s display name into the Display Name field This name could be the User s actual name 6 Type a password into the Password field Use up to 8 letters and numbers but no spaces or other...

Страница 42: ...ement in Tree View 2 Click the User ID link in Management View 3 Click the Events tab Right Meaning Creation Permission to create a logical drive and a spare drive Deletion Permission to delete a logical drive and a spare drive Maintenance Permission to migrate rebuild and synchronize a logical drive to run Media Patrol on a physical drive make controller and physical drive settings Notification P...

Страница 43: ...the page 4 Check the boxes of the notification events that you want to have reported to you via email and popup messages To select events by their severity check one of the four Select Events boxes at the top of the window See the table on the next page 5 Click the Submit button ...

Страница 44: ...dancy Check Rejected Error Events Disk Setdown Disk Non ECC Error Disk S M A R T Error Error Events Array Offline Background Initialization Aborted with Error Synchronization Aborted with Error Redundancy Check Aborted with Error Redundancy Check Inconsistency Found Rebuild Aborted with Error Rebuild Error Aborted on Stream Background Initialization Aborted with Error Migration Aborted with Error ...

Страница 45: ...sumed Synchronization Aborted Synchronization Progress Synchronization Inconsistency Fixed Redundancy Check Started Redundancy Check Completed Redundancy Check Paused Redundancy Check Resumed Redundancy Check Aborted Redundancy Check Progress Information Events Rebuild Started Rebuild Completed Rebuild Paused Rebuild Resumed Rebuild Aborted Rebuild Restarted Rebuild Progress Background Initializat...

Страница 46: ... click the OK button Changing a User s Password In RAIDXpert each user can change his or her own password To change a user s password 1 Log into RAIDXpert under your User name 2 Click User Management in Tree View 3 Click your User ID link in Management View 4 Click the Settings tab 5 Type the current password in the Old Password field ...

Страница 47: ... Address In RAIDXpert each user can change his or her own email address or the Administrator can do it To change your email address 1 Log into RAIDXpert under your User name 2 Click User Management in Tree View 3 Click your User ID link in Management View Important If a user forgets his or her password the Administrator must delete that User account and create a new one as described above ...

Страница 48: ... button Changing a User s Access Rights In RAIDXpert the Administrator can change a user s access rights To change a user s access rights 1 Log in as the Administrator 2 Click User Management in Tree View The user list displays in Management View 3 Click the User ID link for the user whose access rights will change ...

Страница 49: ...ht Meaning Creation Permission to create a logical drive and a spare drive Deletion Permission to delete a logical drive and a spare drive Maintenance Permission to migrate rebuild and synchronize a logical drive to run Media Patrol on a physical drive make controller and physical drive settings Notification Permission to receive notification of events affecting the logical drive ...

Страница 50: ...plays with information about the Host PC RAIDXpert Version The version number of the RAIDXpert software Display Name The display name of the Host PC localhost is the default Supported characters include letters A to Z and a to z numbers 0 to 9 and a hyphen IP Address Refers to the Host PC 127 0 0 1 means accessed at the Host PC itself Other addresses such as 192 168 1 232 means accessed either at ...

Страница 51: ...iew 2 Enter the Sender s address in the Email Sender field Be sure the sender has an account in your email system See your IT administrator 3 Enter your email server in the Email Server field 4 Keep or change the Email Subject line 5 Choose an interval from the Event Frame Refresh Time dropdown menu 30 seconds is the default interval 6 Click the Enable or Disable options for Backup Prompt Offers t...

Страница 52: ...against drive failure The Backup feature provides that protection The backup drive is monitored as a logical drive in the RAIDXpert interface When you have a RAID Ready logical drive on your system and you plug in a new disk drive RAIDXpert will ask you if you want to make a backup of the RAID Ready logical drive Capabilities include Bootable drives Automatic incremental backups Backup continues a...

Страница 53: ...n message These messages display on the top right corner of the Host PC s desktop whether or not RAIDXpert is running at the time This feature makes it easy to monitor your RAID system without having to keep a browser window open and dedicated to the RAID Click OK to delete the message from your desktop ...

Страница 54: ...w controller information click Controller in Tree View The Information tab displays with information about the controller Product Name The AMD product name for this controller Driver Version Version number of the controller s software driver Maximum Number of Ports The number of ports on the controller Maximum Physical Drives The maximum number of physical disk drives the controller can support Ma...

Страница 55: ...ctivity A High setting assigns most of the system resources to background processes The process will finished sooner but read write requests are handled slower A Medium setting tries to balance system resources between the background processes and data input output activity A Low setting assigns most of the system resources to handling read write requests Read write requests are handled at nearly ...

Страница 56: ...ical drive belonging to a different logical drive for this purpose Buzzer When enabled the Controller s buzzer will sound to report a problem S M A R T Status SMART an acronym for Self Monitoring Analysis and Reporting Technology is a feature of the physical drive software When enabled the SATA controller polls the physical drives for SMART information and reports it to you S M A R T Check Polling...

Страница 57: ...duled Activity To delete a scheduled background activity 1 Click Controller in Tree View 2 Click the Schedule tab in Management View 3 Check the box to the left of the process you want to delete 4 Click the Delete button 5 In the Confirmation box click the OK button You can also go to the tab where the background activity is scheduled and click the Disable option Locking the Controller The Lock ta...

Страница 58: ...in Management View 3 From the dropdown menu select a period of time to hold the lock The lock time range is 1 to 30 minutes 4 Click the Lock button to set the lock The lock will release itself automatically at the end of the period you specified 5 To release the lock before the scheduled time click the Unlock button ...

Страница 59: ...Making Physical Drive Settings page 57 Running Media Patrol One Physical Drive page 58 Viewing the Physical Drive Bad Sector Log page 59 Deleting Physical Drive Backup Information page 60 Viewing Physical Drives To access Physical Drive View click Physical Drive View in Tree View From this window you can click the links to access information and functions of individual physical drives and use the ...

Страница 60: ...umber to which it is attached To merge a physical drive 1 Click Physical Drive View in Tree View 2 Click the Merge tab in Management View 3 Check the box to the left of the physical drive you want to merge 4 Click the Submit button Click Physical Drive View again to see the results of your merge operation Scheduling Media Patrol All Physical Drives The Physical Drive View Media Patrol tab allows y...

Страница 61: ...lick the Schedule button Canceling a Schedule To cancel the scheduled Media Patrol operation 1 Click Physical Drive View in Tree View 2 Click the Media Patrol Schedule tab in Management View 3 Click the Disable option Viewing Physical Drive Information To access information about a physical drive 1 Click Physical Drive View in Tree View 2 Click the Physical Drive whose setting you want to view The...

Страница 62: ...ives attached to a SATA port multiplier show the port number to which the port multiplier is connected Target ID Physical drives attached to motherboard SATA ports show target ID 1 Drives attached to a SATA port multiplier each show a different target ID number Drive Status The operational status of this physical drive Functional means normal Others include Offline Background Activity The current ...

Страница 63: ...under the Settings tab see below SATA The SATA data rate of the physical drive 1 5 Gb s or 3Gb s Command Queue Shows NCQ Native Command Queueing if supported by this physical drive Making Physical Drive Settings Physical Drive Settings allows you to enable or disable the Write Cache on an individual physical drive To access the physical drive setting 1 Click Physical Drive View in Tree View 2 Clic...

Страница 64: ...ve View in Tree View 2 Click the Physical Drive on which you want to run Media Patrol 3 Click the Media Patrol tab in Management View 4 Click the Start Now button Scheduled To schedule Media Patrol to run at a later time 1 Click Physical Drive View in Tree View 2 Click the Physical Drive 3 Click the Media Patrol tab in Management View 4 Click the Enable option 5 Click the by Day by Week or by Mont...

Страница 65: ...agement View 4 Click the Disable option Viewing the Physical Drive Bad Sector Log On occasion an error can arise with the media on a physical drive RAIDXpert keeps track of bad sectors in order to inform you of the condition of individual physical drives To access a physical drive s bad sector log 1 Click Physical Drive View in Tree View 2 Click the Physical Drive whose bad sector log you want to ...

Страница 66: ...emains online Backup your data replace the physical drive create a new logical drive and copy your data to it See Rebuilding a Logical Drive on page 74 and Managing a Critical or Offline Logical Drive on page 84 See your system User Manual for more information about replacing a physical drive Deleting Physical Drive Backup Information When you make a backup of your RAID Ready logical drive the phy...

Страница 67: ... View 4 Click the Delete button 5 In the Confirmation box click the OK button The backup information is removed and the physical drive is ready for use in a logical drive or as a spare drive Note If your backup drive is present in your RAIDXpert system when you delete the corresponding RAID Ready logical drive the backup drive is deleted at the same time In that situation you do not need to delete...

Страница 68: ...2 Logical Drive Activation page 83 Managing a Critical or Offline Logical Drive page 84 Viewing Logical Drives Logical Drive View provides a list of all logical drives currently on the Host PC To see a list of your logical drives click Logical Drive View in Tree View From this screen you can click the links to access information and functions of individual logical drives and use the Create and Del...

Страница 69: ...out the available RAID levels 4 In the Select Drive Type screen click the option for one of the following Single Disk s Selects single disks unassigned physical drives Logical Drive Select the Free portion of physical drives whose other portion is assigned to a Logical Drive The available choices depend on the RAID level you selected and the physical drives available 5 Click the Next button The Se...

Страница 70: ...sical drives check the Use Maximum Capacity box For RAID Ready and JBOD the system will check the Use Maximum Capacity Box automatically 7 Click the physical drives to select them Available drives have a white frame Selected drives have a red frame For optimal performance select physical drives of the same model and capacity Also see the Note on the facing page For RAID Ready select only one physi...

Страница 71: ...change this setting 12 RAID 0 1 5 and 10 Choose a Gigabyte Boundary policy from the dropdown menu Gigabyte Boundary Rounds the size of the logical drive down to the nearest whole gigabyte This is the default For more information see Gigabyte Boundary on page 103 None No Boundary function 13 Choose an Initialization policy from the dropdown menu Fast Initialization Erases the reserve and master boo...

Страница 72: ...Finish button If there are physical drives available the Select RAID Level screen appears again where you can create an additional logical drive Click the Logical Drive in Tree View to see all of the information about your new logical drive ...

Страница 73: ...gement View 3 Check the box to the left of the logical drive you want to delete 4 Click the Submit button 5 In the Confirmation box click the OK button 6 In the Warning box click the OK button The selected logical drive is deleted Warning When you delete a logical drive you delete all data on the logical drive Be sure to backup any important data before you delete a logical drive Note If you are d...

Страница 74: ...cal Drive Settings enables you to change the name of a logical drive To access logical drive settings 1 Click Logical Drive View in Tree View 2 Click the Logical Drive whose name you want to change 3 Click the Settings tab in Management View 4 Enter a name in the Assigned Name field 5 Click the Submit button Backing up a RAID Ready Logical Drive This feature is only supported by Windows To use RAI...

Страница 75: ...he Yes button to make a backup of your RAID Ready logical drive to the physical drive that you just plugged into your system Set up by Selecting a Physical Drive This option requires one unassigned physical drive connected to the AMD Controller To backup your RAID Ready by selecting a drive 1 Click Logical Drive View in Tree View 2 Click the Logical Drive whose name you want to change 3 Click the ...

Страница 76: ...hen the backup is finished the backup drive is an exact duplicate of your RAID Ready logical drive If your RAID Ready was a bootable drive your backup drive will be bootable also Your system can boot from either drive If you leave the backup drive in your system and you reboot the system the RAID Ready and backup drive will appear as a RAID 1 mirrored logical drive To use your backup drive in a di...

Страница 77: ... in the current logical drive From To Result RAID Ready 1 drive RAID 0 2 to 6 drives Increases capacity RAID 1 2 drives Adds redundancy RAID 5 3 to 6 drives Increases performance and capacity adds redundancy RAID 10 4 drives JBOD 2 to 6 drives Increases capacity RAID 0 2 drives RAID 5 3 to 6 drives Increases performance and capacity adds redundancy RAID 10 4 drives RAID 0 3 drives RAID 5 4 drives ...

Страница 78: ...or a time when there is less demand on the RAID system On Demand To migrate a logical drive 1 Click Logical Drive View in Tree View 2 Click the Logical Drive you want to migrate 3 Click the Migration tab in Management View 4 From the Migrate RAID Level to dropdown menu choose the target RAID level for your logical drive 5 If your intended action requires additional physical drives click a Single D...

Страница 79: ...m the Migrate RAID Level to dropdown menu choose the target RAID level for your logical drive 5 If your intended action requires additional physical drives click a Single Disk unassigned physical drive to select it Available drives have a white frame Selected drives have a red frame 6 Click the Enable option 7 From the dropdown menus select a start time Start time is based on a 24 hour clock 8 Cli...

Страница 80: ...b in Management View 4 Click the Disable option Rebuilding a Logical Drive Rebuild refers to the process of repairing a logical drive by reconstructing the data on one of its physical drives This feature only applies to logical drives with redundancy RAID 1 5 and 10 Rebuilding requires a spare drive or a Single Disk of equal or greater capacity as the failed physical drive See Managing a Critical ...

Страница 81: ...uild a logical drive 1 Click Logical Drive View in Tree View 2 Click the Logical Drive you want to rebuild 3 Click the Rebuild tab in Management View 4 Click a Single Disk unassigned physical drive to use as a replacement drive Available drives have a white frame Selected drives have a red frame 5 Click the Start Now button You can monitor Rebuild progress on the Logical Drive Rebuild tab Click th...

Страница 82: ...a Single Disk unassigned physical drive to use as a replacement drive Available drives have a white frame Selected drives have a red frame 5 Click the Enable option 6 From the dropdown menus select a start time Start time is based on a 24 hour clock 7 Click in Start At field to display a popup calendar 8 Click the start date in the calendar or enter a date manually 9 Click the Schedule button ...

Страница 83: ...of a logical drive is possible under the following conditions The logical drive is a RAID 1 or a RAID 5 with 3 physical drives See Creating a Logical Drive on page 62 There is a spare drive present in the RAID system See Creating a Spare Drive on page 89 Automatic Rebuild Status is enabled in the Controller Settings See Making Controller Settings on page 49 If the three above conditions are met a ...

Страница 84: ...parity Unlike a Rebuild Synchronization is a maintenance operation Redundancy Check An automated process of checking data and parity but it only reports and does not correct any inconsistencies that it finds Synchronization and Redundancy Check apply to RAID 1 5 and 10 logical drives To perform a Synchronization or Redundancy Check immediately on demand see Synchronizing One Logical Drive on page ...

Страница 85: ... can also synchronize all logical drives at the same time see page 78 Synchronization An automated process of checking and correcting data and parity Unlike a Rebuild Synchronization is a maintenance operation Redundancy Check An automated process of checking data and parity but it only reports and does not correct any inconsistencies that it finds Synchronization and Redundancy Check apply to RAI...

Страница 86: ...o not want to correct inconsistencies 5 Click the Start Now button You can monitor Synchronization or Redundancy Check progress on the Synchronization tab Click the respective buttons to pause resume or abort the Synchronization or Redundancy Check Note You cannot start a Redundancy Check until all other background activities are finished They include Rebuild Full Initialization Migration Expansio...

Страница 87: ...Synchronization tab in Management View 4 In the Policy dropdown menu choose Fix If you want Synchronization Redundancy Check If you do not want to correct inconsistencies 5 Click the Enable option 6 Click the by Day by Week or by Month option 7 From the dropdown menus select a start time and a day of the Week or Month if applicable Start time is based on a 24 hour clock 8 Click the Schedule button...

Страница 88: ...ation Erases the reserve and master boot sectors of the physical drives being added to the logical drive Full Initialization Erases all sectors of the physical drives being added to the logical drive RAID 1 5 and 10 only None No initialization This choice is not recommended When you select full initialization the process takes some time depending on the size of the physical drives in the logical d...

Страница 89: ...you disconnect both physical drives from a RAID 1 logical drive the logical drive goes Offline If you then reconnect both physical drives the array returns to Functional status But if you only reconnect one of the physical drives the logical drive remains Offline Activation changes the logical drive status from Offline to Critical You can then access the data on the logical drive and rebuild the l...

Страница 90: ...Due to the fault tolerance of the logical drive the data is still available and online However once the logical drive goes critical it has lost its fault tolerance and performance may be adversely affected If the fault was caused by a failed physical drive that was removed the drive must be replaced by another drive either identical or larger in order for the RAID system to rebuild and restore opt...

Страница 91: ...e the use the backup drive to restore the data See Backing up a RAID Ready Logical Drive on page 68 When a Physical Drive Fails The following will occur when a physical drive fails or goes offline The Controller s audible alarm if enabled will sound See page 49 RAIDXpert reports the condition in Tree View with popup messages and if Event Notification is set up email messages See page 36 If you hav...

Страница 92: ...ysical drive A physical drive that used to be present but is suddenly absent is the failed physical drive In this example there were four physical drives connected to the AMD motherboard Notice that there is no drive on Port 3 That is the failed drive This procedure cannot locate a failed drive attached to a SATA port multiplier as all such drives have the same port number If your port multiplier ...

Страница 93: ...bout replacing a physical drive Rebuilding Your Logical Drive These instructions describe a manual rebuild They apply when you have not enabled Automatic Rebuild and have no Spare drive 1 Click Logical Drive View in Tree View 2 Click the Logical Drive you want to rebuild 3 Click the Rebuild tab in Management View 4 Click the physical drive in the interface representing the drive that you just repl...

Страница 94: ...Xpert User Manual 88 You can monitor Rebuild progress on the Rebuild tab Click the respective buttons to pause and resume the Rebuild When the Rebuild is finished your logical drive will be Functional again ...

Страница 95: ... on how spare drives work Viewing Spare Drives Spare Drive View provides a list of all spare drives currently on the Host PC To see a list of your spare drives click Spare Drive View in Tree View From this screen you can view the current Spare Drives and click the tabs to access the Create and Delete features Creating a Spare Drive To create a spare drive 1 Click Spare Drive View in Tree View 2 Cl...

Страница 96: ...select for a spare drive a split physical drive where part of the physical drive currently supports a logical drive 5 Click the Create button The new Spare Drive appears under Physical Drive View and Spare Drive View Deleting a Spare Drive To delete a spare drive 1 Click Spare Drive View in Tree View 2 Click the Delete tab in Management View 3 Check the box to the left of the spare drive you want ...

Страница 97: ...Chapter 5 Monitoring and Managing 91 5 In the Confirmation box click the OK button The selected spare drive is deleted ...

Страница 98: ...RAIDXpert User Manual 92 ...

Страница 99: ...ysical drives you must attach a port multiplier to one of the SATA or external SATA eSATA ports A port multiplier enables a single SATA or eSATA port on the motherboard to support up to five SATA drives Port multipliers are available through third party vendors Be sure to follow the installation instructions that come with the port multiplier Note that physical drives attached to an eSATA port are...

Страница 100: ...ves on its own The benefits of a RAID can include Higher data transfer rates for increased server performance Increased overall storage capacity for a single drive designation such as C D E etc Data redundancy fault tolerance for ensuring continuous system operation in the event of a hard drive failure Different types of logical drives use different organizational models and have varying benefits ...

Страница 101: ...cal drives are recommended for performance as well as data storage efficiency Figure 1 RAID 0 interleaves data across two physical drives The logical drive s data capacity is equal to the number of drive members multiplied by the smallest logical drive member s capacity For example one 100 GB and three 120 GB drives will form a 400 GB 4 x 100GB logical drive instead of 460 GB RAID 0 logical drives...

Страница 102: ...ve is present the spare drive will be used as the replacement drive and data will begin to be mirrored to it from the remaining good drive Figure 2 RAID 1 mirrors identical data across to two physical drives Due to the data redundancy of mirroring the capacity of the logical drive equals the size of the smallest physical drive For example two 100 GB physical drives which have a combined capacity o...

Страница 103: ...nformation RAID 5 makes efficient use of hard drives and is the most versatile RAID Level It works well for file database application and web servers Figure 3 RAID 5 Stripes all drives with data and parity information The capacity of a RAID 5 logical drive is the smallest physical drive size multiplied by the number of physical drives less one Hence a RAID 5 logical drive with four 100 GB physical...

Страница 104: ... 4 RAID 10 mirrors data over one drive pair and stripes it over the other drive pair The data capacity is similar to a RAID 1 logical drive with half of the total storage capacity dedicated for redundancy An added plus for using RAID 10 is that in many situations RAID 10 offers double fault tolerance Double fault tolerance may allow your logical drive to continue to operate depending on which two ...

Страница 105: ...sical drive RAID Ready does not offer the performance or security advantages of other RAID logical drives However you can create a backup of your RAID Ready drive by Inserting an unformatted physical drive Designating an installed physical drive For more information see Windows with RAID Ready Backup on page 5 and Backing up a RAID Ready Logical Drive on page 68 In RAIDXpert you create manage and ...

Страница 106: ...ysical drives concatenated together have the equivalent capacity of single 1 5 TB drive Figure 6 JBOD concatenates the capacity of multiple drives As independent physical drives JBOD does not offer the performance or security advantages of RAID logical drives However in RAIDXpert you create manage and delete a JBOD the same as a logical drive You can designate from 2 to 4 physical drives with onli...

Страница 107: ...ility Advantages Disadvantages Data is broken down into blocks and each block is written to a separate physical drive I O performance is greatly improved by spreading the I O load across multiple channels and drives No parity calculation overhead is involved Not a true RAID because it is not fault tolerant The failure of just one drive will result in all data in a logical drive being lost Should n...

Страница 108: ...Ready is comparable to RAID 1 See Backing up a RAID Ready Logical Drive on page 68 Advantages Disadvantages High Read data transaction rate Medium Write data transaction rate Good aggregate transfer rate Disk failure has a medium impact on throughput Advantages Disadvantages Implemented as a mirrored logical drive whose segments are striped logical drives High I O rates are achieved thanks to mult...

Страница 109: ...e block size Generally speaking email POS and webservers prefer smaller stripe block sizes Video and database applications prefer larger stripe block sizes Gigabyte Boundary The Gigabyte Boundary feature is designed for logical drives in which a drive has failed and the user cannot replace the drive with the same capacity or larger Instead the Gigabyte Boundary feature permits the installation of ...

Страница 110: ...gical drive In the event of the failure of a drive within a functioning fault tolerant logical drive the hot spare is activated as a member of the logical drive to replace a drive that has failed The AMD Chipset SATA Controller replaces a failing physical drive in a logical drive with an unassigned drive if one is available The unassigned drive is not part of any logical drive Such a drive is call...

Страница 111: ... with certain combinations of RAID level and number of physical drives as described in the table below From To Result RAID Ready 1 drive RAID 0 2 to 6 drives Increases capacity RAID 1 2 drives Adds redundancy RAID 5 3 to 6 drives Increases performance and capacity adds redundancy RAID 10 4 drives JBOD 2 to 6 drives Increases capacity RAID 0 2 drives RAID 5 3 to 6 drives Increases performance and c...

Страница 112: ...ive 4 000 000 000 blocks x 512 bytes per sector 2 048 000 000 000 bytes of data for a 2TB drive Note that you cannot change the size of the sectors nor can you increase the number of address blocks above 4 billion As a result there are range limits imposed upon logical drive migration as shown in the table above Important The Target logical drive may require more physical drives than the Source lo...

Страница 113: ...ssigned to logical drives spare drives and currently unassigned physical drives that were once part of a logical drive or a spare Media Patrol does not check new physical drives that have never been configured Unlike Synchronization and Redundancy Check Media Patrol is concerned with the condition of the media itself not the data recorded on the media If Media Patrol encounters a suspect sector it...

Страница 114: ...run Media Patrol see Scheduling Media Patrol All Physical Drives on page 54 or Running Media Patrol One Physical Drive on page 58 See also Setting up Email Event Notification on page 36 and Viewing the Physical Drive Bad Sector Log on page 59 ...

Страница 115: ...rk knows it such as 192 168 1 33 How can I be sure everything is working OK by using RAIDXpert One way to do this is through Event Notification RAIDXpert will report events to you in the form of email and popup messages You might only select Warning and Error events so that you only receive messages when something is wrong See Setting up Email Event Notification on page 36 Another method is to per...

Страница 116: ...gical drive Some versions of the AMD Chipset SATA Controller do not support RAID 5 If your controller is one of them choose a RAID 1 or a RAID 10 logical drive instead How can I keep my backup drive up to date with my RAID Ready logical drive Each time you plug in your backup drive the Fast Copy program finds all of the changes on the RAID Ready drive and updates the backup up drive automatically ...

Страница 117: ...work In the example below we show how this is done in Windows A similar procedure is required for Linux PC s However partitioning and formatting in Linux is not automated therefore please refer to your system documentation for the exact procedure 1 From the desktop right click the My Computer icon and choose Manage from the popup menu The Computer Management window opens 2 From the left menu click...

Страница 118: ...4 In the following windows choose Disk 1 to Initialize Do not choose any disks to Convert Click the Finish button to Initialize the logical drive 5 Right click the Unallocated portion of Disk 1 and choose New Partition from the popup menu The New Partition Wizard appears ...

Страница 119: ... Choose Format this partition with the following settings File system NTFS Allocation unit size Default Volume label Enter your choice of name Do not check Perform a quick format or Enable file and folder compression Click Next to move to the next window 8 Review your selections and click Finish The New Partition Wizard will disappear while partitioning and formatting begin This process will take ...

Страница 120: ...RAIDXpert User Manual 114 When formatting is complete your logical drive will appear as a hard disk drive in the Disk Management window above and the My Computer window below ...

Отзывы: