Amcrest IP4M-1054EB Скачать руководство пользователя страница 49


49 


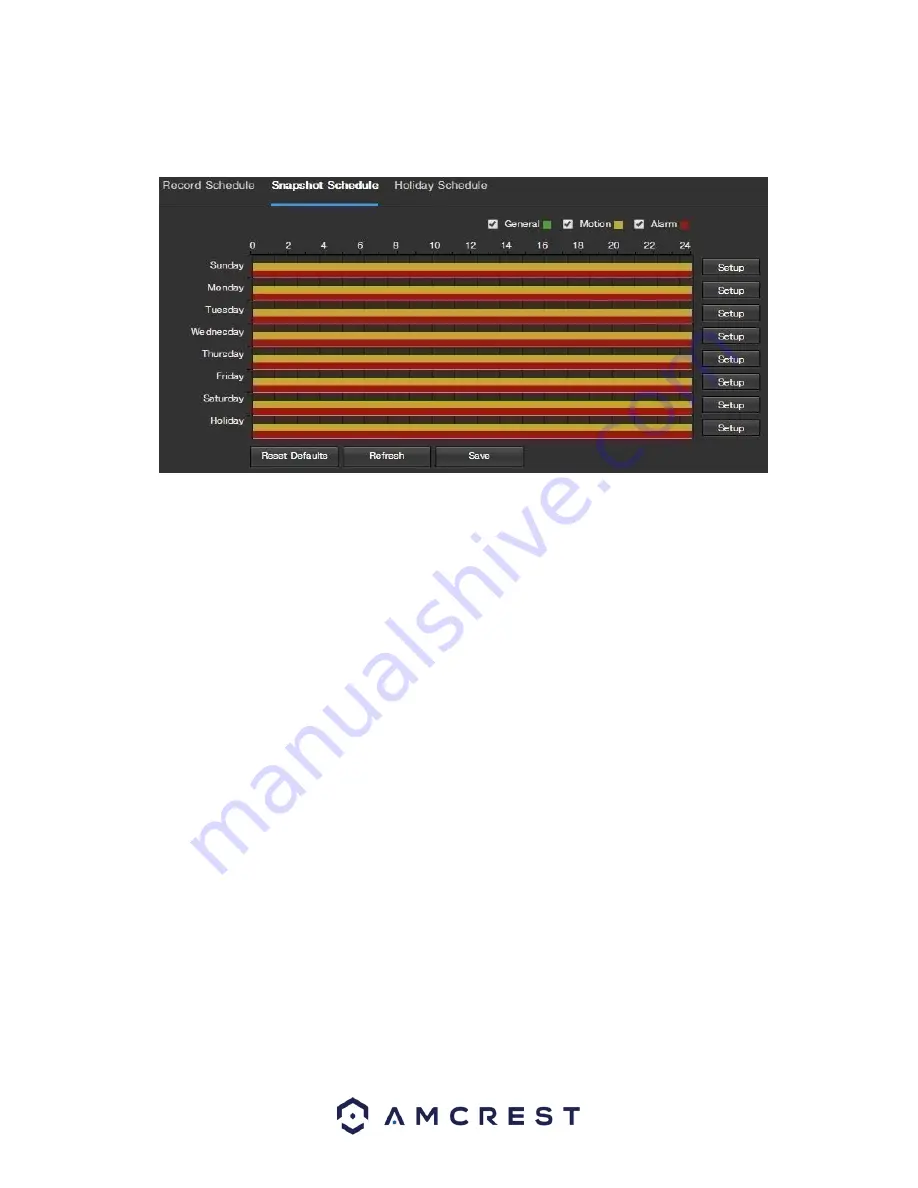
5.4.4.1.2 Snapshot Schedule 


This tab is where snapshot recording settings are configured. Below is a screenshot of the Snapshot Schedule settings 

screen:      


Below is an explanation of the fields on the Snapshot Schedule settings tab:         

• 

Record Type

: These checkboxes allow the user to select which snapshot type they want to configure on the schedule. 

There are 3 types of snapshots:         

o


General

: General means that the camera will take snapshots during the specified time period. General recording is 

represented by the color green.         

o


Motion

: Motion Detection means that the camera only takes snapshots when the motion detection alarm is activated. 

Motion recording is represented by the color yellow.         

o


Alarm

: Alarm means that the camera only takes snapshots when an alarm is activated. Alarm recording is represented 

by the color red.         

• 

Snapshot Recording Schedule

: To specify a snapshot range, first select the type of snapshot desired, then click and 

drag on time bar for the desired date. To edit multiple days at once, drag the cursor further up or down to cover the 
other days.         

o


Setup

: Clicking this button opens a screen that allows for snapshot periods to be set for each day and for each 

snapshot type. There are a total of 6 periods that can be set.         


To reset to default settings, click the Reset Defaults button. To refresh the page, click the Refresh button. To save the 

settings, click the Save button.         


5.4.4.1.3. Holiday Schedule 


This tab is where holiday settings are configured. Below is a screenshot of the Holiday Schedule settings screen:       
   

Содержание IP4M-1054EB

Страница 1: ...Amcrest IP4M 1054EW IP4M 1054EB 4MP ProHD Motorized Lens Camera User Manual Version 1 0 4 Revised December 20th 2018...

Страница 2: ...6 4 Camera Access Setup 7 4 1 Default Username and Password 7 4 2 How to Setup the Camera 7 4 3 App Setup 8 4 4 Desktop Access Setup 13 4 5 Amcrest Cloud Desktop Setup 14 4 6 Web Access Setup Amcrest...

Страница 3: ...t Security Warning To keep your Amcrest camera secure and prevent unauthorized access please make sure to follow the steps below Always make sure that your camera has the latest firmware as listed on...

Страница 4: ...and check to ensure that all the components are present Contact the retailer that you purchased from or Amcrest directly if anything is broken or missing in the package 1 Features and Specifications 1...

Страница 5: ...rent product series IMPORTANT Due to specific hardware limitations within your camera it is important to note that these devices will not be able to automatically pan tilt or pivot in either the app o...

Страница 6: ...pen accessories bag and take out the screws Tighten the 3 screws to fix the device on the installation surface wall or ceiling 5 Loosen the sunshade screw to move it around to the desired position the...

Страница 7: ...t 4 2 How to Setup the Camera To make your experience with your Amcrest camera easy and simple we ve provided multiple ways to set up view and operate your camera depending on your needs Please follow...

Страница 8: ...ou ll find instructions on how to set up your camera up on the Amcrest cloud app as well as the Amcrest View Pro app 4 3 1 Amcrest Cloud App Setup Amcrest Cloud allows you to access your device from a...

Страница 9: ...he QR code on the back side bottom of the camera or manually enter the camera s serial number into the Enter camera S N serial number field Press Next to continue 6 If you are adding a new camera that...

Страница 10: ...camera When all settings have been confirmed tap Finish For more information about the Amcrest Cloud app and its features visit amcrest com support 4 3 2 Amcrest View Pro Setup To add your PoE camera...

Страница 11: ...e of the screen to begin adding your PoE device 3 Tap on Add Device to add a new device to your app 4 Tap on PoE Camera 5 Next select a connection type Since we will be setting up a basic P2P connecti...

Страница 12: ...e View to continue Note You can tap on the icon to verify the password Note Android users tap on Scan QR Code to access the QR code reader 8 The app will prompt you to change the password Enter a pass...

Страница 13: ...Use one of the following web browsers Safari Internet Explorer or Google Chrome To easily connect to the camera s interface install and run the Amcrest IP Config tool You can download the IP Config s...

Страница 14: ...a to power and wait 30 seconds for the camera to start up and initialize 2 Using a web browser on your PC or Mac visit www amcrest com cloud and register for a cloud account Once registered click the...

Страница 15: ...your camera open the main menu then go to Setup Network 6 Click the Connections menu item on the left hand menu and ensure that the HTTP port has changed 7 Click the DDNS menu item on the left hand me...

Страница 16: ...in the IP address field 9 Click the Save button 10 Using the left hand menu go to the Connection menu and write down the TCP UDP and HTTP port number It is recommended to ensure that these port numbe...

Страница 17: ...rest Support using one of the following numbers Toll Free 888 212 7538 International Callers Outside of US 1 713 893 8956 USA 888 212 7538 Canada 437 888 0177 UK 203 769 2757 Email Amcrest Customer Su...

Страница 18: ...This button opens the image adjustment toolbar which allows the user to adjust brightness contrast saturation and hue for the live feed s picture Adapt Original Size This button allows the user to swi...

Страница 19: ...When a date has recorded footage available it s green The current date is blue unless it has recorded footage then it s a lighter green 4 File List This button opens a file list of all recorded video...

Страница 20: ...20 5 3 Cloud Storage The Cloud Storage tab allows the user quick access to the Amcrest Cloud website...

Страница 21: ...menu sections which when clicked display any menu items that fall under their category 2 Menu Items These menu items each open a different menu that allows the user to change specific settings for the...

Страница 22: ...se note the video may become hazy if the value is too low If this value is too high the dark section may lack brightness while the bright section may over expose The recommended value ranges from 40 t...

Страница 23: ...ed additional options to specify a shutter speed and a gain range appear below this box Below is a screenshot of the exposure menu Profile This dropdown box allows the user to select which profile to...

Страница 24: ...ts Below is a screenshot of this menu BLC backlight compensation Default will use the whole image to balance the lighting settings and Customized will allow you to balance the lighting settings from t...

Страница 25: ...determine when black and white mode is turned on in a dark environment Below is a screenshot of this menu Color always represents picture in color does not use IR or black and white mode Performs poor...

Страница 26: ...4 1 6 IR Light This menu allows the user to select whether the IR lights for night vision are on or off for the selected profile Below is a screenshot of this menu Profile This dropdown box allows th...

Страница 27: ...ach of the fields on the Profile Management tab in the Configuration menu item Profile Management This set of radio buttons allow the user to set what basis the profile management settings run on Ther...

Страница 28: ...stest setting of 20 Focus This slider allows the user to focus on objects nearer to the camera or further away Slide the slider to the right to focus on objects further from the camera Slide the slide...

Страница 29: ...Rate Type This dropdown box allows the user to select a bit rate type The system supports two bit rate types CBR and VBR In VBR mode video quality can be set Reference Bit Rate This is the recommended...

Страница 30: ...shots occur when a motion detection alarm or tampering alarm is triggered Image Size This dropdown box shows the image size By default the screenshot size is the same size as the video feed s resoluti...

Страница 31: ...ables the feature The Input Channel Title field allows the channel title to be modified For Time the radio button enables or disables the feature Clicking the Display Weekdays checkbox will show the w...

Страница 32: ...owse button to select a different destination folder The Video Clips field allows the user to select where to save video clips to Click the Browse button to select a different destination folder To re...

Страница 33: ...Subnet Mask or Default Gateway as these values are obtained from the DHCP function To view the current IP address DHCP needs to be disabled Note When PPPoE is enabled modification of the IP Address S...

Страница 34: ...eature must be enabled for the camera to connect to a smartphone or tablet via the Amcrest View app It is enabled by default Status This field displays the status of the P2P connection Once the camera...

Страница 35: ...UDP Port This field designates the User Datagram Protocol UDP port number The default value is 37778 HTTP Port This field designates the Hypertext Transfer Protocol HTTP port number The default value...

Страница 36: ...to the camera rather than having to request a new IP address to use for remote access anytime a change is made To use this feature users will need to setup an account with a DDNS service The camera su...

Страница 37: ...Add IP MAC This button opens a popup that allows the user to add IP or MAC addresses to the trusted site list Note When accessing the camera externally please add the MAC address of the router on the...

Страница 38: ...ender This field allows the user to enter the sender email address This email address will be the one that sends out all emails pertaining to the alerts and alarm emails sent by the camera Authenticat...

Страница 39: ...anation of fields on the UPnP settings screen Enable This checkbox allows the user to enable the UPnP function Router State This field shows the UPnP status and has two options Unknown This means that...

Страница 40: ...reenshot of the multicast screen Below is an explanation of the fields in the Multicast settings screen Enable This checkbox allows the user to enable Multicast functionality Multicast Address This fi...

Страница 41: ...HTTPS certificates Below is a screenshot of this menu Before you create certificate or download certificate from main window Setup Network Connection set the HTTPS port values and then check the box t...

Страница 42: ...low is an explanation of the fields on the Motion Detect tab Enable This checkbox enables motion detection for the camera Schedule Clicking this button opens a weekly schedule that can be used to set...

Страница 43: ...xpired Detection Area Clicking this button opens a pop up screen that can be used to set detection areas o When the setup button is clicked a live stream of the video is shown The user can then set up...

Страница 44: ...ld be Send Email This checkbox allows the user to enable the camera to send an email when a motion detection alarm is triggered Snapshot This checkbox allows the user to enable the camera to take a sn...

Страница 45: ...ed alarm connected to the alarm port on the back of the camera when a video tamper alarm is triggered Alarm Delay This field specifies in seconds how long the delay between alarm activation and Relay...

Страница 46: ...a Relay Out This checkbox allows the user to enable the camera to trigger an alarm when an SD Card abnormality is detected Alarm Delay This field specifies in seconds how long the delay between alarm...

Страница 47: ...ge click the Refresh button To save the settings click the Save button 5 4 3 3 3 Illegal Access This tab allows the user to set the camera s response to an Illegal Access related abnormality Below is...

Страница 48: ...ding is represented by the color green o Motion Motion Detection recording means that the camera captures only footage when the motion detection alarm is activated Motion recording is represented by t...

Страница 49: ...ented by the color yellow o Alarm Alarm means that the camera only takes snapshots when an alarm is activated Alarm recording is represented by the color red Snapshot Recording Schedule To specify a s...

Страница 50: ...s To refresh the page click the Refresh button To save the settings click the Save button 5 4 4 2 Destination This menu controls where recorded media is stored There are 4 tabs in this menu Path SD Ca...

Страница 51: ...mera Status This column designates the status of the SD card Attribute This column designates the read write attributes for the SD card By default this is Read Write Used Capacity Total Capacity This...

Страница 52: ...the FTP server is unavailable To reset to default settings click the Reset Defaults button To refresh the page click the Refresh button To save the settings click the Save button 5 4 4 2 4 NAS This ta...

Страница 53: ...t to default settings click the Reset Defaults button To refresh the page click the Refresh button To save the settings click the Save button 5 4 4 4 Cloud Storage This menu redirects the user to the...

Страница 54: ...format used in the camera Time Zone This dropdown box allows the user to change the time zone used in the camera Current Time This field allows the user to enter in the date and time manually Clicking...

Страница 55: ...gin feature This allows all user account names to remain hidden on this screen User Name This tab shows the usernames available on the camera Group This tab shows the user groups available on the came...

Страница 56: ...ecovered after the camera has been returned to its factory default settings 5 4 5 4 Import Export This screen allows the user to import or export settings from the camera Below is a screenshot of the...

Страница 57: ...reen To upgrade the firmware for your camera follow the steps provided below Go to amcrest com firmware subscribe Search for the model number of your camera and download the latest firmware file Retur...

Страница 58: ...ot of the Log screen To view logs for a specific time period modify the start time and end time fields choose the type of event system setting data event record manage users clear log and click search...

Страница 59: ...ve If you would like to refresh the screen to show applied settings click Refresh To set the screen back to its original default settings click Reset Defaults 5 4 6 3 Online Users This screen allows t...

Страница 60: ...to see in the alarm log Clicking the checkbox next to Prompt will cause the system to pop up a dialog box anytime an alarm is triggered Clicking the checkbox next to Play Custom Alarm will use a custo...

Страница 61: ...ay not be configured correctly You can take the following steps to resolve the issue Log into your camera s web user interface via a laptop or PC Navigate to Setup System General Click on the Date Tim...

Страница 62: ...he camera s firmware 10 Alarms are not working Below are a few possible reasons why this may be occurring The alarm is not setup correctly The alarm cable is not connected correctly The alarm input si...

Страница 63: ...the same capabilities and either party can initiate a communication session PPPoE Point to Point Protocol over Ethernet is a network protocol for encapsulating Point to Point Protocol data packets in...

Страница 64: ...encouraged to try to correct the interference by one or more of the following measures Reorient or relocate the receiving antenna Increase the separation between the equipment and receiver Connect th...

Страница 65: ...oncentration of the hazardous substance of at least one of all homogeneous materials in the parts is above the relevant threshold of the SJ T11363 2006 standard During the environmental friendly use p...

Страница 66: ...h kind of substances or elements please return to the corresponding local authorities to process according to your local government statutes Note To view setup videos for many of the steps outlined in...

Отзывы: