background image


21 


5.


Trim Panel

: This panel allows the user to trim playback video for download. By specifying time stamps, the user can 

trim down.          

6.


Recorded Video Panel

: This panel allows the user to specify what type of video they would like to playback and it also 

allows the user to select where to start playback from. The buttons on the bottom right allow the user to select a 
zoom level.         

7.


Playback Bar

: This panel allows the user to control playback. It also allows the user to control playback speed, and 

playback volume.         

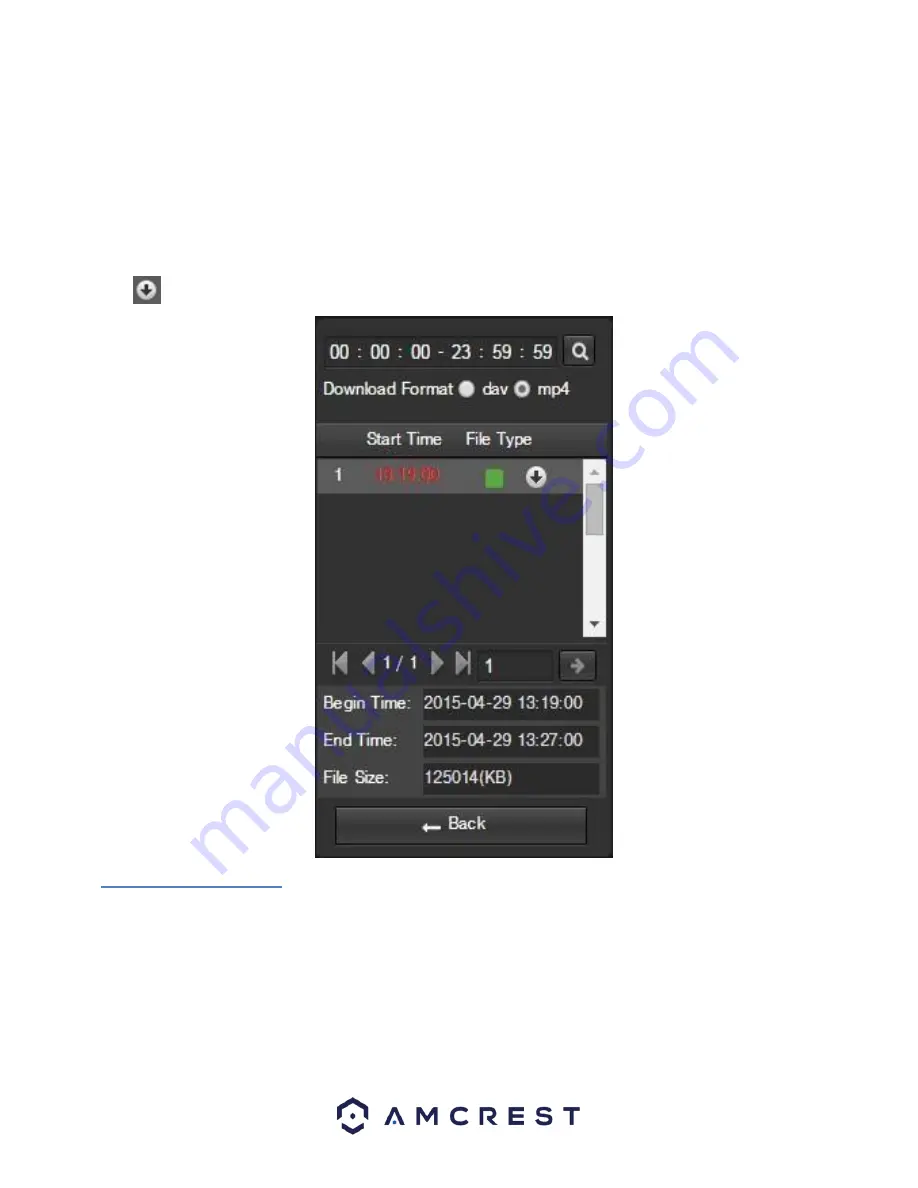
Clicking the File List opens the following screen on the sidebar:         
This allows the user to select files for download. Select the files by clicking the checkbox next to each file, and then 

click           to download the files to the PC.    


5.3. Cloud Storage 

The Cloud Storage tab allows the user quick access to the Amcrest Cloud website.  
 

Содержание IP3M-956EB

Страница 1: ...Amcrest IP3M 956EW IP3M 956EB 3MP UltraHD Vandal Dome POE Camera User Manual Version 1 0 4 Revised December 19th 2018...

Страница 2: ...ation Guide 7 4 Camera Access Setup 8 4 1 Default Username and Password 8 4 2 How to Setup the Camera 8 4 3 App Setup 9 4 4 Desktop Access Setup 14 4 5 Amcrest Cloud Desktop Setup 15 4 6 Web Access Se...

Страница 3: ...Support support amcrest com Important Security Warning To keep your Amcrest camera secure and prevent unauthorized access please make sure to follow the steps below Always make sure that your camera...

Страница 4: ...use an air blower or a microfiber cloth 7 Accessories Be sure to use only the accessories recommended by manufacturer Before installation please open the package and check to ensure that all the comp...

Страница 5: ...w remote and local connection with a large variety of network hardware Note There may be slight differences in functionality due to the existence of different product series IMPORTANT Due to specific...

Страница 6: ...d installation of your camera 3 1 Connection Guide The camera initially should be connected via the following method This camera uses a POE cable to enable connection to the camera via a PC as well as...

Страница 7: ...s cable will be exiting through the wall or ceiling surface please be sure to drill an exit hole and pull the cable through 5 If the camera s cable will be exiting through the side of the camera rout...

Страница 8: ...gged in it is highly recommended to change the password for security reasons Username admin Password admin Note Logging in for the first time will prompt the user to change the password to the admin a...

Страница 9: ...e in the App Store and Google Play store Please note each app requires an iOS 6 0 or later version Android will require a 3 0 or later version OS to run these apps For purposes of this guide we will u...

Страница 10: ...the QR code on the back side bottom of the camera or manually enter the camera s serial number into the Enter camera S N serial number field Press Next to continue 6 If you are adding a new camera tha...

Страница 11: ...camera When all settings have been confirmed tap Finish For more information about the Amcrest Cloud app and its features visit amcrest com support 4 3 2 Amcrest View Pro Setup To add your PoE camera...

Страница 12: ...e of the screen to begin adding your PoE device 3 Tap on Add Device to add a new device to your app 4 Tap on PoE Camera 5 Next select a connection type Since we will be setting up a basic P2P connecti...

Страница 13: ...e View to continue Note You can tap on the icon to verify the password Note Android users tap on Scan QR Code to access the QR code reader 8 The app will prompt you to change the password Enter a pass...

Страница 14: ...Use one of the following web browsers Safari Internet Explorer or Google Chrome To easily connect to the camera s interface install and run the Amcrest IP Config tool You can download the IP Config s...

Страница 15: ...a to power and wait 30 seconds for the camera to start up and initialize 2 Using a web browser on your PC or Mac visit www amcrest com cloud and register for a cloud account Once registered click the...

Страница 16: ...your camera open the main menu then go to Setup Network 6 Click the Connections menu item on the left hand menu and ensure that the HTTP port has changed 7 Click the DDNS menu item on the left hand me...

Страница 17: ...in the IP address field 9 Click the Save button 10 Using the left hand menu go to the Connection menu and write down the TCP UDP and HTTP port number It is recommended to ensure that these port numbe...

Страница 18: ...not working please contact Amcrest Support via one of the following options Visit http amcrest com contacts and use the email form Call Amcrest Support using one of the following numbers Toll Free 88...

Страница 19: ...cified in Setup Camera Video Path Section 3 This bar allows the user to change video settings for the live playback screen See the below table for an explanation of the video settings Button Function...

Страница 20: ...he camera type is shown in the bottom left corner 5 2 Playback The Playback tab allows the user to playback the camera s recorded video Below is a screenshot of the Playback tab This is the interface...

Страница 21: ...ns on the bottom right allow the user to select a zoom level 7 Playback Bar This panel allows the user to control playback It also allows the user to control playback speed and playback volume Clickin...

Страница 22: ...s well as view or modify existing accounts For more information on Amcrest Cloud visit amcrest com support 5 4 Setup The Setup tab allows the user to change different camera settings Below is a screen...

Страница 23: ...he 3 options are Day Night and Normal Brightness This slider is used to adjust playback and recorded video window brightness The value ranges from 0 to 100 The default value is 50 The larger the numbe...

Страница 24: ...adjust the gamma of the video The larger the number the brighter the video is The default value is 50 and the recommended value ranges from 40 to 60 Mirror This radio button allows the user to turn t...

Страница 25: ...n Manual This setting lets you select your shutter speed and have the gain adjust automatically Selecting customized range will let you both the shutter speed an adjust the gain manually 3D NR This ra...

Страница 26: ...ws the user to select the white balance for the video feed The different options are Auto Sunny Night Outdoor and Customized Selecting customized opens a menu that allows the user to set specific red...

Страница 27: ...ity of the camera The three options are Low Middle and High The higher the sensitivity the quicker the camera will change into another mode depending on the light levels D N Delay This dropdown box al...

Страница 28: ...t the camera s IR lights to on and off positions based on Day Night conditions This setting is usually set by default within the camera To reset to default settings click the Reset Defaults button To...

Страница 29: ...llow the user to set what basis the profile management settings run on There are 3 options Normal Full Time and Schedule Normal means that the system can automatically alternate between night and day...

Страница 30: ...d bit rate value according to the resolution and frame rate selected Bit Rate This dropdown box allows the user to select a bit rate Frame Interval This field allows the user to set the P frame amount...

Страница 31: ...mage Size This dropdown box shows the image size By default the screenshot size is the same size as the video feed s resolution Quality This dropdown box allows the user to select image quality Qualit...

Страница 32: ...ables the feature The Input Channel Title field allows the channel title to be modified For Time the radio button enables or disables the feature Clicking the Display Weekdays checkbox will show the w...

Страница 33: ...owse button to select a different destination folder The Video Clips field allows the user to select where to save video clips to Click the Browse button to select a different destination folder To re...

Страница 34: ...tain an IP address from another network device such as a server or more commonly a router When the DHCP function is enabled the user cannot modify the IP address Subnet Mask or Default Gateway as thes...

Страница 35: ...of the fields on the P2P settings tab Enable This checkbox allows the user to enable the P2P feature for the camera This feature must be enabled for the camera to connect to a smartphone or tablet via...

Страница 36: ...Datagram Protocol UDP port number The default value is 37778 HTTP Port This field designates the Hypertext Transfer Protocol HTTP port number The default value is 80 RTSP Port This field designates t...

Страница 37: ...s will need to setup an account with a DDNS service The camera supports a variety of DDNS services such as Quick DDNS NO IP DDNS CN99 DDNS and Dyndns DDNS Based on which service is selected different...

Страница 38: ...amera externally please add the MAC address of the router on the PC end Remove All This button allows the user to remove all sites from the trusted IP MAC list To reset to default settings click the R...

Страница 39: ...that is sent to the receivers Recipients This field allows the user to enter the receiver email address These email addresses are the ones that will receive any emails pertaining to alert and alarm e...

Страница 40: ...th column shows the Internal Port used by that service to establish communication from the router to the camera To edit this click the pencil button in the modify column for that line item o The fifth...

Страница 41: ...the user to write in a trap port number The trap port number should not be the same as the SNMP port Note This feature may not be available on all models To reset to default settings click the Reset...

Страница 42: ...screenshot of the QoS screen Below is an explanation of the fields on the QoS screen Realtime Monitor This field allows the user to enter in a priority value for real time monitoring packets The rang...

Страница 43: ...HTTPS in the web user interface visit https www youtube com watch v gkjlaf Iuso 5 4 3 Event This menu section allows the user to change different settings for triggering events 5 4 3 1 Video Detection...

Страница 44: ...low is an explanation of the fields on the Motion Detect tab Enable This checkbox enables motion detection for the camera Schedule Clicking this button opens a weekly schedule that can be used to set...

Страница 45: ...hot record channel functions will begin another 10 seconds while the screen prompt alarm upload email will not be activated again After 10 seconds if system detects another alarm signal it can generat...

Страница 46: ...to trigger a connected alarm connected to the alarm port on the back of the camera when a motion detection alarm is triggered Alarm Delay This field specifies in seconds how long the delay between al...

Страница 47: ...amper alarm is triggered Alarm Delay This field specifies in seconds how long the delay between alarm activation and Relay alarm activation should be Send Email This checkbox allows the user to enable...

Страница 48: ...alarm when an SD Card abnormality is detected Alarm Delay This field specifies in seconds how long the delay between alarm activation and relay alarm activation should be Send Email This checkbox allo...

Страница 49: ...ge click the Refresh button To save the settings click the Save button 5 4 3 3 3 Illegal Access This tab allows the user to set the camera s response to an Illegal Access related abnormality Below is...

Страница 50: ...ding is represented by the color green o Motion Motion Detection recording means that the camera captures only footage when the motion detection alarm is activated Motion recording is represented by t...

Страница 51: ...ented by the color yellow o Alarm Alarm means that the camera only takes snapshots when an alarm is activated Alarm recording is represented by the color red Snapshot Recording Schedule To specify a s...

Страница 52: ...it can be customized to stop recording or snapshots for that day by using the Record and Snapshot checkboxes To refresh the page click the Refresh button To save the settings click the Save button 5...

Страница 53: ...SD Card settings tab Device Name This column designates the name of the SD card that is currently in the camera Status This column designates the status of the SD card Attribute This column designate...

Страница 54: ...the FTP server is unavailable To reset to default settings click the Reset Defaults button To refresh the page click the Refresh button To save the settings click the Save button 5 4 4 2 4 NAS This ta...

Страница 55: ...his menu redirects the user to the Amcrest Cloud web site At this website amcrestcloud com users can register for new accounts as well as view or modify existing accounts For more information on Amcre...

Страница 56: ...Start Time This dropdown box and field allow the user to enter in the start time for DST End Time This dropdown box and field allow the user to enter in the end time for DST Synchronize with NTP This...

Страница 57: ...rent accounts on the camera Description This column shows a description of the account Modify This column allows the user to modify the user account Delete This column allows the user to delete a user...

Страница 58: ...screenshot of the Auto Maintain screen Below is an explanation of the fields on the Auto Maintain screen Auto Reboot This checkbox allows the user to enable the auto reboot function The dropdown box...

Страница 59: ...the firmware file has been imported click Upgrade The device will reset return to the web user interface The upgrade is now complete Note When upgrading the camera s firmware do not disconnect the in...

Страница 60: ...d click search To backup the log click the Backup button To clear the log click the Clear button 5 4 6 2 1 Remote Log This tab allows the user to enable and access remote logs within the camera Below...

Страница 61: ...the alarm log and all the alarm instances that have occurred The checkboxes allow the user to narrow down which alarms they want to see in the alarm log Clicking the checkbox next to Prompt will caus...

Страница 62: ...ia a laptop or PC Navigate to Setup System General Click on the Date Time tab Click on PC Sync to sync the date and time Click Save to save and apply the new date and time settings 5 Motion detection...

Страница 63: ...file format The PC may not have DirectX 8 1 or higher The PC may not have Windows XP or higher 12 When I login via HTTPS a dialogue says the certificate has expired or is not valid yet Ensure the PC h...

Страница 64: ...strings quickly Record Delay Record Delay specifies in seconds how long the delay between alarm activation and recording should be Relay Out Relay Out triggers a connected alarm connected to the alar...

Страница 65: ...encouraged to try to correct the interference by one or more of the following measures Reorient or relocate the receiving antenna Increase the separation between the equipment and receiver Connect th...

Страница 66: ...oncentration of the hazardous substance of at least one of all homogeneous materials in the parts is above the relevant threshold of the SJ T11363 2006 standard During the environmental friendly use p...

Страница 67: ...h kind of substances or elements please return to the corresponding local authorities to process according to your local government statutes Note To view setup videos for many of the steps outlined in...

Отзывы: